Rubber Plant
Introduction to Rubber Plant Care
Rubber plants (otherwise known by their scientific name of Ficus elastica), are known for their glossy, oval-shaped leaves and their air-purifying qualities, making them a popular choice among houseplant enthusiasts.
Not only do they add a lush touch of green to your indoor surroundings, but they also have the potential to grow into large tall plants with proper care.
Rubber Plant Characteristics
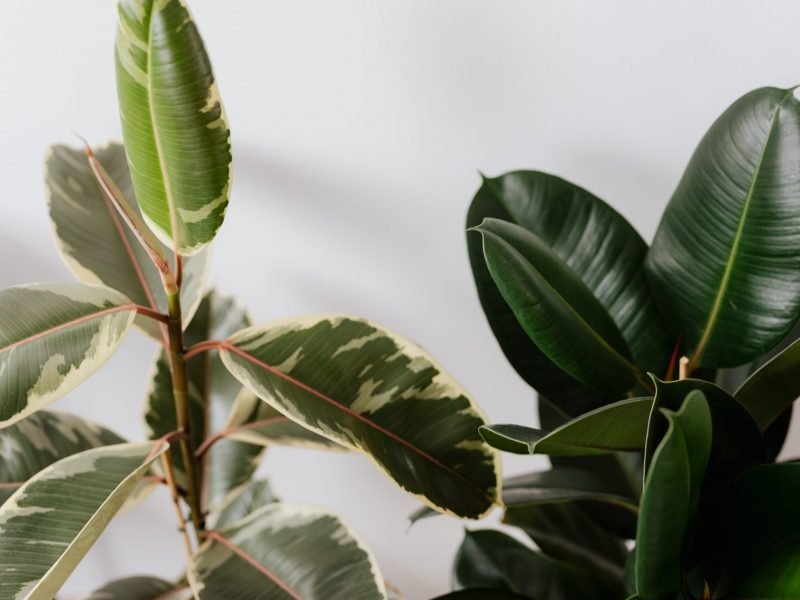
Renowned for their glossy, deep green or variegated leaves, Rubber Plants are known for their resilience and low-maintenance demands.
Native to the tropical regions of India and Malaysia, when grown indoors, they usually top out around 6-10 feet tall with a spread of 2-3 feet but grow even taller in their natural environment.
Leaf Characteristics
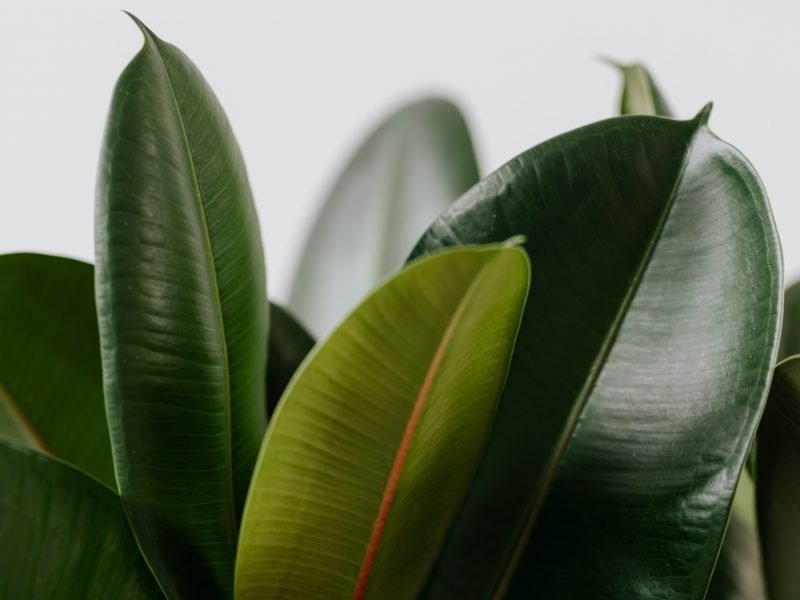
The most striking feature of a Rubber Plant is undoubtedly its leaves. Large and oval-shaped, they can grow up to 12 inches long and 5 inches wide. Sprouting from high up on tall, woody stems, the leaves have a thick, leathery texture and display a rich, glossy deep green color. The new leaves, initially a reddish green, gradually darken to match the older foliage.
Growth Habit
Rubber Plants exhibit a single-stem growth habit. However, with careful pruning (more on that below), they can be encouraged to grow multiple branches, creating a bushier appearance.
Their growth speed is fairly slow, putting out a few new leaves during the growing season, which typically spans from spring to early fall.
Flowering
Though it’s not common, Rubber Plants can produce flowers under optimal conditions. The flowers are small and insignificant, often hidden in the leaf axils. Keep in mind that flowering is quite rare in indoor settings, as it requires specific light and temperature conditions.
The Ideal Light Conditions for Rubber Plants
These tropical natives require a lot of bright, indirect sunlight to thrive. However, they can also tolerate lower light conditions to some extent, making them versatile and widely loved as houseplants.
When it comes to the ideal lighting conditions for your Rubber Plant, consider the following guidelines:
- Bright, Indirect Light: Rubber plants prefer bright, indirect sunlight for the majority of the day. Place your plant near east or north-facing windows, or in a room with plenty of ambient light.
- Avoid Direct Sun: While they enjoy lots of light, direct sunlight, especially during the hot afternoon hours, can be too intense. This can cause the edges of the leaves to become brown and crispy.
- Low Light Tolerance: They have a certain degree of tolerance for low light conditions. However, if placed in a dark room or a spot with insufficient light for a prolonged period, their growth can slow down significantly, and the leaves may lose their lustrous, dark green color and the stems will become quite leggy.
If you notice any signs of distress, such as dropping or yellowing leaves, consider adjusting the light sources. Additionally, you may need to rotate your Rubber Plant every few months to ensure all sides get equal exposure to light. This practice helps maintain balanced growth and an attractive plant shape.
Watering Your Rubber Plant
While these plants appreciate a good drink, overwatering can lead to root rot, a common issue for Rubber Plants. This is why we recommend watering deeply but not very frequently.
The Right Watering Routine
Begin by watering your Rubber Plant thoroughly, then allow the top inch of the soil to dry out completely before the next watering. This often translates to watering once a week during summer and once every two weeks during winter. However, this can vary based on your specific environment as there are so many factors that impact how much water your plant needs.
- Step 1: Use room temperature water to avoid shocking the plant’s roots.
- Step 2: Water the plant slowly and deeply. This method encourages the roots to grow downwards, creating a robust root system.
- Step 3: Allow excess water to drain from the bottom. Never let your Rubber Plant sit in water.
Signs of Overwatering and Underwatering
While Rubber Plants are somewhat forgiving, they can show signs of distress when their watering needs are not met. Overwatered Rubber Plants may exhibit yellowing leaves and a generally unhealthy appearance. On the other hand, underwatered Rubber Plants may have wilted, curling leaves and the leaves may turn light brown in color.
Fertilizing Your Rubber Plant: Timing and Methods
Fertilizing provides the necessary nutrients that the plant can’t always absorb from the soil alone.
Timing Your Fertilization
Typically, Rubber Plants need to be fertilized during their growing season, which falls between early spring and late summer. During this time, fertilizing your plant once a month is generally sufficient.
When the colder months approach and growth slows, stop feeding completely as it can cause more harm than good at this stage.
Fertilizer Selection and Application Methods
Apply a well-balanced, water-soluble houseplant fertilizer, with an equal ratio of nitrogen, phosphorus, and potassium (NPK ratio). It is important to dilute this fertilizer to half its strength or more before application, to prevent root burn (it’s better to be on the safe side, especially if you have never fertilized your Rubber Plant before).
When it comes to application methods, watering the plant thoroughly a day before fertilizing is recommended. This ensures that the soil is moist and ready to absorb the nutrients.
Ideal Humidity Level for a Rubber Plant
The optimal humidity level for a Rubber Plant typically falls between 40% and 50%. At this level, the plant can absorb enough moisture from the air to facilitate its growth, while also preventing the development of mold or leaf spot.
So, how do you maintain this ideal humidity level? Here are some effective strategies:
- Misting: Regularly mist your Rubber Plant with a spray bottle if you need to give the humidity level a boost. This not only provides the plant with moisture but also keeps the leaves dust-free.
- Pebble trays: Place your Rubber Plant on a tray filled with pebbles and water. As the water evaporates, it increases the humidity around the plant. It’s crucial to have the tray filled with pebbles to prevent your plant from actually sitting in the water.
- Grouping plants: Grouping your plants together can create a microclimate with higher humidity, as plants release moisture into the air.
- Humidifier: Using a humidifier can be an effective way to control the humidity level, especially in dry indoor climates.
Temperature Requirements
Rubber plants thrive in temperatures that mimic their native tropical habitat. A consistent temperature range of 60-75°F (15-24°C) is ideal, but be aware that temperature fluctuations outside this range can result in leaf loss or a stunted growth rate.
Temperature Consistency: While the Rubber Plant can tolerate a certain degree of temperature variation, drastic or frequent fluctuations can cause stress to the plant. This is particularly true if the temperature drops below 50°F (10°C). Cold drafts, such as those from an open window in winter, can be particularly harmful over time.
Here are some tips on how to maintain the ideal temperature for your plant:
- Use a thermometer to monitor the temperature of the room where your Rubber Plant is kept.
- During the summer months, use blinds or curtains to shield the plant from harsh, direct sunlight which can cause the temperature to increase dramatically.
- In winter, ensure your plant isn’t too close to heaters, radiators or heating vents.
- Remember to keep your plant away from external doors or windows that are frequently opened and closed, to avoid sudden drafts.
Choosing the Correct Pot
When choosing a pot for your Rubber Plant, there are two critical factors to consider: size and material. A pot too small can cramp the plant’s roots and stunt its growth, while a pot too large can lead to overwatering and stability issues. As a rule of thumb, opt for a pot that is 2 to 3 inches larger in diameter than the plant’s root ball.
As for material, ceramic and terracotta pots are excellent choices due to their porous nature, which aids in soil aeration and prevents waterlogging. However, they can be heavy and may break easily.
Plastic pots, on the other hand, are lightweight and durable, but lack the breathability that ceramic and terracotta pots offer.
Always ensure that your chosen pot has sufficient drainage holes at the bottom. This allows excess water to escape, preventing waterlogging and promoting overall plant health.
Repotting a Rubber Plant
The process of repotting can seem daunting but fear not. With a few simple steps and some attention to detail, you can successfully repot your Rubber Plant and ensure its continual growth and development.
When to Repot
Typically, the best time to repot your Rubber Plant is during the early spring. This timeframe aligns with the beginning of the growth season for the plant, which allows it to adapt more readily to its new surroundings.
Choosing the Right Pot
When choosing a new pot for your Rubber Plant, select one that is approximately 2-3 inches larger in diameter than its current pot. This will provide enough room for root expansion without overwhelming the plant. Remember to ensure that the new pot has sufficient drainage holes to prevent waterlogging and root rot.
Steps to Repotting
- Water the Plant: Start by watering your Rubber Plant a day before the repotting process. This makes the plant easier to remove from its current pot.
- Prepare the Pot: Fill your new pot with a fresh potting mix, suitable for Rubber Plants, up to one third of its depth.
- Remove the Plant: Carefully remove the plant from its current pot. If it’s stuck, you can tap the sides of the pot to loosen the soil and roots.
- Position the Plant: Place your Rubber Plant in the center of the new pot. Ensure that the top of the root ball is at the same level as the rim of the pot.
- Add More Soil: Fill the rest of the pot with additional potting mix, pressing it down gently around the base of the plant.
- Water Again: Water your newly potted Rubber Plant thoroughly, allowing excess water to drain out of the bottom.
Pruning a Rubber Plant: A Complete Guide
The ideal time for pruning a Rubber Plant is in the late winter or early spring, just before the onset of the growing season. Yet, it’s important to remember that Rubber Plants can be pruned any time of the year if necessary (eg. dead or dying leaves).
Pruning Steps:
The process for pruning a Rubber Plant is straightforward and can be broken down into these easy steps:
- Identify: Begin by identifying which branches or leaves need to be pruned. Look for areas that are overcrowded, damaged, diseased or excessively elongated.
- Cut: Using your sharp, sanitized shears, make a clean cut at an angle, just above a leaf node (the point on the stem where a leaf or branch grows).
- Clean: After the cut, a milky white sap will ooze out. This sap can cause skin irritation, so it’s advisable to wipe it off immediately with a clean cloth.
- Repeat: Continue this process, working your way around the plant until you’re satisfied with its shape and size.
Important tip: Always remember to wear gloves while pruning a Rubber Plant, as the sap can cause skin irritation in some individuals.
Rubber Plant Toxicity
The Rubber Plant contains milky latex sap that is toxic to humans and pets.
Effects on Humans
For most individuals, direct contact with the Rubber Plant’s latex may cause minor skin irritation or a rash. Symptoms can include redness, itching, and swelling. More severe reactions are rare but can occur, particularly in individuals with latex allergies.
Effects on Pets
Our furry friends are also susceptible to the effects of the Rubber Plant’s latex. Cats, dogs, and other household pets may experience symptoms like vomiting, drooling, and decreased appetite if they ingest parts of the Rubber Plant
If you or your pet has been exposed to the latex from a Rubber Plant and is experiencing these symptoms, it is important to seek medical or veterinary attention immediately.
Flowers on a Rubber Plant
Indoor Rubber Plants rarely bloom, in contrast to their outdoor counterparts. However, it’s not impossible. Now, if you’re set on seeing your Rubber Plant bloom, there are a couple of things to consider:
- Age and Maturity: Young Rubber Plants are unlikely to produce flowers. These plants typically need to reach a certain level of maturity, often taking several years before they begin to flower.
- Light Conditions: Rubber plants require bright, indirect light to encourage blooming. A lack of appropriate light can hinder the plant’s ability to produce flowers.
- Fertilization: During the growing season, a high-phosphorus fertilizer can encourage your Rubber Plant to produce flowers.
One unusual feature of Rubber Plants is that they can produce ‘false flowers’. These are not true flowers but are growths that resemble flower buds. They usually appear when the plant is stressed.
Rubber Plant FAQs
Are Rubber Plants good indoor plants?
Yes Rubber Plants make great indoor potted plants. Their elegant and minimalistic leaves easily become a focal point in every room and help bring personality and life to the space.
Are Rubber Plants easy to care for?
Yes, Rubber Plants are some of the easiest houseplants to care for as they don’t require much water, can thrive in a range of light conditions and adapt well to most environments and homes.
How do you take care of a Rubber Plant?
There are two main things to remember when caring for your Rubber Plant. Firstly, keep them away from intense full sun and secondly water infrequently but deeply.
How tall do Rubber Plants get?
If grown in the right environment and given the right care, Rubber Plants can grow between 5 to 10 feet. It’s also important that your Rubber Plant has the right sized pot so that the roots have enough space to grow.
Are Rubber Plants toxic?
Some people are allergic to the sap of Rubber Plants so make sure to wash your hands if you come into contact with any sap. Ingesting some of a leaf may also cause stomach irritation so best to keep children and pets away from them.
Do Rubber Plants grow quickly?
No, Rubber Plants are pretty slow growers and you’ll only see a few leaves growing each year. However, it means they won’t outgrow the space too quickly.
Can Rubber Plants tolerate full sun?
Whilst Rubber Plants can endure a little bit of direct sun, this is only really true during winter as the sun is a lot weaker. Keep them out of direct rays during summer as you risk leaf burn.
How often should I water my Rubber Plant?
Rubber Plants need to be watered more in the warmer months to help with new growth. You should make sure the soil is moist, but never waterlogged to avoid any root rot.
Using a moisture meter can really help figure out if your Rubber Plant needs more water as temperature, light level and plant size all impact how quickly the soil dries out.
Common Problems with your Rubber Plant
Why are my Rubber Plant’s leaves turning yellow?
This can be a combination of overwatering and not enough sunlight. Check how moist your Rubber Plant’s soil is with a moisture meter and replace it with high-quality potting mix if necessary. We love the Miracle Gro potting mix especially designed for houseplants. If your Rubber Plant is in a shady spot, try to move it closer to a window so it gets more sunlight.
Why are leaves dropping off my Rubber Plant?
This can either be due to not enough sunlight or an extreme temperature. Make sure your plant is away from drafty windows or doors, radiators or air conditioning units. To determine what’s causing the issue you can use a light meter and digital thermometer to check the environment your plant is in. You can find out more about Rubber Plant losing leaves in our guide.
Why are my Rubber Plant’s leaves drooping?
This is most often caused by underwatering your Rubber Plant. Check how dry the top few centimetres of the soil is, using a moisture meter and make sure to water your plant more regularly in the warmer months. We have written a comprehensive guide to help you diagnose why your Rubber Plant’s leaves are drooping.
Why is my Rubber Plant turning brown?
Brown leaves on your Rubber Plant is usually due to watering issues, too little or too much. Again, a moisture meter or chopstick method will help you determine moisture levels. Visit our guide to find more information about why your Rubber Plant’s leaves are turning brown.
Why are my Rubber Plant’s leaves curling?
Curling leaves on a Rubber Plant are usually caused by watering issues or shock due to a sudden change in environment. Visit our guide for more information on how to stop your Rubber Plant’s leaves from curling.
My Rubber Plant looks as though it is dying
If you think your Rubber Plant is slowly dying on you, then you need to figure out what is causing the problem. Most often it is light or watering issues. We have written a whole guide on the various issues to help you diagnose why your Rubber Plant might be dying .