Prickly Pear Cacti
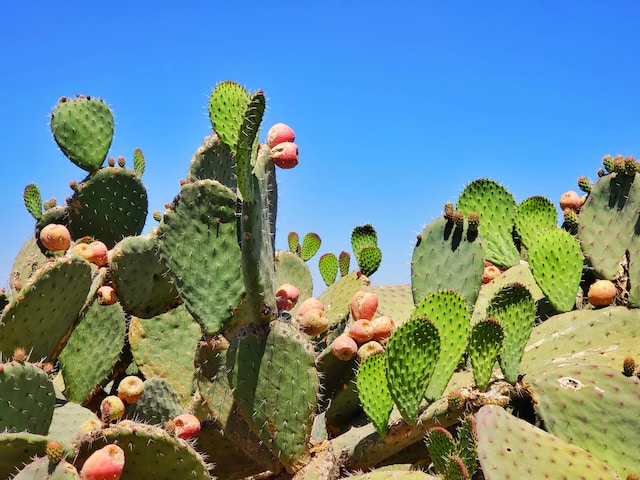
The Prickly Pear Cactus, known scientifically as the genus Opuntia, is particularly popular due to its unique flat pads, colourful blooms, and edible fruit. Known for being a resilient plant, it is an excellent choice for both experienced gardeners and beginners.
Propagating a Prickly Pear Cactus is relatively straightforward, but there are a few things you should know before you get started, including the methods, how to take the cuttings and how to care for your new plant babies. We will cover all of this and more below.
Contents
- Methods of Prickly Pear Cactus Propagation
- Creating a Suitable Propagation Environment
- Using Seeds to Propagate a Prickly Pear Cactus
- Taking Cuttings to Propagate a Prickly Pear Cactus
- Caring for Prickly Pear Cactus Cuttings
- Propagating Prickly Pear Cactus Through Offsets
- Common Issues in Prickly Pear Cactus Propagation
- Frequently Asked Questions
Methods of Prickly Pear Cactus Propagation
When it comes to propagating the Prickly Pear Cactus, you have three options. Each method has its own benefits, challenges and suitable conditions that affect the success rate of propagation.
Propagation through seeds
One of the traditional methods of propagation is using the seeds. In nature, propagation through seeds often happens after the fruit is eaten by wildlife and the seeds are dispersed in their droppings.
In a home setting, you carefully remove the seeds from the fruit, clean them thoroughly, and finally, sow them in a suitable growing medium.
We don’t tend to recommend this method to beginner plant parents because it can be quite tricky and has a lower success rate compared to the other two methods. But these aren’t the only downsides as seed propagation is super slow!
Propagation through cuttings
A common and generally successful method is propagation through cuttings. The process involves cutting the pads of the cactus, also known as cladodes, letting the cutting callus over, and then planting it in a suitable planting medium.
This approach tends to yield higher success rates, as it provides a more mature starting point for growth.
Propagation through offsets
Finally, there is propagation through offsets. The Prickly Pear Cactus often produces smaller side shoots, known as offsets or ‘pups.’
You can separate these from the mother plant and repot them.
As these offsets are already partially mature and contain established tissues, they often take root and grow successfully, providing a relatively easy method of propagation.
The one downside to this method is that you are of course only able to do it if your Prickly Pear Cactus has offshoots, which means this won’t be suitable for everyone.
Creating a Suitable Propagation Environment
Once you’ve decided on your propagation method, creating a suitable environment for your Prickly Pear Cactus is the next crucial step. These plants are native to arid regions, so they prefer conditions that mimic their natural habitats: think well-draining soil, plenty of sun, and minimal water.
Choosing the Right Soil
Apart from sunlight, the type of soil you use is one of the most significant factors in successful prickly pear propagation.
A well-draining potting mix – often sold as “cactus mix” or “succulent mix” – is essential. These mixes typically contain coarse sand, perlite, or pumice to increase drainage.
If those aren’t available, you can make your own by mixing two parts regular potting soil with one part coarse sand and one part perlite.
Sunlight and Temperature
Prickly pear cacti love the sun! Ensure your plant gets plenty of direct sunlight each day. But remember – while they’re heat-tolerant, temperatures above 100°F (38°C) can cause damage as it may dry out your Cactus over time.
During winter, your prickly pear will appreciate cooler temperatures and may even need some protection from frost if temperatures drop below freezing. As a general rule, aim for temperatures between 70-85°F (21-29°C).
Watering Needs
Overwatering is the most common cause of failure when propagating cacti (and caring for them too). Extra moisture can cause root rot, one of the few things capable of killing these hardy plants.
The key is to let the soil fully dry out between waterings, then water thoroughly.
Propagation Containers
Another aspect to consider is the propagation container. Ideally, this should have drainage holes (to prevent water-logging), be relatively shallow (since cactus roots don’t run too deep), and be made of a material that doesn’t retain too much moisture, such as terracotta or unglazed ceramics.
Using Seeds to Propagate a Prickly Pear Cactus
Before you get started it is important to know that this method is significantly more time-consuming and requires a lot of patience.
Gathering Seeds
To get the seeds, you need to wait for the cactus to bloom and produce fruit, which typically happens in late summer. The fruit of the Prickly Pear, commonly known as ‘Tunas’, carry the seeds.
Wait for the fruit to ripen; it’ll turn a deep red or purple color. Carefully harvest a few ripe ones but remember to protect your hands with gloves when handling these prickly fruits.
Cleaning and Drying the Seeds
Next, cut the harvested fruit open and scoop out the seeds. It’s wise to wash the seeds to get rid of the pulp. Set them aside to dry for a few days until they’re hard and dry.
Planting the Seeds
Make sure you choose a container with drainage holes to avoid water-logging. Add a well-drained soil mixture; preferably a cactus/succulent mix.
Before planting, soak your seeds in warm water for around 30 minutes: this helps to soften the hard seed coats. Once soaked, press the seeds gently into the soil.
Aim at having about an inch space between each seed so they have room to grow.
Providing the Required Conditions
Cacti seeds need warmth for germination so a sunny windowsill location will do the trick. Cover the pot with plastic to maintain humidity, but make sure there’s still some air circulation.
Keep the soil slightly moist but beware of overwatering.
The germination time can take anywhere from two weeks to a few months so patience is key when it comes to propagating Prickly Pear Cacti from seeds.
Taking Cuttings to Propagate a Prickly Pear Cactus
When it comes to propagating a Prickly Pear Cactus, cuttings are arguably the most efficient and straightforward method.
Before we get into the steps, we just want to point out one thing you need: a mature, healthy Prickly Pear Cactus. If your mother plant has issues, your propagation is likely going to be unsuccessful.
Choosing aHealthy Pad to Cut
You begin by identifying a healthy pad on the cactus—this typically appears firm and plump, exhibiting a vibrant green hue.
Removing the Cuttings Safely
After selecting the right pad, it’s time to make a clean cut. You’ll need a pair of gardening gloves for this as you don’t want to hurt yourself in the process!
Using a sterile, sharp knife, you make a cut at the joint, where the pad you want to remove meets another pad. A clean, swift cut inhibits the growth of bacteria, reducing any risk of infection.
Caring for Prickly Pear Cactus Cuttings
Once you have managed to successfully take the cuttings from a healthy prickly pear cactus, it’s time for the next crucial phase – caring for these cuttings.
Give the Cuttings Time to Callus
The very first step in caring for your prickly pear cactus cuttings is to allow them time to form a callus.
A callus forms a sort of protective layer which ensures that the cutting isn’t susceptible to rot or fungal infections when it eventually gets into the soil.
Typically, it could take anywhere between a week to two weeks for your cuttings to fully callus.
Planting the Cuttings
Once you notice the appearance of a sturdy callus, it’s the green light for you to proceed to planting. Make sure to use a good draining soil, and set the cuttings into this soil.
It is important, at this juncture, to not water the soil immediately. Give it about a week before the initial watering. This ensures that the cuttings adapt to their new home without the risk of becoming too waterlogged.
Provide Adequate Light and Temperature
When it comes to lighting, Prickly Pear Cactus cuttings favor bright succulent-friendly lights. A nice spot by the window with a lot of indirect sunlight is ideal. On top of this, maintaining a warm temperature will help with the root development process.
Watering the Cuttings
Once the cuttings are in the soil and have had their initial period without water, you can proceed to water them.
Moving forward, a good way to gauge if your cuttings need watering is to check the dryness of the soil. If it’s dry to the touch, chances are your cactus could use a drink.
Propagating Prickly Pear Cactus Through Offsets
Have you ever noticed the tiny, spiny clusters or ‘babies’ that grow out from the base or the sides of your Prickly Pear? These are known as offsets. Propagating these offsets is one of the most effective and easiest methods of Prickly Pear propagation. Here’s everything you need to know:
Detaching The Offsets
Detaching offsets involves carefully separating the offset from the mother plant. To do this, you should gently twist the offset until it comes away from the parent Prickly Pear.
Use gloves or layers of newspaper to protect your hands from the spines. If the offset is quite small, you may need to use a clean, sharp knife to cut it free.
Preparing The Offsets
Once you have your offset, the next step is to prepare it for planting. Much like propagating through cuttings, you will need to let the offset dry out for a few days till a callus forms over the cut surface.
This protects the offset from infections and rot.
Planting The Offsets
After the offset has dried and callused, you can plant it. Choose the right soil mix, which should be well-draining. Plant the offset with its callused end in the soil.
Control watering to ensure the soil remains moderately moist, but never waterlogged as too much water can lead to root rot.
Caring for The Offsets
Keep the pot in an area with bright indirect light and a warm temperature. Ensure you water the newly planted offset carefully to avoid over-saturation. As it establishes a good root system, you can gradually increase its exposure to direct sunlight and reduce watering frequency.
Common Issues in Prickly Pear Cactus Propagation
Rotting Cuttings or Offsets
If your cuttings or offsets start to rot, it’s usually a sign of overwatering or improper drainage. What can you do? Begin by setting the afflicted cutting or offset aside.
Allow it to dry out completely before you consider replanting it once more. If the rot isn’t too severe, it’s possible to save the cutting by cutting away the rotten part.
Seedlings Not Germinating
What if your seeds don’t sprout? First, check the age of the seeds. If they’re old or even of poor-quality, germination might not occur.
Secondly, ensure your temperature and moisture levels are correct. Prickly pear seeds need a warm environment to germinate; consider placing the seeds in a mini greenhouse or covering the pot with clear plastic to retain warmth and moisture.
Poor Growth
Poor growth or stunted plants can often be a sign that they are not receiving enough light, the temperature isn’t ideal, or the soil doesn’t meet their requirements.
Yellowing or Fading Cacti
A prickly pear cactus turning yellow or fading can be a symptom of too much direct sunlight, which causes the plant to bleach and lose its vibrant color.
If you notice this, try adjusting the plant’s position or providing a screen to protect the cactus from harsh sunlight. Also, ensure that the cactus isn’t overwatered, as this can also lead to yellowing.
Frequently Asked Questions
How long does it take for aprickly pear cutting to root?
The rooting process can take anywhere from 2 weeks to a couple of months, depending on the environmental conditions such as temperature, light, and humidity. Patience, you’ll find, is a must-have for any cactus propagator!
Should Iwater prickly pear cuttings right after planting?
As counterintuitive as it might sound, you should actually hold off on watering right after planting. Waiting a week or so gives the cutting time to form a callus over the wound, reducing the risk of rotting.
Once this dry callus forms, regular but careful watering can commence.
Can you grow prickly pears from seeds without stratification?
Stratification – the process of treating stored or collected seeds to simulate natural winter conditions – isn’t typically necessary for prickly pears. These resilient plants can usually succeed without it.
However, some propagators recommend a simple cold stratification step if you’re having trouble with germination.
What kind of soil is best for propagating prickly pears?
Just like other cacti, prickly pears prefer a well-draining soil mix. They don’t bode well in wet environments. A mixture of coarse sand, perlite, and regular potting soil is ideal.
If you prefer purchasing pre-made soil, look for a mix labeled ‘cactus mix’ or ‘succulent mix.’
Why are my prickly pear cuttings turning yellow or soft?
Yellowing, softening, or shriveling of your prickly pear cuttings is typically an SOS sign from your cactus, indicating either overwatering or poor lighting conditions. If the soil is still waterlogged, replace it immediately rather than waiting for it to dry out naturally.
Sticking to a careful watering schedule and providing ample sunlight can help mitigate this issue.
Why are my prickly pear seeds not germinating?
Several factors can contribute to this. For instance, the temperature might be too low, the seeds might not be fresh, or they could be lacking the necessary light exposure. Review the conditions you’re providing for your seeds, and adjust accordingly.


