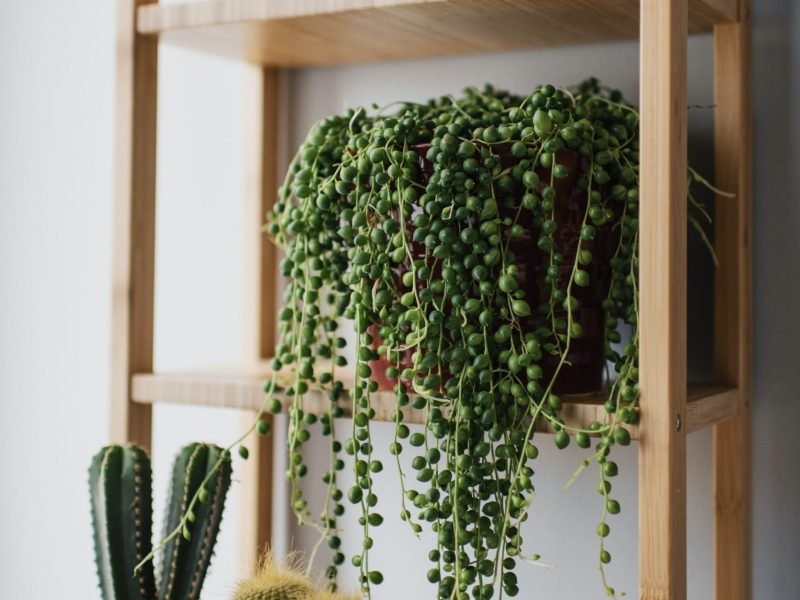
The String of Pearls plant is one of the most delicate and unique houseplants out there. Their thin stems lined with round bright green leaves that transcend out of the pot make them a must-have for every houseplant lover. Though they can be a little fussy about their care routine and environment, one thing that is super simple is propagating them! It really couldn’t be easier and with the right process, you’ll have plenty of new plants in no time.
In this post, we’re going to guide you through the entire process, including a step by step guide for each method you can use, what tools you will need and any problems you may encounter.
But first, why might you even want to propagate your plant?
Before we get started you might be wondering why it’s beneficial to propagate a String of Pearls Plant? Here are some of the main reasons:
Create more plants without having to spend an extra penny!
This is a great way to expand your urban jungle for free. Cuttings also make great gifts for friends and family if you already have enough houseplants. They can be a little tricky to get a hold of so they’ll definitely be grateful.
To save a dying String of Pearls plant.
If you’ve accidentally overwatered (which is easy to do as they are very sensitive to soggy soil) or neglected your Plant and it has started to die, develop brown leaves, yellow leaves, or has become mushy and shrivelled, take some healthy stem cuttings and propagating them to create new healthy plants. We always recommend trying to figure out what the issue is first so you can change your care routine or its environment in future.
To make your plant fit its environment
As they mature, these plants can grow very long and if they start to hit the floor or become inconvenient in your space, then giving them a trim will help keep them in shape. But instead of simply throwing away the beautiful cuttings, why not use them to create new plants.
What tools/equipment you’ll need
It’s important to make sure you have everything ready before taking any cuttings.
Healthy and mature String of Pearls plant
Clean, sharp scissors/shears
Spare pot(s)
Fresh potting soil and water
Plastic sheet if you’re propagating indoors
Rooting hormone (optional)
What methods can I use to propagate my String of Pearls?
There are three main methods; stem cuttings, layering and division. Division is the safest method as each section will already have an established root system. However, it’s not so great to use if you don’t have a mature and bushy plant. We will go through each of the methods below so you can figure out what’s best for you and your plant.
How to propagate a String of Pearls plant through stem cuttings
This is the most common method as it’s suitable for most maturities and lengths. Below you’ll find out step-by-step guide.
Locate one or more healthy vines
When taking a stem cutting you want to make sure that the part of the plant you are cutting is healthy to give you any chance of success. Avoid any sign of disease or pests as they will be transferred onto your new cuttings and will harm your chances at success.
Make sure the stem cutting has several nodes on the vine that you choose. This is where leaves come out from the stem. With these plants, it’s pretty difficult to get a stem cutting without a node as the leaves are so close together so this should be fine.
Make the vine cutting
The next step in the propagation method is to use clean scissors to cut off one or more stem cuttings. Make sure your tools are clean to avoid passing on any bad bacteria to your cutting. You want each stem cutting to be at least 5cm in length. How many you choose to cut off is entirely down to you.
Remove the upper leaves
You want to remove the top few leaves so that the upper section of the stem is bare. This is because you will be placing the cutting in potting mix and don’t want the leaves to rot and go mushy in the soil.
Plant your cuttings into fresh potting mix
Carefully place the bare end of the String of Pearls cutting you’ve propagated into fresh potting mix. You want to use a succulent specific potting mix to ensure that it has all the right nutrients and ingredients for your plant. Perlite is crucial to aid drainage and aeration of the soil.
Sparingly water your cuttings
We like to water our cuttings with a spray bottle to avoid overwatering. They don’t require that much water and can very quickly start to rot if sat in soggy soil for a while.
Be patient
You might not see much happening above the soil for a while which means this stage of the propagation process can get a little boring. However, refrain from putting your stem cutting(s) out of the soil as this will damage any delicate roots that are growing. As long as your cutting looks healthy, you should be fine.
Resume usual care
Now that your vines are pot nicely into soil and the roots have started to grow, you might soon see some new leaves growing from the cutting. Soon enough those vines will be long enough to propagate again!
How to propagate a String of Pearls plant through layering
The first thing to note with this method is that it’s completely different to the air layering method of propagation. That requires cutting into the stem and using a wrap of peat moss. It’s a lot more complex than the layering method.
Locate a healthy stem
You want to make sure that you choose a nice healthy stem for this method of propagation as any issues will harm your chances of success.
Fill a spare pot with fresh soil
Make sure to use a high-quality potting mix so that your cutting gets the right balance of nutrients. It’s also important to use a potting mix that is well-draining (you’re looking for high levels of perlite) as this will help to prevent waterlogged soil.
Place the stem on top of the potting mix
Carefully place your cutting on top of the pot. We like to wrap it around in circles so that each of the nodes is touching the soil. Press in each node very very slightly into the potting mix but don’t cover the stem or leaves.
Water your node
You want to keep some moisture in the top of the potting mix at all times. Not enough to rot the stem but a little bit of moisture to encourage roots to grow. The best way to do this is by using a spray bottle.
Be patient
Now that your String of Pearls vine is happy in its pot and you are watering it occasionally, the only thing left to do is wait. It will be several weeks before anything happens above the soil. Avoid constantly checking root growth as disturbing and stem and pulling it away from the potting mix will slow down and disturb root growth.
Continue normal care
Soon enough, new String of Pearls leaves will pop up from some of the nodes, forming their own vines. Enjoy your new plant and continue to care for it as you would your mother plant!
How to propagate a String of Pearls plant through division
This method of propagation is best used when your plant is quite bushy and has lots of vines that you don’t mind dividing up into several smaller plants. This method is also great for those who don’t want to wait for weeks/months for roots and new leaves to grow.
Take your plant out of the pot
To propagate your String of Pearls through the division method, you’ll need to separate the different vines. The first step is to carefully lift your plant out of the pot, trying not to damage the leaves or root system as they are very delicate.
Separate out the vines
You may have to trim off the odd root to detangle the plant but you should be able to pull the vines apart fairly easily. Each vine should have its own roots so make sure these are healthy before dividing. You then want to group the vines together to form new plants. How many new plants, and how bushy each of them are is completely up to you!
Place each new section in fresh potting mix
Pop your mother plant back into its original pot (or downsize slightly if you have taken away a substantial amount of the original plant as this will help with stability and avoiding waterlogged soil). Then pot your new plant(s) into well-draining potting mix. Make sure you are always using fresh soil as bacteria and pests can linger in the soil without you knowing. f
Continue your normal String of Pearls plant care routine
Make sure that your new plant is getting enough light and warmth and before you know it, they’ll be big enough to take cuttings from again.
String of Pearls Propagation FAQs
How soon will my cuttings grow roots?
It can actually be fairly quick compared to a lot of other houseplants and you should expect to see some roots growing after only a couple of weeks. But it can sometimes be unpredictable so just make sure your cuttings are getting enough light and warmth and you should see roots in no time.
When is the best time of year to begin?
We always recommend beginning the process in spring/ summer as this gives your new plants plenty of sunshine and warmth to grow new roots and leaves. If you are using the division method, you can get away with propagating at other times of the year as the plants already have an established root system.
Taking stem cuttings in autumn and winter will be much slower as this is the dormant period for your plant and you risk your cuttings dying before they can root so success rates are lower.
What type of potting mix should I use?
We recommend always using a well-draining potting that contains perlite as this aids drainage and aeration of the soil, helping to avoid problems such as overwatering and consequently root rot.
Can I use rooting hormone when propagating my String of Pearls?
Using rooting hormone in the form of gel or powder is completely optional. These will help to encourage and strengthen root growth so are good to the stem cutting and layering methods. But you can still see a lot of healthy growth without it so it’s a personal choice.
Will a grow light be useful for my String of Pearls cuttings?
Grow lights are great to use as they provide ideal light conditions to boost healthy growth. We recommend using them if your home doesn’t get that much natural sunlight.
You can also use grow lights on your mature houseplants over autumn and winter when the days are shorter and darker so are a great investment for all plant parents.
When should I fertilise my String of Pearls plant cuttings?
If you’re using the stem cutting or division methods then we recommend staying away from fertiliser until the cuttings are at least 1 year old. Fertilising before then can actually hinder growth of the main root system and will have the opposite effect.
However, if you using division you can get away with fertilising a month or two after.
How to care for your String of Pearls cuttings after propagation
Once you’ve successfully propagated your String of Pearls and they’ve started to grow roots and even new pearls, it’s time to nurture them into mature plants. But you might be wondering what kind of care they need to properly thrive after the propagation process.
In a nutshell, you want to care for your new cuttings as you would the mother plant, but be a little bit extra cautious and not expose them to any extreme environments. This goes for sunlight, watering habits and temperature levels.
Find a bright spot in your home for your new String of Pearls but do keep it away from too much direct sunlight as it can cause them to burn and dry out. When it comes to watering your newly propagated String of Pearls, be very careful not to overwater. They are succulent plants after all and thrive in dry soil. Make sure you allow the potting mix to fully dry out for a bit before watering again. Their delicate roots can very quickly rot if the soil is soggy for a long time so be careful.
One thing you don’t need to worry about at all though is fertiliser. As we mentioned above, wait about a year after propagating before you even think about feeding your new plant. It can actually cause quite a lot of damage to such young plants.
That’s everything you need to know to successfully propagate your String of Pearls plant. There is a lot of patience involved as you wait for the roots to grow so keep an eye on your plant to spot any early warning signs. But with the right care and environment, you shouldn’t encounter too many issues.
Check out our full String of Pearls Care Guide for all the information you need on how to continue caring for your cuttings once they have matured.


