Why is my String of Hearts turning yellow?

Last Updated: April 1, 2022

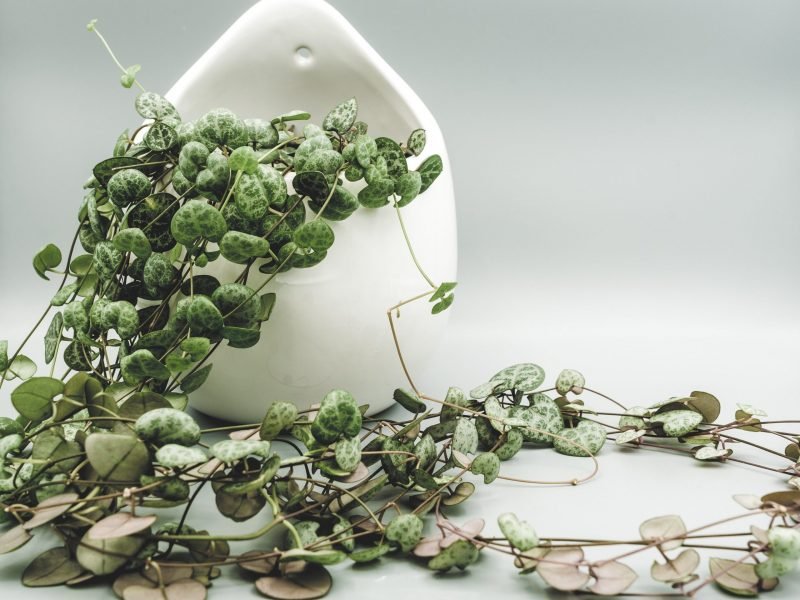
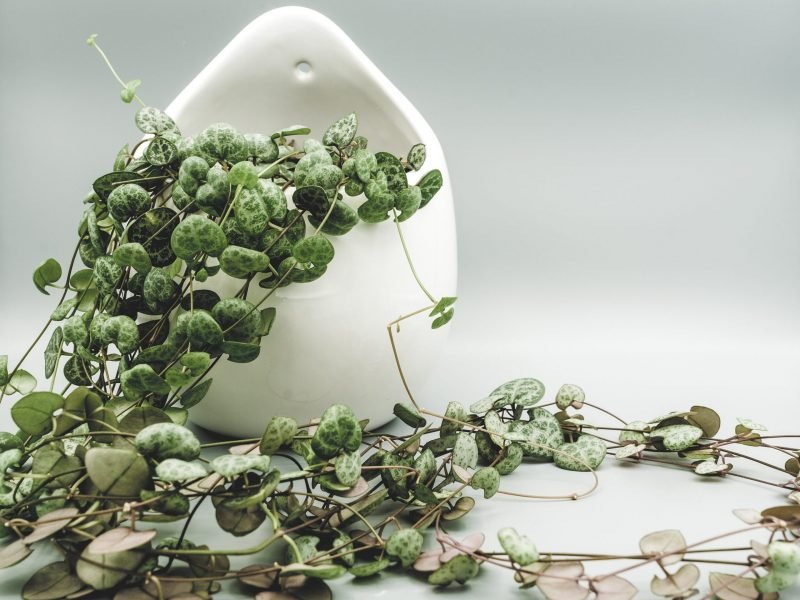
The String of Hearts plant, sometimes known as Rosary vine, is one of the most beautiful but delicate houseplants. Their unique heart-shaped leaves that hang off long, thin vines make them a must-have for any room. However, they can be a little sensitive and react quite strongly when not given the right care. One of the most common problems you may face with String of Hearts plants is yellow leaves. There are several causes for yellow leaves but don’t worry, if you have caught the problem fairly early, there is no reason why you can’t get your plant back to full health soon enough.

Below you’ll find all the reasons why your String of Hearts may have yellow leaves, as well as how to fix the issue and prevent it happening again.

Overwatering is a common cause of yellow leaves

9 times out of 10 your String of Hearts plant will be turning yellow due to overwatering. This problem is also often accompanied by your plant losing leaves. String of Hearts plants hate sitting in soggy soil more than anything and it can quite quickly cause a number of issues for your String of Hearts. The most serious issue it causes is root rot which can happen very quickly as the roots on String of Hearts plants are very delicate and short. This means even the slightest issue in the soil can cause your plant to show signs such as yellow leaves.

Rotting and mushy roots mean that your String of Hearts is unable to take up nutrients and the vines will often fall out of the pot. Waterlogged soil also gives off quite a damp and musty smell so get up close to your plants every so often to check for any smells.

There are a few simple ways to find out if your String of Hearts’ soil is waterlogged:

Take your String of Hearts out of its pot

If there are a significant amount of yellow leaves on your String of Hearts then you probably want to take the plant out of its pot so you can inspect the soil up close. If you feel that it is waterlogged and clumpy then this is definitely the issue causing the yellow leaves.

Finger/Chopstick Method

Firstly, the finger trick where you stick a finger into the soil to see if there is any moisture in the soil. If yes, you’ll notice soil sticking to your finger when you take it out. If the soil is bone dry then it will just be like dust which will fall off your finger. If you don’t want to get your hands dirty then you can also use a chopstick where the same rule applies. If the chopstick comes out clean then it’s time for a water.

Do I risk damaging the root system if I stick my finger in the soil?

As long as you are careful and don’t prod around too much, then you shouldn’t cause too many issues. If you notice a large root in your way, try and pick a different spot rather than forcing the chopstick in as this will break the root.

Picking up your String of Hearts Plant

Another way you can check the moisture levels in the soil is by regularly picking up your plant. This is a great method to get to know your plants and soon you’ll have a really clear gauge as to when they need watering. The lighter the plant is, the less water there is in the soil – pretty simple! Luckily, String of Hearts are very light houseplants as they don’t have thick stems or roots which means picking them up shouldn’t be too difficult but don’t try this with bigger plants as you don’t want to cause injury.

Use a moisture meter

If you want to take the guess work out of knowing when to water your String of Hearts (and prevent more yellow leaves) you can use a moisture meter. You simply pop it in the soil and it will give you a reading of the moisture in the soil. They are super affordable little gadgets which are a great investment for every budding plant parent! We recommend this one which is available at Amazon.

How do I fix a waterlogged String of Hearts?

If the yellow leaves on your String of Hearts are caused by waterlogged soil then it’s super important that you act quickly. Root rot can be damaging to your plant due to the shallow and delicate leaves. Instead of letting the soil dry out naturally, you want to replace it straight away once you notice it is waterlogged. This will prevent any further yellow leaves from developing on your plant and the roots can start to recover and healthy growth should resume soon. Make sure to use a high-quality well-draining potting mix like this one which you can pick up on Amazon.

After replacing the potting mix, prune away all of the yellow leaves. Once they have turned yellow the damage is done and they won’t go back. Pruning off the leaves and stems where the plant is damaged will help your plant recover quicker as it won’t be wasting any energy on trying to keep these dying leaves alive. Instead, it can focus on new healthy growth.

In future, to prevent any more yellow leaves, try to regulate your watering and always check that the top of the soil is dry before giving your String of Hearts any more water. You also need to adjust your watering routine according to the seasons. During the growth period of spring and summer your String of Hearts will require water about every 10 days. However, in winter months about once every month or two is enough as the days are a lot shorter and colder so your plant will be dormant.

Drainage issues can also cause yellow leaves

Sometimes it may not be your watering schedule that is killing your String of Hearts, but the poor draining of the soil and pot.

Add perlite into the potting mix

You can very easily increase the amount of drainage in your String of Hearts’ soil by mixing in a small amount of perlite, this will make it far easier for water to flow through and out of the drainage holes of your pots. Plus you can grab some perlite from Amazon which makes it super easy!

Ensure your pot has drainage holes

It’s very important that your pots have drainage holes so that any excess water can flow out of the pot into either the planter or the saucer. This is a great step to preventing root rot and yellow leaves as your plant won’t be sat in waterlogged soil.

Another easy step is to add a few small stones or pebbles to bottom of your pots, this helps in making sure that the drainage holes are never blocked by soil or any loose debris.

Use clay/ terracotta pots

Although clay or terracotta pots can be a little bit more expensive or breakable, their upsides are much more than just the aesthetic. The clay they’re made of is permeable which means that some of the water in your soil can evaporate through the sides of the pot. This isn’t the case for the plastic pots that most use, which instead hold in all of that moisture. So sometimes it is worth investing a little more to make sure that the roots of your String of Hearts plant isn’t sitting in too much moisture as this will help avoid yellow leaves. Our plants really love these terracotta pots.

Low temperatures can cause yellow leaves on String of Hearts plants

Cold temperatures and drafts can also be very harmful to your String of Hearts. Make sure your plant is not placed near doors or windows that may be drafty. Even though the temperature of your home may be perfect for your String of Hearts and it is receiving a lot of sunlight, the drafts coming in from outside may be colder and harm your plants health.

We recommend picking up a digital thermometer to check the temperature across the day and night in various spots in your home. This will make sure that you don’t place your String of Hearts too close to windows or in places where the temperature really drops at night. They are super affordable and the benefits are definitely worthwhile!

Don’t worry too much if only a few of the leaves on your String of Hearts are starting to turn yellow, it means you caught the issue early. Once you have diagnosed whether it is overwatering, drainage issues or cold temperatures that’s the problem, adjusting your watering routine or moving it to a new spot in your home should help your plant return to full health. If your String of Hearts continues to develop yellow leaves and you can’t find a way to revive it you may want to think about propagating the healthy parts of the plant. Stem cuttings are a great way to grow a new healthy String of Hearts plant and it’s quite a quick process too! Check out our String of Hearts Propagation Guide for everything you need to know.

To find out more about String of Hearts care, common problems and top tips check out our complete String of Hearts care guide.

Fiddle and Thorn is a participant in the Amazon Services LLC Associates Program, an affiliate advertising program designed to provide a means for sites to earn advertising fees by advertising and linking to Amazon.com

Take our houseplant survey!

Quickly respond to our 30 second houseplant survey and get 75% off our Complete Houseplant Care eBook!

Take the Survey

No thanks…

String of Hearts Brown Leaves (Causes and Solutions)

Last Updated: May 28, 2022

Adored for their speckled heart-shaped leaves, the String of Hearts can be a little high maintenance at times to keep their foliage looking fresh. If things aren’t quite right you might find that your String of Hearts starts to develop brown, dry and crispy leaves. This is definitely a sign that something isn’t quite right and something in the care or environment needs to change. But don’t fret, there is a good chance you can revive your String of Hearts if it hasn’t fully taken over. Below we will be going through the two main reasons why String of Hearts plants develop brown leaves so you can make the right changes to help your plant recover.

Too much sunlight can cause brown leaves

If your leaves are turning brown, there is a good chance that it’s because your String of Hearts is getting too much direct sunlight. This can cause the leaves to burn, from which they will not be able to recover. There is often a myth that there is no such thing as too much light, especially for succulent plants such as String of Hearts but this isn’t true. String of Hearts plants do like areas with bright light, but it needs to be indirect. You need to also watch out a little more in summer when the sun is a lot stronger for more of the day and the risk of leaf burn and brown leaves is higher. It is best to move your String of Hearts a metre or so further away from the window in warmer months to avoid any leaf burn/brown leaves. To figure out how much light your String of Hearts is getting throughout the day, you can use a light meter.

Underwatering can also lead to brown String of Hearts leaves

The brown leaves on your String of Hearts might also be a consequence of underwatering. Check the moisture levels in the soil to be sure and if it feels dry and powdery then your plant probably needs more water.

Your first instinct to fix an underwatered String of Hearts and prevent more brown leaves is probably to drown it in water. However, this can actually cause further damage as your String of Hearts may get shocked by the sudden change in soil moisture. The best thing to do in this case is to slowly reintroduce watering by giving your plant a little water each day for a few days. To solve the issue of the brown leaves in the long term, adjust your watering routine and put a reminder in your phone so you remember to water your String of Hearts a little more than before. This should prevent any more brown leaves from occurring in future.

Investing in a moisture meter is also a great idea to help with moisture levels in the potting mix and prevent brown leaves, these handy little devices take all of the guesswork away from watering.

These are the two most common issues that can cause brown leaves on String of Hearts plants. Both sunlight issues and underwatering are quite easy problems to fix so you shouldn’t have any issues bringing your String of Hearts back to full health. Keep a close eye on your String of Hearts over the next few weeks to make sure that any changes you make to your plant’s care or environment are having a positive effect, and not causing any more brown leaves.

To learn more about caring for your plant, as well as how to spot other issues, check out our String of Hearts care guide.

Fiddle and Thorn is a participant in the Amazon Services LLC Associates Program, an affiliate advertising program designed to provide a means for sites to earn advertising fees by advertising and linking to Amazon.com

Take our houseplant survey!

Quickly respond to our 30 second houseplant survey and get 75% off our Complete Houseplant Care eBook!

Take the Survey

No thanks…

Why is my String of Hearts losing leaves?

Last Updated: April 1, 2022

We don’t tend to recommend the String of Hearts plants to beginner plant parents as they can be quite a sensitive plant. Their delicate leaves and vines are easily damaged and diagnosing the right issue can sometimes be challenging so it’s important to keep a close eye on your plant if you think something may be wrong. There are a few reasons why your String of Hearts may be losing leaves so before you start changing anything about your plant’s environment or how you care for it, try to figure out what the cause is.

In this post, we will cover off all the various reasons why your String of Hearts may be losing leaves, as well as how to figure out which is the cause and fix it before the problem progresses too far.

Overwatering is the most common reason String of Hearts plants lose leaves

If your String of Hearts’ leaves turn yellow before they fall off then overwatering is most likely to blame. It can be really easy to accidentally overwater your plant because the roots on a String of Hearts are very very delicate and short. Too much water in the soil will quickly lead to root rot which will mean the leaves and vines slowly start to die before falling off the plant. This is because your String of Hearts is unable to take up nutrients if the roots are mushy.

Rotting and mushy roots mean that your String of Hearts is unable to take up nutrients and the vines will often fall out of the pot. Waterlogged soil also gives off quite a damp and musty smell so get up close to your plants every so often to check for any smells.

There are a few simple ways to find out if your String of Hearts’ soil is waterlogged and causing your plant to lose leaves:

Take your String of Hearts out of its pot

If your String of Hearts plant is losing a lot of leaves then you need to inspect the potting mix immediately. You’ll be able to tell very quickly if the soil is waterlogged and clumpy.

Finger/Chopstick Method

Another way to tell if your potting mix is waterlogged is by putting a finger or chopstick into the soil and seeing if it comes out clean. If there is soil stuck then there is still moisture in the soil. But if the soil is bone dry then it will just be like dust which will fall off your finger.

Do I risk damaging the root system if I stick my finger in the soil?

As long as you are careful and don’t prod around too much, then you shouldn’t cause too many issues. String of Hearts plants have very delicate roots so try not to do this too often.

Picking up your String of Hearts Plant

Another way you can check the moisture levels in the soil is by regularly picking up your plant. This is a great method to get to know your plants and soon you’ll have a really clear gauge as to when they need watering. The lighter the plant is, the less moisture there is in the soil. String of Hearts plants are one of the lightest houseplants as their leaves and vines are very thin but don’t try this method for any of your larger plants as it can cause injury.

Use a moisture meter

If you aren’t sure exactly how to figure out if the potting mix has too much moisture causing your String of Hearts to lose leaves, then invest in a moisture meter. They are great for all plant parents as you just pop it into the soil and it’ll tell you how soggy or dry it is. Plus, they are really affordable little gadgets!

How do I fix a waterlogged String of Hearts?

So if you figure out that overwatering and waterlogged soil is causing your String of Hearts to lose leaves, then you must act quickly to fix the problem. Root rot can be really damaging to your String of Hearts due to their short and delicate roots. We always recommend replacing the potting mix straight away instead of letting it dry out naturally. You don’t want to cause any more damage to the roots and this will help stop any more leaves from falling off your plant and encourage new healthy growth.

In future, to prevent any more leaves from falling off your plant, try to hold off watering your String of Hearts as much. Make sure that the potting mix has fully dried out before watering again. During the growth period of spring and summer your String of Hearts will require water about every 10 days. During autumn and winter, cut back watering to about once every month or two. Your plant will be dormant and there won’t be any new growth meaning that overwatering is much easier to do during this time.

It may take a little longer for your String of Hearts to recover from overwatering than some other issues due to the damage to the root system. As long as you have replaced the potting mix and the environment is right, there is a good chance your plant will come back to full health.

Drainage issues can also cause leaf drop

Sometimes it may not be your watering schedule that is causing your String of Hearts to lose leaves, but poor (or a lack of) drainage in the pot. But don’t worry, this is a really simple problem to fix and there are a few great ways to do it:

Add perlite into the potting mix

You can very easily increase the amount of drainage for your String of Hearts by mixing in a small amount of perlite, this will make it far easier for water to flow through and out of the drainage holes of your pots. Perlite is a light-weight, white material that not only helps drainage but also allows for more aeration in the soil which delivers more oxygen to your plants and will help prevent more leaves from falling off your String of Hearts.

Ensure your pot has drainage holes

It’s very important that all of your plant pots have drainage holes so that any excess water can flow out of the pot into either the planter or onto the saucer. This is a great step to preventing root rot and leaves falling off your String of Hearts as your plant won’t be sat in waterlogged soil.

Add pebbles to the bottom of your pot

Another easy step to help with drainage is to add a few small stones or pebbles to the bottom of your pots, this helps to make sure that the drainage holes are never blocked by soil or any loose debris which may stop excess water flowing out.

Use clay/ terracotta pots

Although clay or terracotta pots can be a little bit more expensive and breakable, their upsides are much more than just the aesthetic. The clay they’re made of is permeable which means that some of the water in your soil can evaporate through the sides of the pot. This isn’t the case for the plastic pots that most use, which just hold in all of that moisture. So sometimes it is worth investing a little more to make sure that the roots of your String of Hearts aren’t sitting in too much moisture as this will help avoid leaves dropping off.

Underwatering can also cause String of Hearts plants to lose leaves

Funnily enough both over- and underwatering can lead to your String of Hearts losing leaves. So it’s really important you figure out which is the cause as you don’t want to be adjusting your watering schedule in the wrong way.

Here’s how to spot if your String of Hearts is underwatered:

Leaves are dry and crispy

If the leaves that are falling off are very dry, crispy, shrivelled and look dehydrated, then the problem is probably consistent underwatering.

The potting mix is dry

An easy way to see if your String of Hearts is losing leaves due to a lack of water is by taking the plant out of its pot and inspecting the potting mix. If the soil feels very dry to touch, almost like dust, then your plant needs more water.

The soil is coming away from the sides of the pot

This is a great method to be able to tell if your String of Hearts is being underwatered just by looking at it. If you notice that the soil has compacted and is actually coming away from the sides of your pot, then it indicates that you need to increase watering and this may be the cause of your String of Hearts losing leaves.

Use a moisture meter

Just like with overwatering above, using a moisture meter will help figure out how dry the potting mix is and if you need to water more to stop your plant losing any more leaves.

How do I fix an underwatered String of Hearts?

Now that you’ve established that your String of Hearts is losing leaves due to a consistent lack of water, you need to make sure to reverse the issue in the right way. Your first instinct may be to drown your plant in water but this can actually cause your String of Hearts to go into shock due to a sudden change of environment. To prevent this from happening, we recommend slowly reintroducing water by giving it a little bit once a day for a week. This will slowly dampen the potting mix and hopefully, stop any more leaves from falling off your String of Hearts.

A lack of sunlight can cause your String of Hearts to lose leaves

Although watering issues tend to be the most common reason why String of Hearts plants lose their leaves, there are other possibilities. String of Hearts plants don’t mind a slightly shady corner but will struggle if the light levels become really low. Their vines will start to become leggy and they will lose some of their older leaves.

The only way to fix this is to move your String of Hearts into an area of your home with more sunlight. Somewhere with bright, indirect light or medium light levels is ideal to stop your String of Hearts plant from losing any more leaves. Just make sure to keep them away from direct sunlight as this can scorch the leaves and cause a range of different problems!

In order to figure out how much light your String of Hearts plant is getting in its current spot, we recommend using a light meter. These are great to monitor how much light your plant gets throughout the day and also how it changes throughout the seasons. Somewhere with great light levels in summer, may not be suitable in winter.

Cold temperatures can cause leaf drop

Cool temperatures may also be causing your String of Hearts to lose leaves. Cold air coming in through air conditioning vents or drafty windows can shock your plant and result in your plant shedding some of its leaves. It can be difficult to notice drafts so it’s best to pick up a digital thermometer so you can keep an eye on the temperature. They’ll also help you detect hotspots that are damaging to plants, so a great investment all around!

The best way to stop your String of Hearts from being exposed to cold drafts is to move them away from any AC vents and draft proof any doors or windows which they are near to. You may also want to move your plant to a warmer room in your home and this should stop your String of Hearts from losing any more leaves.

Environment shock will cause the odd leaf to fall off

It’s not just cold temperatures that can shock your String of Hearts. If you have recently moved house or moved your String of Hearts to a new spot in your home this may also be the cause of your plant dropping leaves. The initial shock should wear off over a few days so make sure your String of Hearts is getting enough light and water and things should improve. Your String of Hearts will also only ever lose a few leaves due to environmental shock so keep an eye on the number and rate of leaves falling off.

If the problem persists for a few weeks after moving your String of Hearts then you may need to check the soil for any damaged roots and monitor how much light it is getting throughout the day to find another reason.

Those are the main reasons why your String of Hearts plant is losing leaves. There are quite a few different causes so it may take a little bit of investigating to figure out which one you need to fix. But hopefully, if you have caught the problem fairly early, your String of Hearts should recover with a little bit of love. If you want to find out more about how to best care for your plant check out our complete String of Hearts Care Guide.

Fiddle and Thorn is a participant in the Amazon Services LLC Associates Program, an affiliate advertising program designed to provide a means for sites to earn advertising fees by advertising and linking to Amazon.com

Take our houseplant survey!

Quickly respond to our 30 second houseplant survey and get 75% off our Complete Houseplant Care eBook!

Take the Survey

No thanks…

Why is my string of hearts dying?

Last Updated: April 1, 2022

String of Hearts are known to be pretty hardy houseplants that don’t need too much care, but they can start to show signs of distress if their environment isn’t ideal. The main reasons why your String of Hearts might be suffering are overwatering, not enough sunlight, nutrient deficiency, cold temperatures and pest infestation.

Overwatering

How overwatering can cause damage to your String of Hearts

If you notice that your String of Hearts is turning slightly yellow it is most likely due to overwatering. String of Hearts don’t need to be watered often, we go for once every 7-10 days in summer and even less in winter. They really don’t like being sat in water so you need to ensure that the pot has good drainage.

Overwatering can very quickly lead to root rot which is very harmful to your String of Hearts. Not only does it cause the leaves to turn yellow, but it will also mean that the plant is unable to take up water or nutrients, meaning your plant may begin to die pretty quickly. If you think that you may have overwatered your String of Hearts it is best to replace the soil straight away rather than just sit and wait for it to dry up over time. Better to be overly cautious, and replacing the soil will do no harm to your String of Hearts.

Make sure to check the moisture in the soil before you water. There are two really easy ways to make sure that it definitely needs water. First check the moisture at the top of the soil, if it is still damp then wait a few days before watering. You can also lift up your string of hearts carefully to check the weight of the plant before and after watering. You will then start to be able to gauge how heavy the soil is when it is dry vs waterlogged. If you can’t quite get to grips with these two methods, or want to be super accurate with your care and watering schedules you can always pick up a moisture metre. These handy little devices can give you all sorts of data and make houseplant care a breeze.

Your watering schedule should change throughout the year depending on the growing seasons. String of Hearts go dormant in winter so don’t be alarmed if there is not much growth happening. This also means that the amount of water needed dramatically increases so it becomes a lot easier to accidentally overwater in these darker months. So just make sure to be extra cautious when watering your string of hearts in winter. If you’re particularly worried that you might over water you String of Hearts it could be worth investing in a good quality self watering plant pot, these take all of the trouble out of the process and will make sure that your plant isn’t resting in stagnant water – eliminating the risk of root rot or other watering based issues.

Not Enough Sunlight

Why sunlight is so important for saving your String of Hearts

String of Hearts love bright sunshine and can struggle in anything less! Make sure you place them somewhere they receive several hours of bright light. Don’t worry if they get direct light as unlike most other houseplants, they cope pretty well with this. If your String of Hearts is getting too little sunshine, it will become leggy and there will be large gaps between any new leaves growing on the stems. So make sure that you place your string of hearts in the brightest spot in your home to give it the best environment possible.

If you’re struggling to find a spot with better lighting or if you live in an area that doesn’t get a whole lot of natural light through the colder darker months, it could be worth looking into and investing in a quality grow light. These are great year round, especially for young cuttings or propagation projects.

Nutrient Deficiency

Your String of Hearts might also be struggling to survive because of a lack of nutrients. It is worth changing out your succulent soil every year as well as feeding your plant every few months in the growing season. A lack of nutrients won’t kill your String of Hearts instantly but it may prevent it from producing any healthy growth and over time it can cause more severe issues.

You can safely fertilise your String of Hearts every couple of months throughout the growing season, though we’d only recommend half of the package dose. We find that fertiliser pellets or spikes are the easiest to use, these are our favourites.

Complete Houseplant Care eBook

Our comprehensive (and rather good looking) eBook that will teach you everything you need to know to successfully care for, and maintain your houseplants!

Buy on

Temperature Issues

How increasing the temperature can save your String of Hearts

Another cause of yellowing leaves in String of Hearts can be cold temperatures and drafts. They really dislike cold air so make sure that it is not placed near doors or windows that may be drafty. Even though the temperature of your home may be perfect for your String of Hearts, the drafts coming in from outside may be colder and harm your plant’s health. You can always pick up a digital thermometer to check the spot your String of Hearts is sat for piece of mind.

Pest Infestation

A slightly less common reason why your String of Hearts might be dying is pest infestation. Although we have never experienced this, it can happen that mealybugs take hold of your plant. As the leaves and stems are quite delicate it is not always possible to wipe the leaves like we would recommend with other plants so your best option is to treat your String of Hearts with organic insecticide to fight the infestation. Make sure to check over your other plants in the room to see if any other plants have pests. Make sure to keep your string of hearts (and other infected plants) a good distance away from any of your other houseplants as you don’t want the infestation to spread.

These are the main reasons why your String of Hearts might be dying or showing signs of distress. The most common reason is overwatering but it is worth double-checking your plant’s environment to spot signs of the other causes listed. Make sure to correct the problem immediately and your String of Hearts will hopefully return to its healthy self!

Fiddle and Thorn is a participant in the Amazon Services LLC Associates Program, an affiliate advertising program designed to provide a means for sites to earn advertising fees by advertising and linking to Amazon.com

Take our houseplant survey!

Quickly respond to our 30 second houseplant survey and get 75% off our Complete Houseplant Care eBook!

Take the Survey

No thanks…

Why is my Spider Plant turning brown? 7 Causes and Solutions

Last Updated: May 2, 2022

Spider Plants are perfect for beginner houseplant parents due to their easy care needs and their willingness to just sprout more baby spider plants than you could ever know what to do with. However, it can be frustrating when we start to notice brown patches/tips on our Spider Plant’s leaves. If caught early, this is definitely nothing to worry about and can be fixed with a slight change to the care routine or environment. The most common reasons why your Spider Plant is turning brown are: over- or underwatering, direct sunlight, chemical sensitivity, over-fertilisation or a lack of humidity.

Overwatering can cause brown leaves

Let’s start off with a common cause of brown leaves in all houseplants; overwatering. As a plant parent, it can be super easy to want to give your Spider Plant all the care in the world. But too much love can actually be very harmful to your plant.

Luckily for you, Spider Plants are pretty hardy plants and won’t die suddenly if you overwater them once in a while. However, consistent overwatering will mean it will start to develop root rot. This will cause your Spider Plant to become unstable and the leaves will start to turn brown and fall out as your Spider Plant will not be able to get nutrients from the soil to maintain healthy leaves or new growth.

If you think that you may have overwatered your Spider Plant it is best to replace the soil straight away rather than just sit and wait for it to dry up over time. Be careful when removing the soil from the roots as you don’t want to cause any further damage.

Make sure to check the moisture in the soil before you water your Spider Plant. There are two really easy ways to make sure that it definitely needs water. First check the moisture at the top of the soil, if it is still damp then wait a few days before watering again. You can also lift up your Spider Plant to check the weight of the plant before and after watering. You will then start to be able to gauge how heavy the soil is when it is in need of water.

Underwatering often causes light brown leaves

Like overwatering, too little water can also be harmful to your Spider Plant so it is important to get the right balance. Although your Spider Plant won’t die on you suddenly if you forget to water it every once in a while, or make it go a little longer without water whilst you are on holiday, consistent underwatering will start to have an impact on your plant’s health. If you notice that your Spider Plant is starting to droop and go quite pale, it is most likely due to underwatering.

Stick a finger in the top few centimetres of the soil to check the moisture. You can also try lifting your Spider Plant as we mentioned earlier to see it if feels particularly light. If you find that your Spider Plant feels very dry, water it a little every other day for a week. Your first instinct might be to give it loads of water straight away but this can actually be harmful to your Spider Plant if the soil goes from one extreme to the other. Yes, plant’s can get shocked too by a sudden change in environment. So instead you want to reintroduce frequent watering for a week or two and this should solve the problem.

Brown leaves can also be caused by drainage issues

Sometimes it may not be your watering schedule that is causing your Spider Plant to turn brown, but poor drainage. You can very easily increase the amount of drainage in the pot by mixing in a small amount of perlite into the soil. This will make it far easier for water to flow through and out of the drainage holes of your pots (also double check your pots have drainage holes). Another easy step is to add a few small stones or pebbles to the bottom of your pots, this helps in making sure that the drainage holes are never blocked by any clogged up soil or loose debris.

Too much direct sunlight can scorch the leaves

Lighting is always important to your houseplants and Spider Plants are no different. If your plant is getting too much bright light you’ll start to notice the tips of the leaves turning brown as well as yellowy patches throughout the leaf. This is due to the sunlight burning the leaves which is unfortunately irreversible. Try moving your Spider Plant into a slightly shadier place, and if there’s no improvement move it a little further again until you find it’s the perfect spot.

Brown leaf tips can mean chemical sensitivity

Spider Plants can actually be a little sensitive to fluoride and chlorine that you find in tap water. Over time, this may be causing harm to the roots which often shows itself in brown leaves. If you live in a hard water area, it may be that your spider Plant is reacting to high levels of chemicals in the water. There are two ways to make sure that the water you give them is free of both these chemicals. Firstly you can leave a jug of tap water for around 24 hours to allow for a lot of the chemicals to evaporate. Another method is leaving a tray outside to collect rainwater to give to your houseplants to make sure chemical levels are lower than the treated water that comes out of your tap.

Don’t over-fertilise your Spider Plant

Spider Plants don’t need regular fertilisation. Every 3 months is around what we recommend in the growing months and not at all in the dormant colder months. If you are fertilising your Spider Plant more regularly, it may be causing damage to the main root system which over time could kill your Spider Plant. As well as reducing the frequency of fertilisation, try to use a diluted water-soluble fertiliser on your Spider Plant to ensure that it does not cause any shock or damage to the plant. You can also skip the fertiliser part altogether, we don’t tend to add anything to the water for our Spider Plants and they still grow healthy new growth and more spiderettes than we could ever need!

Low humidity could also cause brown leaf tips on your Spider Plant

Alongside watering, it is important that you try and increase the humidity for your Spider Plant get it back to tip-top condition. Often our homes can have quite dry air, especially in the winter months when we often have the heating on for most of the day. A lack of humidity in the air can cause the leaves to be a little limp, droop down, and turn dry, brown and crispy from the tips up.

But luckily for you, it can be pretty simple to increase the humidity for your Spider Plant, these are our top tips:

Misting the leaves

One of the simplest ways to increase the humidity for your spider Plant is to mist them with a spray bottle a couple of times a week.

Pebble tray

Place your Spider Plant over a tray of pebbles with fresh water over the top. Over the day water from the tray will evaporate giving your plant exactly what they’re looking for.

Move your Spider Plant to the bathroom

If you’re lucky enough to have great lighting in your bathroom you can move your Spider Plant in there to increase the humidity. The running water from your showers means your bathroom is probably one of the most humid in your home.

Buy a humidifier

They’re relatively affordable little devices and they make keeping a consistent humidity level so much easier. Most will allow you to place them on a timer so they run on a fixed schedule, and some will even have a built-in monitor so they automatically turn on and off to keep the humidity exactly where you want it.

Want to know more about how to raise the humidity for your Spider Plant and other houseplants? We have written a whole guide on this.

There are quite a few reasons why your Spider Plant’s leaves are turning brown, so it may have to be a bit of a process of elimination to find out what is the main cause. Brown leaves on your Spider Plant isn’t the end of the world if you have caught and correctly diagnosed the problem early. By shifting your watering schedule and keeping a close eye on new growth, it should return to full health quickly. Don’t expect the brown leaves to all of a sudden turn luscious green, what’s done is done. Don’t pull away the dying or dead leaves as this can harm your plant. Instead, wait for them to drop naturally or prune away the brown parts once your plant has resumes healthy growth.

You can find out more about how to care for your plant in our Spider Plant care guide.

Fiddle and Thorn is a participant in the Amazon Services LLC Associates Program, an affiliate advertising program designed to provide a means for sites to earn advertising fees by advertising and linking to Amazon.com

Take our houseplant survey!

Quickly respond to our 30 second houseplant survey and get 75% off our Complete Houseplant Care eBook!

Take the Survey

No thanks…

Why is my Spider Plant losing leaves? | Common Causes and Solutions

Last Updated: May 31, 2022

Often recommended as a beginner houseplant or the perfect thing if you don’t have a green thumb, the Spider Plant isn’t totally fuss free. Yes, they can adjust to a variety of environments and are certainly easier to care for than a lot of other plant types, but just with any other plant, if something isn’t right it can lead to your Spider Plant being distressed. This can often result in your Spider Plant losing leaves.

To determine whether the cause of the leaf drop is a serious problem, or if it’s just part of the ageing process, we have written a complete guide to the various causes. We hope this will help you figure out what is wrong with your Spider Plant and prevent any more leaves from falling off your plant.

Overwatering is a common cause of Spider Plants losing leaves

If you find that your Spider Plant is losing leaves from the bottom up, then it may be a problem with the roots that is causing the issue. When the root system is damaged, you’ll notice the issue starting there and progressing throughout the plant, resulting in a variety of problems including leaf drop.

Spider Plants can tolerate some soggy soil but hate sitting in water for long periods of time. Once the roots start to rot, it means the root system is unable to get the needed oxygen, water and nutrients to the rest of the plant. This will mean your Spider Plant can’t maintain the level of healthy growth that it has and it will start to lose some leaves.

If you think that your Spider Plant is waterlogged and this is why it’s losing leaves, check the moisture of the soil immediately using a moisture meter and adjust your watering schedule accordingly. This could be cutting back on how often you water your plant, or just reducing the amount of water you give each time. We also recommend replacing the potting soil straight away (rather than waiting for it to naturally dry out) so that the roots can begin to recover and resume healthy growth.

In future, to prevent your Spider Plant from losing more leaves, try to regulate your watering and always check that the top of the soil is dry before giving your Spider Plant any more water. You need to also water according to the seasons; in the spring and summer (growth period) your Spider Plant will require water about every 5-6 days. However, in winter (dormant period) about once every few weeks is enough.

Underwatering can also cause your Spider Plant to lose leaves

Funnily enough both over-and underwatering can lead to your Spider Plant losing leaves. Holding back water to an underwatered plant, or increasing how much you water an overwatered plant will be fatal for your Spider Plant so it’s crucial that you figure out which one is happening before adjusting your watering schedule.

Here’s how to spot if your Spider Plant is losing leaves due to being underwatered:

Leaves are dry and crispy

If the leaves that are falling off your Spider Plant are very dry, crispy, shrivelled and look dehydrated, then the problem is probably consistent underwatering.

The potting mix is dry

An easy way to see if your Spider Plant is losing leaves due to a lack of water is by taking the plant out of its pot and inspecting the potting mix. If the soil feels very dry to touch, almost like dust, then your plant needs more water. You might also notice that the root system looks quite crinkled and dry. This also indicates underwatering. If this is the case, trim away any crispy roots to encourage your plant to grow new healthy roots.

The soil is coming away from the sides of the pot

This is a great method to be able to tell if your Spider Plant losing leaves because it is being underwatered just by looking at it and is something to do each time you water. If you notice that the soil has compacted and is actually coming away from the sides of your pot, then it indicates that you need to increase watering and this may be the cause of your Spider Plant losing leaves. This also goes for all of your houseplants so is something to keep in mind.

Use a moisture meter

Just like with overwatering above, using a moisture meter will help figure out how dry the potting mix is and if you need to water your Spider Plant more to stop it from losing any more leaves.

How do I fix an underwatered Spider Plant?

Now that you’ve established that your Spider Plant is losing leaves due to a consistent lack of water, you need to make sure to reverse the issue in the right way. Your first instinct may be to drown your plant in water but this can actually cause your Spider Plant to go into shock due to a sudden change of environment. To prevent this from happening, we recommend slowly reintroducing water by giving it a little bit once a day for a week. This will slowly dampen the potting mix and hopefully, stop your Spider Plant from losing any more leaves.

Your Spider Plant might be losing some leaves due to natural ageing

If it’s only the oldest bottom leaves on your Spider Plant that are falling off, then this may be natural ageing. As your plant matures, your Spider Plant will lose some of its oldest, lowest leaves to focus its energy on growing new healthy and often bigger growth.

This is completely natural and isn’t a cause for concern. To make sure that something else isn’t going on, we recommend you monitor how many leaves are falling off your plant. As long as the rate is slow, and your Spider Plant is producing much more new, healthy growth, then you shouldn’t worry about this at all.

These are the three most common reasons why Spider Plants start losing their leaves. The first port of call is establishing whether or not it is natural ageing or a problem with watering that is causing the leaf drop. If watering is the issue, it’s important to be 100% sure whether it is overwatering or underwatering. Adjusting your watering schedule in the wrong way might just be the thing that tips it over the edge and makes it impossible to revive your Spider Plant. If things aren’t looking so good, then we recommend propagating some of the spiderettes that might be hanging on your plant so that at least you have some healthy baby plants to nurture.

Check out our Spider Plant care guide for everything you need to know about caring from your plant, as well as propagation advice, general top tips and how to treat other problems you might face with your plant.

Fiddle and Thorn is a participant in the Amazon Services LLC Associates Program, an affiliate advertising program designed to provide a means for sites to earn advertising fees by advertising and linking to Amazon.com

Take our houseplant survey!

Quickly respond to our 30 second houseplant survey and get 75% off our Complete Houseplant Care eBook!

Take the Survey

No thanks…

Why is my Spider Plant drooping and soft? Causes and Solutions

Last Updated: March 17, 2023

The Spider Plant will always hold a special place in our hearts as it was our starter plant way back! They tend to be quite easy to care for and can thrive in a range of environments. However, a common issue that you tend to find with Spider Plants is that they can become quite droopy or soft if something isn’t right. Usually, this is a pre-warning that more symptoms are about to arrive so it’s a good thing if you have caught it at this stage as it makes fixing the issue a lot easier. In this post, we will guide you through each of the factors that can lead to your plant drooping, as well as how to solve the issue and get your plant looking healthy again!

Overwatering is a common cause of drooping or soft Spider Plant leaves

If the drooping leaves are paired with dark brown spots but the leaves aren’t crispy, then overwatering is the most probable cause. These plants are pretty hardy and can deal with a whole range of environments, including waterlogged soil for some time. However, consistent overwatering will mean their leaves will start to look quite limp as their roots begin to rot and turn mushy. You should be watering your plant around once a week in the hottest months of the year, and less frequently in autumn and winter.

How do I know if overwatering is the cause of the soft droopy leaves?

If you think that you may have overwatered your plant it is best to replace any soggy soil straight away rather than just sit and wait for it to dry up over time. You’ll be able to tell if you have been watering too much as the roots will have turned soft and very dark in colour. You might also be able to smell the stagnant water in the soil as it can be quite poignant.

How do I fix an overwatered Spider Plant?

Make sure to check the moisture levels in the soil before you water your plant each time. This will make sure that you are only giving your plant moisture once the potting mix has had time to dry out.

We like to do this in one of two ways. Firstly, using either a moisture monitor or just our finger to check the water levels in the potting mix. If it is still damp then wait a few days before watering again. You can also lift up your Spider Plant as we mentioned before. Only do this if your plant isn’t that mature as you don’t want to hurt your back or anything whilst doing this.

Self-watering pots and a good moisture meter will make sure that you don’t run into this issue again.

Drainage issues can also cause droopy Spider Plant leaves

Sometimes it may not be your watering schedule that is causing your plant’s leaves to droop and fall off or your Spider Plant to turn soft, but it might actually be caused by improper drainage. This can either happen because of the soil or because of the pot.

Adding a small amount of perlite can really help to aid drainage and you should always check your pot has enough drainage holes as this will allow any excess water to flow out into either a saucer or planter.

You should also consider using clay or terracotta pots as they are permeable meaning some moisture is able to evaporate out of the sides of the pot. Chances are you bought your Spider Plant in a plastic pot, as they have a lot of advantages for plant shops but they aren’t actually the best for your plants as they keep in every single drop of water.

So sometimes it is worth investing a little more to make sure that the roots of your Spider Plant are not sitting in too much moisture. We love using these terracotta pots from Amazon.

A drooping Spider Plant can also be caused by a lack of water

Too little water can harm your plant in more ways than one and this goes for all plants, not just Spider Plants. It can cause dry leaves, lack of growth and nutrient deficiency. But one of the earlier signs of underwatering is drooping leaves so this is a good warning sign to watch out for.

If you find that the stems and leaves look a little lifeless, it could be because the soil has been dry for too long. Use the methods we outlined above to see how dry the potting mix is.

If you have been underwatering your plant, water it a little every other day for a week. Your first instinct might be to give it loads of water straight away but this can actually be harmful to your Spider Plant if its environment goes from one extreme to the other.

Investing in a moisture meter would be a great idea, these handy little things take all of the guesswork away from watering.

Drooping Spider Plant leaves can also indicate overheating

As well as watering issues, hotspots can also cause issues with your plants and might be the reason that your Spider Plant is drooping or turning soft. If your plant is very close to the window, then during summer that intense light can make that spot a lot warmer than the rest of your house which means you might not even realise a hotspot has formed.

If your plant is being exposed to a lot of heat, it will lose the moisture a lot quicker and will droop and become limp as a result. Using a digital thermometer is the best way to really know how the temperature is fluctuating around your plants and can help you find a better spot to avoid further damage to your plant.

Those are the main reasons why your Spider Plant has started to droop down or turn soft. If there are no other problems visible on your plant, then you should start to see the problem reverse in a few days and your plant should look healthy and happy again. Make sure to keep a close eye on your Spider Plant over the upcoming weeks to check that no other signs of distress are starting to develop and that there are no more drooping or soft leaves.

To learn more about how to best take care of your plant, check out our Spider Plant care guide.

Fiddle and Thorn is a participant in the Amazon Services LLC Associates Program, an affiliate advertising program designed to provide a means for sites to earn advertising fees by advertising and linking to Amazon.com

Take our houseplant survey!

Quickly respond to our 30 second houseplant survey and get 75% off our Complete Houseplant Care eBook!

Take the Survey

No thanks…

Why is my Snake Plant dying? Causes and Solutions

Last Updated: April 1, 2022

There is a bit of a houseplant myth where people believe that Snake Plants are unkillable. Whilst it is true that they are definitely less sensitive that a lot of their houseplant friends, Snake Plants can suffer if their environment or care isn’t great. The main reasons why your Snake Plant might be dying are: overwatering, drainage issues, lighting problems, low temperatures and pest infestation.

Overwatering can cause your Snake Plant to die

Improper watering is one of the biggest issues for most houseplants and Snake Plants are no different. Overwatering will cause their leaf tips to turn brown, their roots to rot and eventually their leaves to become unstable and mushy.

During the growth months, you shouldn’t be watering your snake plant more than once every week or two. During the colder months, once a month is definitely enough. It is really good to get to know your plants as each and every one is ever so slightly different. As well as checking the moisture at the top of the soil before watering, we also recommend picking up your snake plant before and after watering so you get an idea of much your plant will weigh when it needs water. Be careful that you don’t hurt yourself on the leaf tips when doing this, we are speaking from experience here!

*A little watering tip we have for a snake plants is to always water from the bottom. This encourages the roots to grow downwards and will increase the plant’s stability.

A dying Snake Plant can also indicate drainage problems

Your Snake Plant may also be dying due to drainage issues in your pot. Although you could be watering the correct amount, if your pot isn’t draining the water in the right way, it could cause the soil to become waterlogged.

You can very easily increase the amount of drainage in your soil by mixing in a small amount of perlite, this will make it far easier for water to flow through and out of the drainage holes of your pots (you should also check to make sure your pots have drainage holes).

Another easy step is to add a few small stones or pebbles to the bottom of your pots, this helps in making sure that the drainage holes are never blocked by soil or any loose debris.

Lighting issues might also be the cause of your dying plant

It is important to get the right balance with snake plants. Whilst they definitely are low-light plants, particularly dark corners will stilt their growth and mean that their pattern will become bland and less prominent over time. If you find the leaves are drooping a little it may be because your snake plant is not getting enough light. As long as your plant is getting some sunshine in the day, this won’t often be the cause of death for your snake plant.

It is actually more likely that your snake plant is suffering due to too much sunlight. Snake plants can cope with a range of lighting conditions but dislike bright, direct sunlight for more than an hour a day. Direct sunlight can burn and dry out the leaves, which is irreversible, unfortunately.

If your snake plant is placed by a south-facing window, this could provide too much sunlight per day. Try moving your plant a little further away from the window, or to an east or west-facing window.

Watch out for low temperatures

Cold temperatures and drafts can also cause snake plants to suffer. They really dislike cold air so make sure that it is not placed near doors or windows that may be drafty. Even though the temperature of your home may be perfect for your snake plant, the drafts coming in from outside may be colder and harm your plant’s health. You can always pick up a digital thermometer to check the spot your snake plant is in.

Your Snake Plant might be dying due to a pest infestation

A slightly less common reason why your snake plant might be dying is pest infestation. It can happen that mealybugs take hold of your plant. Mealybugs are covered in white cotton-like material and are most often found towards the bottom of the leaves, in the most protected areas of the plant.

If you find mealybugs on your snake plant recommend giving the whole plant a shower. They have hardy leaves so can withstand the shower better than some other more delicate plants. You should also treat your snake plant with an organic insecticide to fight the infestation.

Make sure to check over your other plants in the room to see if any other plants have pests. Keep your snake plant (and other infected plants) a good distance away from any of your other houseplants as you don’t want the mealybugs to spread.

To find out more about how to care for your plant, visit our Snake Plant care guide. There you will find everything you need to know to keep your Snake Plant healthy and thriving as well as tips and tricks around propagation, fertilisation and repotting.

Fiddle and Thorn is a participant in the Amazon Services LLC Associates Program, an affiliate advertising program designed to provide a means for sites to earn advertising fees by advertising and linking to Amazon.com

Take our houseplant survey!

Quickly respond to our 30 second houseplant survey and get 75% off our Complete Houseplant Care eBook!

Take the Survey

No thanks…

Why is my Schefflera losing leaves? Causes and How to Fix it!

Last Updated: June 15, 2022

Also known as the Umbrella plant due to their unique leaves, the Schefflera is an incredible houseplant. They aren’t too difficult to take care of either; once you have found a perfect spot for it and a good watering routine, you shouldn’t encounter too many problems. However, your Schefflera may start losing leaves if it is not happy so look out for this warning sign. The main causes of Schefflera plants losing leaves are overwatering, poor drainage, not enough light, temperature issues and natural ageing.

Not enough light can cause your Schefflera to start losing leaves

Schefflera thrive in bright, indirect light and will struggle with anything less, often causing them to lose leaves. Insufficient light levels will start to cause your plant to shed some of the older leaves to keep their energy reserves for the new healthy growth. This is actually one of the most common causes of Scheffleras losing leaves but one that is hopefully quite an easy fix depending on the light situation in your home. Make sure your place them somewhere where they will receive several hours of bright but indirect sunshine and this should restore health pretty quickly.

One way to know if your Schefflera is losing leaves due to a lack of sunlight is whether you can see it reaching for the light. If your Schefflera looks as though it’s trying to grow towards the window, then this indicates that it might need more sunlight.

When looking for the perfect new spot for your Schefflera, make sure that it won’t be receiving too many hours of direct sunshine. In summer, when the sun is not only strong but also out for a larger proportion of the day, such intense light can dry out your Schefflera. This is why you want to find a spot with plenty of bright but indirect light.

Overwatering might be why your Schefflera is losing leaves

Schefflera are fairly hardy plants and won’t die if you overwater them once in a while. However, consistent overwatering will mean they start losing their leaves and their roots will start to rot. Schefflera need to be watered no more than twice a week in the hottest months of the year, and less frequently in autumn and winter.

Overwatering can very quickly lead to root rot which is very harmful to your plant. It will cause the plant to become unstable, causing it to lose leaves as well as turn brown, yellow and droopy. If you think that you may have overwatered your Schefflera it is best to replace the soil straight away rather than just sit and wait for it to dry up over time as you risk your Schefflera starting to die.

Make sure to check the moisture in the soil before you water your plant. This will go a long way to preventing root rot and stop your Schefflera from losing any more leaves. There are two really easy ways to make sure that it definitely needs water. First check the moisture at the top of the soil, if it is still damp then wait a few days before watering again. You can also lift up your Schefflera to check the weight of the plant before and after watering. You will then start to be able to gauge how heavy the soil is when it is in need of water. However, if your Schefflera is quite mature, then you might want to use a moisture meter instead of lifting your plant to avoid damaging your back or hurting yourself in some way. Moisture meters are great little affordable devices that will help you know when your Schefflera needs water.

We recommend propagating some of your Schefflera so that you can at least save some of the healthy parts of your plant and nurture them into mature plants.

If your Schefflera is losing leaves it can indicate drainage issues

Sometimes it may not be your watering schedule that is why your Schefflera is losing leaves, but the poor draining of the soil and pot. You can very easily increase the amount of drainage in your Schefflera by mixing in a small amount of perlite, this will make it far easier for water to flow through and out of the drainage holes of your pots (you should also check to make sure your pots have drainage holes). Another easy step is to add a few small stones or pebbles to the bottom of your pots, this helps in making sure that the drainage holes are never blocked by soil or any loose debris.

Although clay or terracotta pots can be a little bit more expensive or breakable, their upsides are much more than just the aesthetic and they can really help prevent your Schefflera from losing any more leaves. The clay they’re made of is permeable which means that some of the water in your soil can evaporate through the sides of the pot. This isn’t the case for the plastic pots that most use, which instead hold in every single drop of moisture.

This means that if you accidentally overwater your Schefflera a couple of times, there is nowhere for that excess moisture to go. Instead, it will sit in the pot, rotting the roots. So sometimes it is worth investing a little more to make sure that the roots of your Schefflera are not sitting in too much moisture, causing your plant to continue losing leaves. Terracotta pots look great too, so there’s really no downside.

Temperature issues might also be causing your Schefflera to lose leaves

Another reason why your Schefflera may be losing its leaves is due to inconsistent temperatures. If your plant is getting too much sunlight, it may cause it to overheat which can cause shock and leaf drop. This often happens if your plant is directly by a south-facing window (in the northern hemisphere) so be careful that it is not receiving too much direct sunshine.

If you’re not already, make sure to open your windows every now and then to make sure that the air in your room is circulating properly. This reduces the risk of hotspots forming in the room where your Schefflera is growing. The ideal temperature is between 18°C – 24°C, so it shouldn’t be too difficult to keep in a good range.

Just as warm air can be harmful to your plant, cold drafts can also damage its health, particularly in winter. Make sure your Schefflera isn’t placed next to a particularly drafty window or door. Whilst this won’t kill your Schefflera in one night but over time a constant stream of cold air can be quite damaging to your Schefflera.

But it’s not just cold drafts from outside that you need to worry about as your Schefflera might be losing leaves in summer due to proximity to air conditioning units or vents. Whilst the cool air might be refreshing for you, it can be quite damaging to your houseplants. Not only can it cause your Schefflera to go into shock and cause the plant to freeze in extreme cases, but it also means that the potting mix will take longer to dry out, increasing the risk of root rot.

You can always pick up a digital thermometer to check the temperature to stop your Schefflera from losing any more leaves.

Natural ageing can cause your Schefflera to lose leaves

As your Schefflera matures, it may occasionally lose a lower leaf as a natural sign of ageing. This is absolutely nothing to worry about but make sure that you keep track of how many leaves have dropped and how often this is occurring. If you feel your Schefflera is losing too many leaves, double-check the environment around your Schefflera as it could be a sign of one of the issues detailed above.

There is no harm in giving the soil and roots a once-over to check for signs of root rot and keep an eye on any changes in light or temperature that may be affecting its health.

It’s important to monitor the rate at which your Schefflera is losing leaves and compare that to the rate at which it is growing new healthy ones. If it begins to lose more leaves than it is producing, then this is a sign that something isn’t quite right.

If your Schefflera is losing leaves due to natural shedding, then you’ll also notice that the ones that are falling from your plant are usually the lowest, smallest leaves. If your Schefflera is losing some of its newer and larger leaves, then this indicates a more serious issue.

Those are the most common reasons why Schefflera plants begin losing their leaves. It can be quite a serious issue if your plant is losing more leaves than it is growing as at some point it will die. This is why it’s important to act quickly to ensure that you’re able to diagnose and start fixing the issue. Moving forward, keep a close eye on your Schefflera as this will help you spot any issues early, giving you the best chance at getting your plant back to full health.

To learn more about how to keep your plant thriving, check out our Schefflera care guide.

Fiddle and Thorn is a participant in the Amazon Services LLC Associates Program, an affiliate advertising program designed to provide a means for sites to earn advertising fees by advertising and linking to Amazon.com

Take our houseplant survey!

Quickly respond to our 30 second houseplant survey and get 75% off our Complete Houseplant Care eBook!

Take the Survey

No thanks…

Why is my Schefflera dying? Causes and Solutions

Last Updated: May 27, 2022

Known for their unique umbrella-like leaves, Schefflera are becoming more and more popular in the houseplant world. They tend to be easy to take care of and don’t require much space in your home compared to some other houseplants. However, you might find that your Schefflera is starting to show worrying signs such as loss of leaves, brown or yellowing leaves, lack of growth of drooping leaves. There are a few reasons why your Schefflera may be dying, the most common of which are; overwatering, underwatering, transplant shock, a sudden change in environment or pest infestation.

Overwatering can cause your Schefflera to die

Schefflera are pretty hardy plants and won’t die suddenly if you overwater them once in a while. However, consistent overwatering will mean they start to lose their leaves and their roots will start to rot. Schefflera need to be watered no more than twice a week in the hottest months of the year, and less frequently in autumn and winter.

Consistent overwatering will lead to root rot which is very harmful to your Schefflera and might be why it’s dying. It will cause the plant to become unstable, the individual leaves will droop and eventually fall off completely as your Schefflera will not be able to get nutrients from the soil to maintain healthy leaves or new growth.

If you think that you may have overwatered your Schefflera it is best to replace the soil straight away rather than just sit and wait for it to dry up over time. Be careful when removing the soil from the roots as you don’t want to cause any further damage.

Make sure to check the moisture in the soil before you water your Schefflera. There are two really easy ways to make sure that it definitely needs water. First check the moisture at the top of the soil, if it is still damp then wait a few days before watering again. You can also lift up your Schefflera to check the weight of the plant before and after watering. You will then start to be able to gauge how heavy the soil is when it is in need of water. Handle your Schefflera gently when picking it up to prevent any leaves from breaking away from the main stem.

Drainage issues might be why your Schefflera is dying

Sometimes it may not be your watering schedule that is causing your Schefflera to lose its leaves, but the poor draining of the soil and pot. You can very easily increase the amount of drainage in your Schefflera by mixing in a small amount of perlite, this will make it far easier for water to flow through and out of the drainage holes of your pots (you should also check to make sure your pots have drainage holes). Another easy step is to add a few small stones or pebbles to bottom of your pots, this helps in making sure that the drainage holes are never blocked by soil or any loose debris.

Although clay or terracotta pots can be a little bit more expensive or breakable, their upsides are much more than just the aesthetic. The clay they’re made of is permeable which means that some of the water in your soil can evaporate through the sides of the pot. This isn’t the case for the plastic pots that most use, which instead hold in all of that moisture. So sometimes it is worth investing a little more to make sure that the roots of your Schefflera are not sitting in too much moisture.

A dying Schefflera can indicate underwatering

Like overwatering, too little water can also be harmful to your Schefflera. Although it won’t die on you suddenly if you forget to water it every once in a while, or make it go a little longer without water whilst you are on holiday, consistent underwatering will start to have an impact on your Schefflera’s health. If you notice that you Schefflera is losing some of its lower leaves, it may be due to underwatering, as it prioritises new healthy growth over its older leaves.

Stick a finger in the top few centimetres of the soil to check the moisture. You can also try lifting your Schefflera as we mentioned earlier to see it if feels particularly light. If you find that your Schefflera feels very dry, water it a little every other day for a week. Your first instinct might be to give it loads of water straight away but this can actually be harmful to your Schefflera if the soil goes from one extreme to the other. Instead, you want to reintroduce frequent watering for a week or two and this should solve the problem.

Not enough light might be causing your Schefflera to die

Schefflera plants like bright, indirect light and if they spend too long in a shady spot, they may start to drop some of their lower leaves. Make sure you place them somewhere they receive several hours of bright light. They shouldn’t be directly next to a window, as direct light will cause other issues for your Schefflera, so it is about finding the right balance.

You might also need to think about moving your Schefflera around depending on the seasons. In the winter months, when the sun isn’t as strong (and out for less of the day) it might be necessary to move your plant a little closer to the window to make use of the limited sunlight as best as possible.

It may also be transplant shock

Just like humans, Schefflera plants can get a little stressed out when they move home. In their case moving home is moving to a new, bigger pot. Signs such as drooping or falling leaves after repotting are totally normal. It may take a few days for the signs to appear but in the right environment, with the right care, it should only take a few weeks for your Schefflera to get used to the new pot and get back to normal. Keep an eye on your Schefflera after repotting to make sure that the signs do not continue for too long.

A change in environment could be why your Schefflera is dying

Your Schefflera may also show signs of stress if it has been moved to a new spot in your home. A sudden change in light conditions or temperature causes your Schefflera to go into shock. If your plant is still receiving enough light, and the temperature change is not too extreme, then it should settle into its new home nicely after a few weeks. If you have moved home, the bumps it may have encountered in the process might have also caused a few leaves to drop but it shouldn’t be anything to worry about long term.

A dying Schefflera can also indicate pests

A slightly less common reason why your Schefflera may be dying is a pest infestation. It can happen that pests such as mealybugs, spider mites and scale insects take hold of your Schefflera.

If you find pests on your Schefflera we recommend giving the whole plant a shower. Keep the shower pressure quite low so as to avoid any damage to the delicate stems. Alternatively, wash down each leaf with soapy warm water and replace all of the soil to get rid of the pests. You should also treat your rubber plant with an organic insecticide to fight the infestation.

Make sure to check over your other plants in the room to see if any other plants have pests. Keep your Schefflera (and other infected plants) a good distance away from any of your other houseplants as you don’t want the pests to spread.

Reviving your dying Schefflera shouldn’t be too difficult if you have caught the warning signs early. Make sure to take immediate action once you have diagnosed the problem. If you are struggling to figure out what is causing your Schefflera to die, swapping out the soil and regulating your watering schedule is a good place to start. In the meantime, you might also choose to propagate parts of your Schefflera to grow new plants from the healthy sections of your plant.

Fiddle and Thorn is a participant in the Amazon Services LLC Associates Program, an affiliate advertising program designed to provide a means for sites to earn advertising fees by advertising and linking to Amazon.com

Take our houseplant survey!

Quickly respond to our 30 second houseplant survey and get 75% off our Complete Houseplant Care eBook!

Take the Survey

No thanks…