How to Propagate a Lucky Bamboo Plant

Last Updated: April 29, 2022

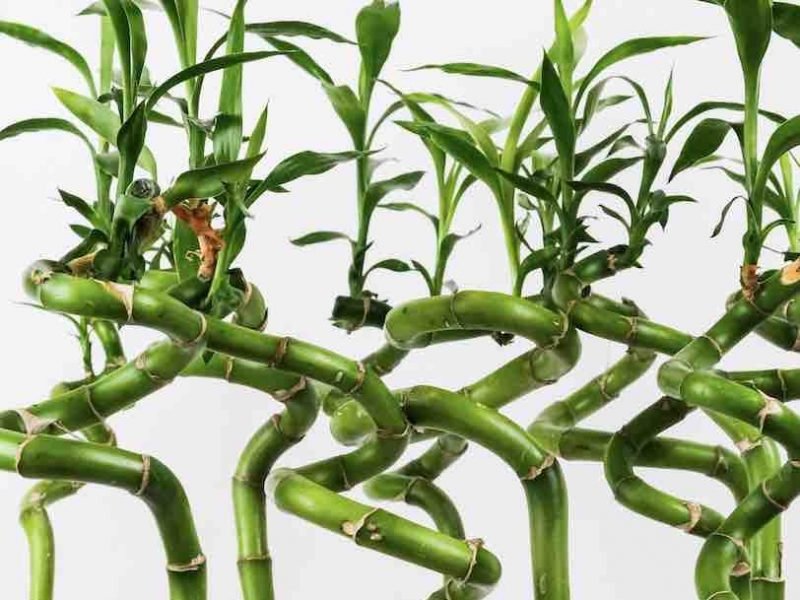
Lucky Bamboo plants are one of the most unique houseplants due to their ability to grow in just water! When shaped properly, their curling stems add that little something extra to their charm and we totally understand why plant parents across the world propagate these each spring. Lucky Bamboo propagation may feel a little daunting at first but if you have a strong and healthy mother plant it can be a really simple process.

In this post we will guide you through the complete Lucky Bamboo propagation process; the various methods you can use, the dos and don’ts and some other useful tips to help you along the way

Benefits of Lucky Bamboo Propagation

There are several reasons why you might choose or need to propagate your Lucky Bamboo. Firstly, they don’t always grow how we want them to! They sometimes grow sideways, too leggy or tall. Propagating can help to keep your Lucky Bamboo in the right shape for your space.

The other benefit of propagating a Lucky Bamboo plant is that you can expand your collection of houseplants for free. They can also make great gifts if you already have too many plants.

But other than the more fun reasons to propagate your Lucky Bamboo, it might also be the only option you have to save your plant if it is dying. Although we never like this option, sometimes it’s the only way to keep at least some of the plant alive.

Lucky Bamboo Propagation Methods

There is one main method of Lucky Bamboo propagation that is successful and that is removing offshoots which you can grow in either water or soil. Below you will find a step by step guide to this method of Lucky Bamboo propagation.

How to propagate a Lucky Bamboo through stem cuttings/ offshoots


Step 1: Locate your stem cutting

When taking a Lucky Bamboo stem cutting you want to make sure that the part of the plant you are cutting is healthy to give you the best chance at success. You want to remove an offshoot of the main stalk to grow as a new plant.

Step 2: Make the cut

This is the scary part! Now that you have located the section of the stem that you want to use, you need to cut it off! Use clean scissors/ shears or a knife to make the cut as close to the mother stalk as you can. Use your tools to make a clean diagonal cut across your plant as this increases the surface area of the cutting for roots to grow out of.

Step 3: Fill up a glass with water

Next, you want to prepare a container with water to place your cutting into. You can also grow your offshoot cutting straight in potting mix, but we recommend water to begin with to help the growth of new roots. Lucky Bamboo plants can be a little sensitive to hard water, so if you can use filtered water or rainwater then go for it!

Step 4: Place your Lucky Bamboo cutting in water

Put your propagation glass in bright but indirect sunlight. Intense light will damage the Lucky Bamboo cutting and might mean your propagation isn’t successful.

Step 5: Refresh the water every few days

This keeps the water free from bacteria and stops it from stagnating which damages the delicate cutting.

Step 6: Now you wait!

Other than refreshing the water in the propagation station, there is nothing left to do but keep an eye on your cutting. Don’t worry if you don’t see anything happening for a few weeks as this process can take a while and be quite unpredictable.

Step 7: Plant your Lucky Bamboo cuttings into potting mix

Once the roots on your Lucky Bamboo cutting have started to grow, you can decide if you want to move the cutting over to potting mix. This is optional though as the great thing about Lucky Bamboo plants is that they can grow in water forever.

Lucky Bamboo Propagation FAQs


What time of year should I propagate my Lucky Bamboo plant?

Ideally, you want to propagate at the beginning of spring for the best chance at a successful propagation. This is because when taking offshoot cuttings, they need to grow new roots from scratch, so warm sunny weather will help aid this.

If you try to propagate your Lucky Bamboo in autumn or winter will mean that your Lucky Bamboo cuttings will be trying to grow at a time when the plant is usually dormant. So you won’t really see much happening at all and the risk of the cutting rotting is a lot higher.


Do I need to use a rooting gel or powder when propagating a Lucky Bamboo plant?

Whilst you can still have plenty of success without it, you can definitely use rooting gel to speed up the propagation process a little. This will help the roots grow quicker and stronger. You want to be careful with it though as too much rooting hormone can have adverse effects.

Should I fertilise my Lucky Bamboo cutting?

Fertiliser is one less thing you have to worry about as we strongly recommend staying away from it when propagating Lucky Bamboo plants. It can damage the cuttings as they will be quite delicate and sensitive to too much fertiliser can cause various issues such as yellow leaves and small growth so hold off the feed for a while.

Common problems with Propagating Lucky Bamboo


Help! My Lucky Bamboo cutting isn’t growing roots…

This process is very unpredictable and it can take many weeks and sometimes even months for roots to appear. Make sure you are changing out the water regularly and keeping your cutting(s) in a nice warm environment and you should start to see new roots growing eventually.


Why is my Lucky Bamboo cutting turning mushy?

If your Lucky Bamboo cutting is turning brown and is soft to touch, then unfortunately this suggests that it has started to rot. This can happen for two reasons, either too much of the cutting was submerged in the water or the water has stagnated. Make sure that only one third of the cutting is in water and that you refresh it every few days.


Why is my Lucky Bamboo cutting turning yellow?

If the leaves on your new cutting are starting to develop yellow patches, it may have received too much direct sunlight or the cutting has started to rot as we have mentioned above.

Check out our full Lucky Bamboo Care Guide for more information on how to look after your cuttings after propagation.

Fiddle and Thorn is a participant in the Amazon Services LLC Associates Program, an affiliate advertising program designed to provide a means for sites to earn advertising fees by advertising and linking to Amazon.com

Take our houseplant survey!

Quickly respond to our 30 second houseplant survey and get 75% off our Complete Houseplant Care eBook!

Take the Survey

No thanks…

How to propagate a Hoya Carnosa plant | Step by Step Methods

Last Updated: May 31, 2022

Also known as Wax Plants, Hoya Carnosa is a super low-maintenance houseplant that can also reward you with incredible blooms if cared for properly. If you’re looking to propagate your plant then you have come to the right place.

There are several methods you can use; from stem and leaf cuttings to the division of the mother plant. Some of the methods are easier than others, and can also depend on the maturity of your plant. But don’t fret, we will go through each of the methods below to help you choose which is right for you. You’ll also find a list of tools you’ll need as well as how to diagnose and fix any issues you find along the way.

Why propagate a Hoya Carnosa?

It’s a great way to expand your urban jungle without having to spend any more! They also make great gifts for friends and family if you don’t have any more space for plants.

Another reason you might want to take cuttings from your Hoya Carnosa is to reshape your plant. During the dark winter months, growth can become quite leggy and uneven. Pruning your plant can help encourage bushier growth and also help your plant fit into the space better if it’s gotten a bit long. But instead of throwing away those perfect stem cuttings, use them and create new plants!

You might also propagate your plant out of necessity if it’s starting to die. We always recommend trying to diagnose and fix the issue before it takes over the whole plant but if things aren’t looking any better, you might want to use the healthy stems to create a new plant.

If this is the case, you want to be 100% sure that the part of the plant you are using is healthy as any issues will just continue and take over your new cutting.

Propagating a Hoya Carnosa can be easy!

Hoya Carnosa Plant

What tools will I need to propagate my Hoya Carnosa?


  • Healthy and mature Hoya Carnosa

  • Sharp scissors/shears

  • Spare pot(s)

  • Fresh soil and water

  • Newspaper or plastic sheet if you’re propagating indoors

What are the different methods I can use to propagate my Hoya Carnosa?

The great thing about Hoya Carnosa plants is that there are quite a few ways you can choose to propagate them. The main 4 methods are; stem cuttings, leaf cuttings, layering and division.

Leaf cuttings can be quite tricky to grow so we recommend this for more experienced plant parents or those that are after a challenge! We have found a lot of success with the stem cutting, layering and division methods, all producing strong roots and a new healthy plant!

Note that the layering method is totally different to the air layering method, but more on that later!

We will go over each different method in detail below so you can figure out which is the best for you and your plant!

There are four methods of propagation you can choose from

Hoya Carnosa

How to propagate a Hoya Carnosa using stem cuttings

This is the main method as it’s suitable for all maturities and lengths of plants and has the highest success rate.


  1. Locate a healthy stem

    When taking a stem cutting you want to make sure that the part you are cutting is healthy to give you any chance of success. Avoid any sign of disease or pests as they will be transferred onto your new cuttings and very quickly take over your cutting.

    Ideally, you also want to locate a stem that has several healthy nodes and leaves. A node is the joint in the stem where the root would grow out from (you will feel a slight bump running a finger down the stem).

  2. Make the cut

    Using sharp scissors or a knife make the cut across the stem cutting. Make sure your tools are clean as you don’t want to pass on any direct, bacteria or pests to the wound in your cutting. Make sure your stem cutting has at least one node as this will ensure it roots.

    We recommend using cuttings with 2-3 nodes as the maturity will help with new root and leaf growth. Avoid using a cutting with any more than 3 nodes as it will require a lot of energy to keep it alive.

  3. Fill up your container with water

    Next, you want to fill up a glass with fresh temperate water to place your cuttings into. Avoid hot or cold water as this can very quickly shock or burn your cutting which can often kill your cutting.

    If you can, try to use purified water so the levels of chlorine and fluoride aren’t as high as in the water straight out of the tap.

    A great way to do this naturally is to leave the water out for 24 hours to allow the chemicals to evaporate. You can also use filtered water or collected rainwater to avoid this sensitivity.

  4. Place your cuttings in water

    Make sure that the nodes on your Hoya Carnosa stem cutting are sat in the water so that the roots will start to grow out from them.

    Make sure that the leaves aren’t sat in the water as they will very quickly start to rot, releasing bad bacteria into the water. Place your glass in bright but indirect sunlight to avoid leaf burn.

  5. Change out the water regularly

    One of the most important steps in this process is to switch out the water in your glass regularly (every 2-3 days).

    This keeps the water free from bacteria and stops it from stagnating which is harmful to your cutting. Stagnant water will also start to smell our your home so you really want to avoid this.

  6. Be patient

    Luckily Hoya Carnosa plants aren’t the slowest growers so you should see some new root growth after only a few weeks.

    It can be a little unpredictable though so just make sure your cuttings are getting enough light, warmth and fresh water and you should start to see roots soon.

  7. Plant your cuttings into fresh potting mix

    Once the roots on your cutting are between 5-10 centimeters long, it’s time to pot them into soil! We recommend using a high-quality potting mix to make sure your cuttings are getting enough nutrients.

    Carefully place your cuttings a few centimetres into the soil, making sure not to damage the newly formed roots as they can be quite delicate at this stage.

  8. Resume usual Hoya Carnosa care

    For the first few weeks of your cuttings living in potting mix, we recommend keeping the soil a little more moist than usual as the cuttings are used to living directly in water.

    But after a few weeks, you can go back to usual care and soon your new cuttings will be long enough to propagate again…and the cycle continues!

How to propagate a Hoya Carnosa using leaf cuttings

This is the trickiest method as the success rate isn’t that high even if you follow all the right steps. Propagating leaves is always quite unpredictable but you can get it to work sometimes and the reward is great!


  1. Locate a healthy leaf

    When taking a leaf cutting you want to make sure that the part of the plant you are cutting is healthy to give you any chance of success. Avoid any sign of disease or pests as they will be transferred onto your new cuttings.

    You can try to use leaves that have naturally fallen off but you will have more success cutting leaves from the plant as chances are they will be healthier.

  2. Make the cut

    Use your clean scissors to cut off one or several leaves. Make sure your tools are clean to avoid passing on any bad bacteria to your cutting. To increase your chances of success we recommend using more than 2 or 3 leaves.

  3. Place your cuttings in potting mix

    Get a spare pot and fill it with fresh high-quality potting mix. Place the bottom of the leaf into the potting mix so that about one-third of the leaf is covered. This will help stabilise the leaf and encourage the roots to grow.

  4. Place in a sealable clear plastic bag

    Once you have pot your cuttings in fresh soil, you want to create a little greenhouse with a plastic bag to make the environment warm and humid. Keep the bag a little open to get some air circulation.

    The humidity that will build up in the bag means you won’t have to water your leaves very much at all.

  5. Occasionally water your leaves

    Due to the humidity in the bag, you only really need to water your leaves a tiny amount roughly once a week.

    Keep an eye on the soil moisture levels to see if you need to increase or decrease this at all as every home is different and temperature, humidity and sunlight will impact how often you need to water.

  6. Be patient

    Now all there is left to do is wait and occasionally add water and check in on your Hoya Carnosa leaf cuttings. It will take several weeks or even months for roots to start to grow.

    The most important thing is that you don’t try and check root growth every few days by pulling the cutting out to inspect it.

    This can damage the cutting and stop any future growth.

  7. Check on your cuttings

    After about 4-5 weeks, if roots are still very small and delicate then maybe grow in the ‘greenhouse’ for a few more weeks. If roots are quite established then you can start to grow the cutting outside of the plastic bag.

  8. Enjoy your new plants

    It will take a while for you to see anything happening above the surface but as long as the leaves still look healthy this is a good sign that your propagation has been a success.

    You’ll soon start to see some new leaves growing out from your cutting and before you know it you’ll have a new Hoya Carnosa!

    Continue to care for it as you would the mother plant.

Hoya Carnosa Propagation

A Hoya Carnosa plant

How to propagate a Hoya Carnosa plant through layering

The first thing to note with this method is that it’s completely different to the air layering method. That requires cuts and peat moss and is a lot more difficult than the layering method.


  1. Locate a long healthy stem

    You want to make sure that you choose a nice healthy stem for this method as you’ll be growing roots whilst it’s still attached to the mother plant. Avoid this method if your mother plant is showing signs of distress or disease as it will impact the health of the stem cutting.

  2. Fill a spare pot with fresh soil

    Make sure to use a high-quality potting mix so that your cutting gets the right balance of nutrients. You also want to make sure you never ever re-use potting mix when propagating or repotting plants.

    There can be a lot of unwanted pests and bacteria hiding in potting mix and reusing it will simply transfer this across your beloved houseplants. Whilst there is still of course a risk when using even fresh soil, the dangers are much lower.

  3. Place a node on the potting mix

    Place the spare pot next to your mother plant and dig in one of the healthy nodes off your chosen stem into the plant.

    You don’t want to cover the leaves or even the stem fully, but you want to ensure the node on the stem is making contact with the potting mix.

  4. Water your node

    You want to keep some moisture in the top of the potting mix at all times. Not enough to rot the stem but a little bit of moisture to encourage roots to grow.

  5. Be patient

    As with the other methods, this bit can be a little boring as you’ll have to wait several weeks before anything happens.

    Try to refrain from constantly checking root growth as disturbing and stem and pulling it away from the potting mix will slow down and disturb root growth.

  6. Make the cut

    Once your stem has successfully rooted itself into the new pot, it’s time to separate it from the mother plant. Make a cut using sharp scissors on the side closest to the mother plant.

    You will then have a nicely rooted stem cutting which is now a healthy and happy Hoya Carnosa plant.

  7. Continue normal care

    Enjoy your new plant and continue to care for it as you would your mother plant!

How to propagate a Hoya Carnosa through division

This method only really works if your plant is quite mature and you don’t mind taking a chunk from it to form a new plant. The way it works is by dividing the natural sections of the plant and is a great way to get a new plant without having to wait months and months like in the other methods.


  1. Take your Hoya Carnosa out of its pot

    In order to propagate through division, you need to be able to locate the various vines and separate out the roots. Take your plant out of its pot carefully, trying not to damage the leaves or root system.

  2. Locate the various natural divisions

    Shake off the potting mix around the roots so you can see the entire root system clearly. A good way to loosen the soil is to run your fingers through the roots to start to separate them. Don’t worry if a few break or fall out, this is normal and won’t cause much damage to your plant.

    The best way to locate the different segments is by following each individual vine and loosening the roots around it. They should be completely separate from each other.

  3. Separate your plant

    At this stage you need to choose how many plants you want to end up with and how many sections will be in each plant. There’s no right or wrong way to do this ?

  4. Place each section in fresh potting mix

    Pop your mother plant back into its original pot (or downsize to a new pot if you’ve removed a lot from the plant). Then pot your new plant(s) into fresh potting mix.

  5. Continue normal care

    You’re all done! Now all that’s left is to continue your usual Hoya Carnosa care routine and watch them grow.

Hoya Carnosa Propagation FAQs

The process can be a little scary as you don’t want to cut off pieces from your beloved and healthy mother plant and risk them dying on you. But don’t worry, we have all of the answers below to make sure that it all goes off without a hitch.

Common problems when propagating a Hoya Carnosa plant

Propagating plants won’t always be smooth sailing and there’s a chance you might encounter a few issues along the way. But luckily we have been through the process many times so are able to explain all of the main issues you might spot as well as how to fix them.

We recommend keeping an eye on your cuttings daily to help spot problems early as this will help you solve the problem before it takes over your cutting and kills it.

Everyones process will be a little different as some cuttings take longer to root in and sometimes it just doesn’t work. But as long as you are equipped with the right method, care, environment and tools you should have a pretty good shot at growing new plants. The end result is worth all the struggles so be patient!

Check out our full Hoya Carnosa care guide to find all the information on how to continue to care for your cuttings once they have matured.

Fiddle and Thorn is a participant in the Amazon Services LLC Associates Program, an affiliate advertising program designed to provide a means for sites to earn advertising fees by advertising and linking to Amazon.com

Take our houseplant survey!

Quickly respond to our 30 second houseplant survey and get 75% off our Complete Houseplant Care eBook!

Take the Survey

No thanks…

How to propagate a Fishbone Cactus | Step by Step Methods

Last Updated: May 27, 2022

Loved for their incredibly unique leaves, Fishbone Cacti are not only super easy to care for, but are also a perfect plant to propagate. No matter how young, old, big or small your plant is, you’ll be able to create more it pretty easily.

In this post, we will go through each of the methods to help you choose which is right for you and your plant. You’ll also find a list of tools you’ll need as well as how to diagnose and fix any issues you might come across along the way.

Why propagate a Fishbone Cactus?

Before we get into the different methods, we thought it’s important to start with the various reasons why you might actually want and need to propagate your plant. Firstly, who can say no to free plants? It’s a great way to extend your urban jungle without having to spend any more. And if you don’t have any more space for plants, Fishbone Cactus cuttings make great gifts for friends and family.

During the dark winter months, growth can become quite leggy and uneven. Pruning your plant can help encourage bushier growth and also help your Cactus fit into the space better if it’s grown a bit long. Instead of throwing away those great cuttings, you’ve taken as you prune your plant, why not use them and create new plants!

You might also propagate your Fishbone Cactus out of necessity if your plant sadly starts to develop brown, yellow, mushy or dry leaves. We would always recommend you look to diagnose the issue and attempt to fix it but if things don’t start to improve you might need to cut off a healthy part of the plant to keep it alive. When doing this you need to make sure that the part you are using is still completely healthy. Any issues with the cutting won’t go away and can very quickly kill your cutting.

You can propagate a Fishbone Cactus in many ways

Fishbone Cactus

What tools will I need to propagate my Fishbone Cactus?

Let’s start off with the easy part – knowing exactly what you’ll need when. It’s important to make sure you have all the right things before you take that first cut!

  • Healthy and mature Fishbone Cactus

  • Sharp scissors/shears

  • Spare pot(s)

  • Fresh soil and water

  • Newspaper or plastic sheet if you’re propagating indoors

What are the different methods I can use?

There are two main methods that you can use and luckily they are both quite simple. You can either propagate through leaf cuttings or through the division of the mother plant. Division tends to be best if you have quite a mature plant with lots of offshoots and stems so if your Fishbone Cactus is still quite small then leaf cuttings might be the best option for you.

We will go over each different method in detail below so you can figure out which is the best for you and your plant!

Fishbone Cacti can be propagated through leaf cuttings

Fishbone Cactus leaf

How to propagate a Fishbone Cactus using leaf cuttings

This is the main method as it’s suitable for all maturities and lengths of plant. Luckily, it’s also really easy and has quite a high success rate if the steps are followed.

Another great thing about the leaf cuttings method is that you can create several new Fishbone Cacti plants in one go! In the steps below we will assume you are just using one leaf but the process doesn’t change at all if you choose to do more.

  1. Locate a healthy leaf

    When taking a leaf cutting you want to make sure that the part you are cutting is healthy to give you any chance of success. Avoid any sign of disease or pests as they will be transferred onto your new cuttings and very quickly take over your new plant. Leaf cuttings are much more susceptible to disease and sensitive to bacteria so this part is key.

  2. Make the cut

    Using sharp scissors or a knife make the cut across the leaf. Make sure your tools are clean as you don’t want to pass on any direct, bacteria or pests to the wound in your cutting.

    We recommend cutting diagonally across the leaf to increase the surface area for root growth. Cutting diagonally does also slightly increase the chances of bacteria getting into the cutting but the risks are low and the positives outweigh that risk in this case.

  3. Let the cutting callous over

    Leave your leaf cutting out in a warm but dry place for a few days. This will ensure the cutting wound callouses over and will help prevent any bacteria getting into the actual leaf when you place it in water.

  4. Fill up your container with water

    Next, you want to fill up a container with fresh temperate water to place your leaf into. Make sure you don’t use hot or cold water as this can very quickly kill your cutting by burning or shocking it. We also like to use a clear glass to pop our cuttings into. It means you can keep an eye on how the roots are growing and spot any issues quickly.

    When placing your leaf into the water, make sure that the bottom 5 centimetres are submerged but not too much more as this will increase the risk of leaf rot.

  5. Change out the water regularly

    One of the most important steps in the process is to switch out the water in your glass regularly (every 2-3 days). This keeps the water free from bacteria and stops it from stagnating which is harmful to your cutting. Stagnant water will also start to smell so you’ll really want to avoid this.

  6. Be patient

    This is the part of the process where things can get a little boring. It can take several weeks until you see any new root growth so just make sure you continue to regularly change out the water during this time.

  7. Plant your cuttings into fresh potting mix

    Once the roots on your Fishbone Cactus leaf cutting are between 5-10 centimetres long, it’s time to pot them into soil! We recommend using a high-quality potting mix to make sure your cuttings are getting enough nutrients. Carefully place your cuttings a few centimetres into the soil, making sure not to damage the newly formed roots as they can be quite delicate at this stage.

    We recommend using a high-quality succulent potting mix as this will help with drainage and aeration in the soil. Overwatering and root rot is a common plant killer so it’s important your potting mix contains ingredients such as perlite to help avoid this.

  8. Resume usual care

    For the first few weeks of your cuttings living in potting mix, we recommend keeping the soil a little more moist than usual as the cuttings are used to living directly in water. Gradually reduce the amount you are watering and after two to three weeks go back to your usual Fishbone Cactus care. Soon enough, with enough love and the right environment, your cuttings will soon be long enough to propagate all over again.

Fishbone Cactus Leaves

A Fishbone Cactus plant

How to propagate a Fishbone Cactus through division

This method only really works if your plant is quite bushy and you don’t mind taking a chunk from it to form a new plant or two. This method is also perfect for those who don’t want to wait weeks and weeks for any new growth. With the process of division, you get more plants instantly!

  1. Take your plant out of its pot

    In order to propagate your plant through division, you need to be able to locate the various vines and separate out the roots. Take your plant out of its pot carefully, trying not to damage the beautiful leaves.

  2. Locate the various natural divisions

    Shake off the potting mix around the roots so you can see the entire root system clearly. Don’t worry too much if a few roots break, this is inevitable and shouldn’t cause too much harm to your plant.

    When looking for a part of the plant to divide it will become very obvious that there are various different offshoots and stems on your Fishbone Cactus. The best way to locate them is by following each individual leaf and loosening the roots around it. There should be several sections of your plant that are completely separate from each other.

  3. Separate your plant

    At this stage, you need to choose how many plants you want to end up with and how many sections will be in each plant. There’s no right or wrong way to do this and it depends entirely on how big and bushy your Fishbone Cactus is.

  4. Place each section in fresh potting mix

    Pop your mother plant back into its original pot (or downsize to a new pot if you’ve removed a lot from the plant). Then pot your new Fishbone Cactus into fresh potting mix. You want to make sure you are using a well-draining potting mix as this will help avoid problems such as overwatering.

  5. Continue normal plant care

    You’re all done! Now all that’s left is to continue your usual plant care routine and watch them grow.

Leaf cuttings on a Fishbone Cactus

Leaf of a Fishbone Cactus plant

Fishbone Cactus Propagation FAQs

Propagating your plant can be a little scary as you have to actually take chunks of the gorgeous zig-zag leaves. However, don’t worry at all as we have the answers to all of your questions to make sure that you come away with new healthy and happy houseplants.

Propagating your Fishbone Cactus is easy!

Fishbone Cactus plant

Common problems when propagating a Fishbone Cactus

Although Fishbone Cacti are one of the simpler houseplants to propagate, it doesn’t mean that it won’t come with some issues along the way.

Check out our full Fishbone Cactus care guide to find all the information on how to continue to care for your cuttings once they have matured.

Fiddle and Thorn is a participant in the Amazon Services LLC Associates Program, an affiliate advertising program designed to provide a means for sites to earn advertising fees by advertising and linking to Amazon.com

Take our houseplant survey!

Quickly respond to our 30 second houseplant survey and get 75% off our Complete Houseplant Care eBook!

Take the Survey

No thanks…

How to propagate a Fiddle Leaf Fig Tree | Step by Step Methods

Last Updated: May 17, 2022

Fiddle Leaf Fig Trees are one of our favourite houseplants out there so we have always been super interested in figuring out the best way to propagate them and create more plants for free! They just bring that special something to your home, becoming the focal point in every room.

It doesn’t have to be a difficult process if you know exactly what to do. So we hope this post will guide you through the whole process, from tools needed to a step by step method as well as how to solve any issues you might face.

Why propagate your Fiddle Leaf Fig Tree in the first place?

The main reason tends to be people wanting to multiply the number of plants without actually having to buy any more. Because at the end of the day, who can say no to free plants?! Small cuttings also make great gifts for friends, especially as fully grown plants are pretty expensive and can be a little tricky to get your hands on. You might also look to sell some of your cuttings and make some extra cash!

Another reason might be because your plant is becoming too big for the room. If you want to trim back your plant to fit the space, or just want to cut off some leggy growth, instead of throwing away the cuttings, why not use them to create new plants.

And lastly, you may want to propagate your Fiddle Leaf Fig Tree if part of your plant is damaged, or dying. If you have tried to save your plant by adjusting the environment or care and still nothing works then we recommend taking a cutting and use that to create a new plant. The most important thing when doing this is to choose a healthy section of your plant as this will give your cutting the best chance of success.

What tools will I need to propagate my Fiddle Leaf Fig Tree?

Let’s start off with the easy part. It’s important to make sure you have all the right things before taking that first cutting!


  • Healthy and mature Fiddle Leaf Fig Tree

  • Sharp scissors/shears

  • Spare pot(s)

  • Fresh soil and water

  • Newspaper or plastic sheet

  • Toothpick, plastic wrap and sphagnum moss (if you are using the air layering method)

What methods can I use?

There are three main methods; stem cuttings, division and layering. Stem cuttings and division are definitely the more common methods used and the ones we would recommend if you are fairly new to propagating houseplants. Below you will find a step by step guide to each method.

A lot of people ask if you can propagate from a single leaf and we usually say no. The problem with single leaves is that whilst they can grow roots, they will never actually develop any branches or more leaves. This is because you need part of the stem to grow buds from. Occasionally, leaf cuttings do contain a very small section of the stem which can over time grow a bud but this is quite rare and takes a lot of time.

How to propagate a Fiddle Leaf Fig Tree from stem cuttings


  1. Locate your stem cutting

    When taking a stem cutting you want to make sure that the part of the plant you are cutting is healthy to give you any chance of success. You also need to make sure this section of your Fiddle Leaf Fig Tree has at least one node. This is a stem joint and where the roots would appear out of. Ideally, we would recommend using a cutting with 2 or 3 leaves (and their nodes) on. Choosing a cutting that is slightly more mature will help speed up the process but a cutting with any more than 3 leaves will require a lot of energy to grow and maintain good health.

  2. Make the cut

    You want to use clean scissors/ shears or a knife to make the cut to avoid passing on dirt or any infection to the plant. Use your tools to make a clean cut across your plant in a diagonal way. This increase the surface area of the cutting and will help with healthy root growth.

    You will notice that when you cut the stem that white sap will come out from the cutting. This is totally normal to the Fig plant family. Make sure you don’t ingest it or get it in your eyes as it will cause irritation. If you happen to get it on your skin, it shouldn’t cause too many issues but be wary it can cause some irritation for those with sensitive skin.

  3. Choose how you want to grow your cutting

    You can choose to grow your Fiddle Leaf Fig Tree directly in potting mix, or place it in water for a few weeks before repotting. Both work and are successful methods of propagating. Some plant parents don’t use the water method as they can be slightly more sensitive to overwatering compared to some other plants but we have always used the water method and have seen great results. Choosing to grow your cutting in water also allows better visibility on the stem and roots so you can spot any signs of illness or root rot quickly. If you are using potting mix skip straight to step 8.

  4. Take off any lower leaves

    If you choose the water method you will want to remove any of the leaves lower part of the cutting that may end up sitting in the water. They will rot if they are sat in water for a long period of time so best to cut them off now. Each cutting is different so there may not be any leaves that need removing, other times you may have to cut one or two – it’s completely dependent on the length of the stem.

  5. Fill up your container with fresh water

    Next, you want to fill up a container with fresh temperate water to place your Fiddle Leaf Fig Tree cutting into. Make sure the water isn’t super cold or hot as this will shock or burn your cutting and decreases the chances of a successful propagation. It’s best to use purified water so the levels of chlorine and fluoride aren’t as high as in the water straight out of the tap. A great way to do this naturally is to leave the water out for 24 hours to allow the chemicals to evaporate. You can also use filtered water or collected rainwater for your cutting.

    We always tend to use transparent glass container as it means you can not only marvel at the new roots growing on your cuttings, but it means you can spot any issues early on.

  6. Place your cutting in water

    Make sure that at least one of the nodes on the stem cutting is sat in the water to encourage roots to grow out from it. Place your container in bright but indirect sunlight. Intense light will damage the leaves on your cutting.

  7. Change the water regularly

    It’s really important that you keep the water in your propagation station fresh. We recommend switching it out every couple of days to keep it free from bacteria and stop the water from stagnating and smelling. After a few weeks, you should start to see some roots growing from your cutting. Once they are a few centimetres long, your Fiddle Leaf Fig Tree is ready to be pot into soil.

  8. Plant your cuttings into potting mix

    Make sure when you pot your cutting that you use a high-quality potting mix to aid with drainage and aeration. You should also make sure the mix is fresh and not from any of your old plants as this is an easy way to accidentally carry bacteria and pests between your beloved plants. Newly formed cuttings are much more sensitive to disease and pests so you want to be as careful as possible.

How to propagate a Fiddle Leaf Fig Tree by division

You can only use this method if your plant has several offshoots growing off the same mother plant. If your plant is only one offshoot then you must use the stem cutting or layering methods.


  1. Locate the various offshoots

    When looking for a part of the plant to divide it will become very obvious if there are various offshoots on your Fiddle Leaf Fig Tree. They will be completely separate and growth will grow from each individual stem popping out from the soil.

  2. Take the plant out of the pot

    Once you have located the various sections of the plant you will need to take your plant out of the pot so you can divide the root system. Carefully lift the plant out and shake off the potting mix around the roots. A good way to loosen the soil is to run your fingers through the roots to start to separate them. Luckily, they are pretty sturdy plants and their stems don’t damage as easily as many other plants so you don’t have to be super delicate when handling them.

  3. Separate the sections

    You may have to trim off the odd root if they aren’t detangling easily but you should be able to carefully pull the sections apart from each other. It’s ok if you have to slice around the plant a little to separate them but just make sure that each part of the plant has a substantial amount of the root system to aid a successful propagation.

  4. Place in water or fresh potting mix

    Pot the main mother plant back into its original pot (or downsize if you have taken a large chunk from the plant) and decide whether you want to place the offshoot in water first or straight into potting mix. This depends on the size of the cutting and the maturity of the root system. If the offshoot has quite mature roots then it will be totally fine growing in potting mix already. However, if you feel the roots need to grow a little more then we recommend placing them into water as a middle step.

  5. Continue normal care

    If your cutting is now in fresh potting mix then you can care for it as you would your other Fiddle Leaf Fig Tree. If it is in water first you want to refresh that water every couple of days and repot into potting mix once the roots have matured a little.

How to propagate a Fiddle Leaf Fig Tree through air layering

Air layering is a slightly less common method as it can sometimes be a little tricky but the idea is that your Fiddle Leaf Fig Tree cutting will grow roots whilst still attached to the mother plant. We tend to only recommend this method to more experienced plant parents who are fully confident with the other methods first.


  1. Locate a healthy stem

    When choosing the air layering method you want to make sure you are using a healthy and strong part of the stem. Avoid any part of the plant that is yellow, brown or showing signs of pests/sunburn etc. This will impact how successful your propagation is so choosing the right part of the stem is key to this method.

  2. Make a vertical incision into the stem

    Using a clean knife make a vertical cut into the stem that is a couple of inches long. You want it to go about halfway through the stem but not the whole way through. When making the cut it’s important you don’t slice all the way through to the other side of the stem.

  3. Open up the incision

    We recommend inserting a toothpick into the centre of the incision to hold it open. This can be a little fiddly as you don’t want to poke through the stem.

  4. Attach damp sphagnum moss to the side of the incision

    You want to tie the sphagnum moss around the stem with the cutting in making sure it stays damp but not soggy at all times. Use brown string, plant ties or garden wire to secure the peat moss to the stem of your Fiddle.

  5. Wrap up the sphagnum moss

    You want to wrap a piece of plastic wrap around the moss and stem. Wrap it firmly around the stem but still leaving some air pockets around the sphagnum moss.

  6. Once you see a new root you can cut off the stem

    After several weeks you should start to see new roots growing out of the moss. Once you see this you can slice the cutting off your Fiddle Leaf Fig Tree, remove the film and pot the cutting into fresh potting mix. Handle your new cutting with care as the fresh roots will be delicate and are easily damaged.

Fiddle Leaf Fig Tree Propagation FAQs

Common problems when propagating a Fiddle Leaf Fig Tree

Propagation won’t always be successful and you may run into several issues along the way if something isn’t quite right. But monitoring your new cutting will help you spot any problems early and you should be able to fix it.

We hope you have found this guide useful. Each and every time you propagate your plants you’ll find the process slightly different. There’s no exact timeline of when to expect root growth as it depends on so many factors. But as long as you are caring for your cutting properly and it’s in the right environment, there shouldn’t be too many major issues. Soon enough, you’ll have a whole new Tree to enjoy!

Check out our full Fiddle Leaf Fig Tree Care Guide that has all the information and top tips to help you care for your plant. We also have a lot of common issues listed so if you ever have a problem with your plant, you’ll know straight away what’s causing it and how to fix it.

Fiddle and Thorn is a participant in the Amazon Services LLC Associates Program, an affiliate advertising program designed to provide a means for sites to earn advertising fees by advertising and linking to Amazon.com

Take our houseplant survey!

Quickly respond to our 30 second houseplant survey and get 75% off our Complete Houseplant Care eBook!

Take the Survey

No thanks…

How to propagate a Dumb Cane plant

Last Updated: May 27, 2022

Dumb Cane plants, also often known by their Latin name Dieffenbachia, are really easy to propagate. However, it can be a little dangerous as their toxic sap can cause a whole range of issues and allergic reactions in humans and animals. So before starting the process, be sure that you are taking all the right precautions.

In this post we will guide you through the complete process; the various ways you can multiply your plant, the dos and don’ts, what tools you’ll need as well issues to look out for.

What tools you will need to propagate a Dumb Cane plant?

Let’s start off with the easy part. It’s important to make sure you have all the right tools before starting the process.


  • Healthy and mature Dumb Cane plant

  • Thick gardening gloves and protective clothing as Dumb Cane plants are very toxic to humans and pets

  • Sharp scissors/shears

  • Spare pot

  • Fresh soil and water

  • Newspaper or plastic sheet

  • Toothpick, plastic wrap and peat moss (if you are using the air layering method)

What methods can I use to propagate my Dumb Cane plant?

There are three main methods you can use; stem cuttings (in either water or potting mix), air layering and division. Stem cuttings and division are definitely the easier methods and the ones we would recommend to relatively new plant parents.

But if you like a challenge or have done it before, the air layering method is a great option.

Below you will find a step by step guide to each method.

How to propagate a Dumb Cane plant through stem cuttings


  1. Locate your stem cutting

    When taking a stem cutting you want to make sure that the part of the plant you are cutting is healthy to give you any chance of success. You also need to make sure this section of your Dumb Cane has one or more nodes. Nodes are joints where the stem and leaves meet.

    Ideally, you want to have 2-3 nodes on your stem cutting as the maturity will help with root growth.

    However, if your cutting has more than 3 nodes, it will require a lot of energy to keep it alive, let alone grow new roots.

  2. Make the stem cutting

    This is the scary part! Now that you have located the section of the stem that you want to use, you need to cut it off.

    Use your scissors/ shears or a knife to make the cut diagonally across the stem. A diagonal cut increases the surface area which will help root development.

    You also want to make sure that the tools you’re using are clean as you don’t want to be passing on any dirt or bacteria to your cutting.

  3. Choose how you want to grow your cuttings

    At this point, you have a choice whether you want to grow your stem cutting in water or if you want to grow it straight into potting mix.

    Both can be successful but we tend to go with growing in water for several weeks so you can keep an eye on root growth. Potting straight into soil can hide problems with the root system and watering routines can be trickier.

    If you are choosing to go straight to potting mix, then you can skip to step 9 in this process.

  4. Take off any lower leaves

    As you will be placing your cutting in water for several weeks you want to carefully remove any leaves on the lower part of the cutting that may end up sitting in the water. They will rot if they are sat in water for a long period of time so best to cut them off now.

    This step won’t apply to each and every cutting so only remove the leaves if they will end up sitting in the water.

  5. Fill up your container with water

    The next step is to fill up a container with fresh temperature water ready to place your cutting into. Make sure that the water isn’t super hot or cold as this can very quickly shock your cutting and cause it to wilt, burn or freeze.

    We also tend to use transparent containers so that we can see the root growth happening. Not only is it pretty cool to watch, but it’ll mean you can spot any issues early, giving you the best chance at reviving your cutting if anything does go wrong.

  6. Place your Dumb Cane cutting in the water

    Make sure that at least one node on your cutting is fully submerged in the water as this is where the roots will grow out from.

    Place your cutting in bright but indirect sunlight. Intense light will damage and burn your new cutting and will often mean your propagation won’t be a success.

  7. Change out the water regularly

    When propagating plants in water, the most important thing to be doing is keeping that water fresh. We recommend replacing it every couple of days to stop bacteria from growing.

    If the water stagnates it can be quite harmful for your cutting and it’ll also start to smell which will be unpleasant for you too!

  8. Be patient

    Now that you’ve gotten into the routine of switching out the water regularly, all you need to do is wait for roots to grow!

    Don’t worry if this process takes several weeks or months as that is totally normal! Root growth is unpredictable and there’s no set timeline so as long as your cutting is healthy and it’s in the right environment, you should start to see new roots soon.

    Once the roots on your Dumb Cane cutting reach about 5-10 centimetres it’s time to move on to the next step.

  9. Plant your cuttings into potting mix

    Now it’s time to pot your cuttings in fresh posing soil. Make sure you never reuse potting mix as it can accidentally transfer pests or diseases onto your plant.

    We also recommend using a high-quality potting mix to make sure your new plant gets the right nutrient balance.

    Once your cutting is in its new home, continue your usual Dumb Cane care routine.

How to propagate a Dumb Cane plant through division

You can only use this method if your Dumb Cane has several stems growing in the same pot. If your plant is less mature and has only one offshoot, then you must use either the stem cutting or air layering methods.


  1. Locate the various offshoots

    When looking for a part of the plant to divide it will become very obvious if there are various offshoots/stems. They will be completely separate and leaves will grow out from each of the stems. They will also grow completely separately out of the soil.

  2. Take your plant out of the pot

    In order to separate out the different sections of your Dumb Cane plant, you’ll need to take it out of the pot.

    Remember to wear protective gloves and clothing to avoid coming into contact with any of the poisonous sap.

    Shake off the potting mix around the roots so you can see the natural divisions within your plant.

  3. Separate the sections

    You may have to trim off the odd root if they aren’t detangling easily but you should be able to carefully pull the sections apart from each other.

    It’s ok if you have to slice around the plant a little to separate them but just make sure that each part of the plant has a substantial amount of the root system.

  4. Place in water or fresh potting mix

    Pot the main Dumb Cane plant back into its pot (or downsize if you have taken a lot away from the plant) and decide whether you want to place the new plant in water first or straight into potting mix. This depends on the size of the division and the maturity of its root system. If the divided section has quite mature roots then it will be fine growing in potting mix straight away.

    Make sure you use a fresh, high-quality potting mix so your new plant gets all the nutrients it needs.

  5. Continue normal care

    Now that your new Dumb Cane plant is happily in its new home with plenty of fresh potting mix, your propagation is complete!

How to propagate a Dumb Cane plant through air layering

This method can be a little trickier and fiddlier but if you’re after a challenge and aren’t super fussed if it turns out to be unsuccessful, we really recommend giving this method a go.


  1. Locate a healthy stem

    When choosing the air layering method you want to make sure you are using a healthy, mature and strong part of the stem.

    Avoid any part of the plant that is yellow, brown or showing signs of pests/sunburn etc.

  2. Make a vertical incision into the stem

    Using a clean knife make a vertical cut into the stem of your Dumb Cane that is a couple of inches long (this is why you need to choose one of the strongest and most mature stems).

    Make sure you only go about halfway through the stem, it’s important you don’t slice all the way through to the other side.

  3. Open up the incision

    We recommend inserting a toothpick into the centre of the incision to hold it open. This can be a little fiddly as you don’t want to poke all the way through the stem.

    The toothpick will keep the incision open and this is where the new root growth will start.

  4. Attach damp peat moss to the side of the incision

    You want to tie a lump of peat moss around the stem covering the incision. Make sure the peat moss stays damp but not soggy at all times. The best way to do this is by misting the top and bottom. Use brown string, plant ties or garden wire to secure the peat moss to the stem.

  5. Wrap up the peat moss

    You want to wrap a piece of plastic wrap around the peat moss and stem. Wrap it firmly around the stem but still leaving some air pockets around the peat moss. This will help it breathe and allow you to mist it occasionally to keep it a little damp.

  6. Once you see a new root you can cut off the stem

    After several weeks you should start to see new roots growing out of the peat moss.

    Once you see this you can slice the cutting off your Dumb Cane plant, remove the film and pot the cutting into fresh potting mix.

    Handle your new cutting with care as the fresh roots will be delicate and easily damaged.

Dumb Cane Propagation FAQs

Common problems when propagating Dumb Cane plants

If you keep an eye on your cuttings and plants, you’ll be able to spot the warning signs early and with a little bit of our help, you should be able to revive your cutting.

There is a lot of waiting on roots which can feel like forever but with the right care and the ideal environment, you shouldn’t have too many problems.

Check out our full Dumb Cane Care Guide that has all the information on how to continue care for your cutting once it has matured.

Fiddle and Thorn is a participant in the Amazon Services LLC Associates Program, an affiliate advertising program designed to provide a means for sites to earn advertising fees by advertising and linking to Amazon.com

Take our houseplant survey!

Quickly respond to our 30 second houseplant survey and get 75% off our Complete Houseplant Care eBook!

Take the Survey

No thanks…

How to propagate a Dragon Tree (Dracaena)

Last Updated: April 23, 2023

Dragon Tree (Dracaena) ready to be propagated

Dragon Trees, also often known by their Latin name Dracaena, are a really easy plant to propagate! You don’t really need a mature plant to propagate it as it’s all done with either top or stem cuttings. They grow fairly quickly in spring and summer so you won’t be waiting around for new growth for long. They are also a great plant for propagation beginners as there aren’t many steps and the success rate is quite high.

In this post we’ll guide you through the whole propagation process; the various ways you can propagate, top tips and things to avoid, what tools you’ll need and things to look out for to ensure a successful propagation.

Why propagate a Dragon Tree?

Firstly, they don’t always grow how we want them to – they can sometimes grow sideways, too leggy and can also become very tall. Propagating can help to keep your plant the right size for the space.

Another reason you may choose to propagate your Dragon Tree is if you notice any problems developing on part of the plant. Overwatering, sunburn etc can impact the health of your plant. If your efforts to revive your plant have been unsuccessful then you may choose to propagate the part of the plant that’s still healthy. It’s a great way to keep at least some of the plant alive.

And lastly, our favourite reason is to get free plants! Propagating is a great way to multiply the amount of greenery in your home without actually having to spend any more money on plants. Cuttings also make great gifts for friends and family if you already have too many houseplants so the reasons you might want to propagate one are almost endless…

What tools you will need?


  • Healthy and mature Dragon Tree

  • Sharp scissors/shears

  • Spare pot

  • Fresh soil and water

  • Newspaper or plastic sheet

What methods can I use to propagate my Dragon Tree?

There are only two ways you can propagate a Dragon Tree: through top cuttings or stem cuttings. It may seem quite daunting to cut the top of your plant off but this is the only real way you can propagate your plant.

The main difference between the two methods is how many cuttings you produce. Tip cuttings will give you only one new plant, whereas larger stem cuttings can give you multiple new plants. Below you will find a step by step guide to each method.


How to propagate a Dragon Tree through top plant cuttings


  1. Locate the various offshoots

    Dragon Trees have various stems coming off one central stem. Each of these offshoots can be cut off to produce top cuttings. You want to choose a mature stem offshoot that is healthy and not displaying any signs of illness or unhappiness (yellow leaves near the top of the stem, brown leaves or dots on the leaves). Propagating a part of the plant which shows signs of illness will harm your chances of a successful propagation.

  2. Make the cut

    This is the scary part! Now that you have located the section of the stem, you need to cut it off! You want to cut off a section of the stem that has about 5-8 leaves on it. This will ensure the cutting is mature enough to grow roots but too many leaves will mean it needs a lot of energy to keep it alive which increases the chance of issues occurring.

    Use clean scissors/ shears or a knife to make the cut to avoid passing on dirt or any infection to the plant. Use your tools to make a clean cut across your plant in a diagonal way. This increases the surface area of the cutting and will increase root growth.

  3. Take off a few lower leaves

    As you will be placing your cutting in water for several weeks you want to carefully remove a couple of the lower leaves that may end up sitting in the water. They will rot if they are sat in water for a long period of time so best to cut them off now. If your cutting only has a few leaves then skip this step and make sure the water level isn’t super high.

  4. Fill up your container with water

    Next, you want to fill up a glass with fresh temperate water to place your cutting into. Make sure the water isn’t super cold or hot as this will shock or burn the cutting which will often cause it to wilt and die. It is best to use purified water so the levels of chlorine and fluoride aren’t as high as in the water straight out of the tap.

    Dragon Trees aren’t always super sensitive to this compared to other houseplants but if you can use filtered water or rainwater then it’ll help prevent the yellowing of leaves.

  5. Place your cutting in water

    Place your glass in bright but indirect sunlight. Intense light can damage your cutting and might mean your propagation isn’t successful.

  6. Change out the water regularly

    Switching the water every few days will prevent it from stagnating and will keep it free from bacteria that can harm your cutting. Stagnant water will also start to smell pretty bad so definitely something you want to avoid.

  7. Be patient

    This is the point where the propagation process can get a little boring. There is nothing left to do other than change out the water and wait for roots to grow from the bottom of your cutting. Don’t worry if this process takes several weeks or months as that is totally normal!

    During this time you should start to see new growth from your mother plant. A new bud will form out of the stem where you made the cut and normal growth should resume fairly quickly.

  8. Plant your cutting into potting mix

    Once the roots on your Dragon Tree cutting have matured well and are several centimetres in length then it’s time to pot into fresh soil. You want to always use a high-quality potting mix to help with drainage and aeration and make sure that your plant gets all the right nutrients. Carefully place your cutting into the mix making sure not to damage the delicate newly formed roots and continue regular care.

Stem cutting of a Dragon Tree

How to propagate a Dragon Tree through stem cuttings

The stem cutting method uses all the same steps as in the top cutting method so we won’t repeat them all again but it’s worth noting the one difference. In the stem cutting method, you take a much larger cutting and then cut it into several sections. You want each section to have several leaves and be about 5-10 centimetres in length.

It’s up to you how many sections you cut off, it depends on the maturity and size of the mother plant as well as how many new plants you want to have.

Apart from this, propagating through stem cuttings will follow all of the same steps and top tips as just using top cuttings.

Dragon Tree Propagation FAQs

Here’s a few of the most common questions we find people have when looking to propagate their plants.

Common problems when propagating a Dragon Tree

As with any houseplant, you won’t always have a 100% success rate as there are some things that can go wrong. The wrong environment or care will heavily impact your cutting as they are much more sensitive without a strong root system. We recommend checking in on your cuttings daily as this will help to spot any problems early which will give you the best chance to fix it!

You will have to be a little patient as you wait for the new roots and leaves to grow but as long as the environment is bright and warm and the water is being switched out regularly, you shouldn’t run into many issues.

Check out our full Dragon Tree care guide to find out more about caring for your cuttings once they have matured.

Fiddle and Thorn is a participant in the Amazon Services LLC Associates Program, an affiliate advertising program designed to provide a means for sites to earn advertising fees by advertising and linking to Amazon.com

Take our houseplant survey!

Quickly respond to our 30 second houseplant survey and get 75% off our Complete Houseplant Care eBook!

Take the Survey

No thanks…

How to Propagate a Devil’s Ivy | Step by Step Methods

Last Updated: March 4, 2023

With their long trailing vines and heart-shaped leaves, it’s no wonder that plant parents fall deeply in love with their Devil’s Ivy plant and desperately want to continue making more. Luckily, propagating them is incredibly simple and with the right processes and care, you shouldn’t run into too many problems at all. Before you know it, you’ll have so many plants you won’t know what to do with them all.

In this post, we will guide you through the entire process of how to propagate your plant so that you’re fully equipped with the knowledge you need to create infinite new plants. We will be covering the tools and equipment you’ll need as well as a detailed step by step process for each of the different methods as well as how to spot and solve any issues you might face.

Why propagate a Devil’s Ivy plant?

Before we get into the details, we thought it would be useful to cover the reasons why plant parents choose to or have to, propagate their plant. The main reason is probably just wanting to multiply the number of plants you have without having to shell out any more money on houseplants! Plants and plant cuttings make great gifts for friends which is why we always make sure to take a few cuttings from each of our new plants.

The other reason why many plant parents choose to propagate their plant is that it’s either too long or becoming very leggy. Pruning your plant encourages bushier growth and is a great way to cut back that winter growth which can often be straggly or leggy. But instead of simply throwing away those special cuttings, why not propagate them and start a whole new mother plant.

If you notice that your plant is starting to look a little ill, then you may choose to propagate the healthy part of the plant to save it. We always recommend that you first try to figure out what’s causing the issue and see if you can fix it (it’ll also help prevent you from doing the same to your new plants). But if the issue is just getting worse, then the best thing to do is cut off the healthy vines and use those to grow new plants.

What tools will I need?

Let’s start off with the easy bit. It’s really important to make sure you have all the things you need before taking that first plant cutting.


  • Healthy and mature Devil’s Ivy plant

  • Clean, sharp scissors/shears

  • Spare pot(s) with drainage holes

  • Fresh soil and water

  • Newspaper or plastic sheet if propagating indoors

What are the different methods I can use to propagate a Devil’s Ivy plant?

The most common method of propagation is through stem cuttings. As long as you have a few nodes on each of the cuttings, this is a really successful way to create new plants.

The other method of Devil’s Ivy propagation is through layering. Note that this technique is different to air layering, and is much simpler as it means rooting your vines whilst still attached to the mother plant. Below you’ll find a detailed step by step process of each method so you can figure out what’s best for you and your plant.

How to propagate a Devil’s Ivy plant using stem cuttings

This is the most common method as it’s suitable for all maturities. So however big, small, bushy or leggy your plant is, this method can work for you! It’s also really easy and you can create several new plants just by taking a short stem cutting.


  1. Locate a healthy vine

    When taking a stem cutting you want to make sure that the part of the Devil’s Ivy plant you’re going to propagate is healthy to give you the best chance of success. Avoid using vines that are showing any signs of disease or pests as these problems will be transferred onto your new cuttings.

    Ideally, each stem cutting will have several healthy nodes and leaves. A node is the joint in the stem where the root would grow out from (you will feel a slight bump running a finger down the stem). If you can, try to choose a section of the plant that already has a small aerial root stub as this means root growth will be quicker.

  2. Make the cut

    Use your tools to make a clean cut across the stem of your chosen vine, leaving at least two to three nodes per section. It can work with just one node but it’ll take a lot longer for the cutting to grow a mature root system and there is a higher risk of the cutting dying.

    Top tip: Make sure your scissors/ shears are clean when making the cut to avoid passing on dirt or any infection into the cutting(s).

  3. Fill up a container with water

    Next, fill up a container with fresh temperate water to place your cuttings into. Avoid using particularly warm or cold water as this can very easily shock or burn your cutting. We like to use a transparent container when propagating a Devil’s Ivy as it not only allows you to see the cool new roots that grow out of your plant, but it’ll help you spot any issues early!

  4. Place your cutting(s) in water

    Make sure that the nodes on your stem cutting are sat directly in the water so that the roots will start to grow out from them. Place your cuttings in bright but indirect sunlight (too much direct sunlight during spring and summer can burn your cuttings and kill them).

  5. Refresh the water every few days

    One of the most important steps when propagating Devil’s Ivy plants is to refresh the water in the container regularly (every 2-3 days). This keeps the water free from bacteria.

  6. Now just be patient!

    Compared to a lot of other houseplants, Devil’s Ivy plants are fairly quick at growing roots and after a week or two, you should start to see them popping through the nodes. Don’t worry if this process takes a little longer though as it is unpredictable. As long as your cuttings are getting enough light, warmth and fresh water, you should start to see roots appearing very soon.

  7. Plant your cuttings into fresh potting mix

    Once the roots on your cutting are about 5-10 centimetres in length, you can pot them into soil! You want to use a high-quality potting mix to ensure your cuttings are getting the right balance of nutrients to encourage new healthy growth. Carefully place your cuttings a few centimetres into the soil, making sure not to damage the new roots.

  8. Resume your usual Devil’s Ivy care routine

    For the first few weeks of your cuttings living in potting mix, we recommend keeping the soil a little more moist than usual as the cuttings are used to living in water. But after a couple of weeks, you can begin to care for your new plants as you would the mother plant.

Devil’s Ivy propagation through stem cuttings in water.

Propagating a Devil's Ivy plant

How to propagate a Devil’s Ivy plant through the layering method

It’s important to know that this method is completely different to the air layering method. That one requires cutting into the stem and using a wrap of peat moss. It’s a lot more complex than the layering method.


  1. Locate a healthy Devil’s Ivy vine

    You want to make sure that you choose a healthy stem for this method as any issues will harm your chances of a successful propagation. You aren’t removing the vine from the mother plant so you can’t use this method to save a dying plant, unfortunately.

  2. Fill a pot with fresh potting mix

    Using a high-quality potting mix, fill up one of your spare pots so that the soil nearly reaches the top. Flatten it gently but don’t compress the soil.

  3. Place the stem on top of the potting mix

    Carefully place your Devil’s Ivy cutting on top of the pot. Depending on the size of the pot, you can either lay it straight across or in a zig-zag pattern. This depends on how many nodes you want touching the soil. Press in each of the nodes very slightly into the potting mix. Make sure that the stem and leaves aren’t covered by the soil but that the nodes are making contact with it.

  4. Water the nodes

    You want to keep some moisture in the top of the potting mix at all times. Not enough to rot the stem but a little bit of moisture to encourage roots to grow from your Devil’s Ivy vine. The best way to do this is by using a spray bottle.

  5. Be patient

    Now the only thing left to do is wait and continue to spray and water your Devil’s Ivy vine. It will be several weeks before anything happens above the soil. Try not to constantly check on the root growth as disturbing the stem and pulling it away from the potting mix will slow down and potentially damage root growth.

  6. Continue normal care

    Soon enough, new leaves will pop up from some of the nodes, forming their own vines. This means your Devil’s Ivy propagation has been a success and you can remove the vine from the mother plant. You can then choose if you want to separate out the sections of the stem or keep it all as one plant.

Use clear containers when propagating a Devil’s Ivy

Propagating a Devil's Ivy plant

FAQs on Devil’s Ivy propagation

Here are a few of the most common questions we find people have when looking to propagate their plants.

Common problems you may encounter when propagating a Devil’s Ivy plant

Even for the most experienced plants parents, propagating houseplants doesn’t always have a 100% success rate and you may encounter some problems along the way. But don’t worry, we have learnt the hard way to make sure you can figure out what is causing various issues along the way.

That’s it! That’s everything you need to know to successfully propagate your plant. It can be a little daunting at first to take cuttings from your incredible vines, but we promise that it’s worth the stress and the waiting.

For more information on how to care for your cuttings once they have been propagated check out our Devil’s Ivy care guide.

Fiddle and Thorn is a participant in the Amazon Services LLC Associates Program, an affiliate advertising program designed to provide a means for sites to earn advertising fees by advertising and linking to Amazon.com

Take our houseplant survey!

Quickly respond to our 30 second houseplant survey and get 75% off our Complete Houseplant Care eBook!

Take the Survey

No thanks…

How to propagate a Croton Plant from cuttings

Last Updated: May 17, 2022

These genetically unstable plants are super unique in the houseplant world as no two will ever really look the same. This is why we are all obsessed with propagating these plants, we are never really sure how they will turn out! The whole process can actually be very simple if you have the right method and tools. It’s worth noting here that their sap is toxic and will cause skin and stomach irritation if you come into contact with it. This is why you should always wear gardening gloves, clean your tools after use and keep any children and pets away from your plant.

In this post, we will guide you through the entire process so that you’re fully equipped with the knowledge you need to create new plants. Below we will cover the tools you’ll need, what method is the best one to use as well as a guide to diagnosing and solving any issues you come across.

Why propagate your Croton Plant?

Before we get into the step by step of each method, we thought it would be useful to go over the various reasons plant parents choose to or are forced to, propagate their plants. The main reason is the ability to just wanting to multiply the number of plants you have without having to shell out any more money! Cuttings make great gifts for friends and family as they are loved for their unique and colourful foliage.

Another reason is that often these plants don’t always grow how we would want them to. They can very quickly become too long or very leggy. Pruning will encourage bushier growth and is a great way to cut back that straggly and small winter growth. But instead of letting them go to waste and throwing away those incredible cuttings, why not start a whole new mother plant!

It can also happen that you notice your plant is starting to look a little ill and is dying. If you’ve tried to fix the issue but nothing seems to work then the best thing to do is cut off the healthy stems to create new Croton Plants.

What tools/ equipment do I need?


  • A healthy and mature Croton Plant

  • Sharp scissors/shears

  • Cleaning cloth

  • Gardening gloves (they are toxic)

  • Spare pot(s) with drainage holes

  • Fresh soil and water

  • Newspaper or plastic sheet if propagating indoors

  • Toothpick and peat moss (if using the air layering method)

What are the different methods I can use to propagate my Croton Plant plant?

Stem cuttings are the most common method. This works best for slightly more mature plants as you’ll be taking a fairly long stem cutting to make sure it’s a success.

The second method is through air layering. It’s a slightly more complex method that isn’t always a success. We recommend this for more experienced plant parents, or those who are looking for a challenge. Below you’ll find a detailed step by step process of each propagation method so you can figure out what’s best for you and your plant.

How to propagate a Croton Plant through the stem cutting method


  1. Locate a healthy stem

    Only ever take stem cuttings from healthy parts of your plant. If you try to use a part of the plant that’s looking a little wilted, yellow or dry, the problem will just get worse once you’ve taken the cutting as they are much more susceptible to disease. You want to choose a stem cutting with at least 5 leaves on it.

    How many stem cuttings you take is totally up to you. It doesn’t impact the process at all but just depends on the maturity of your plant and personal preference.

  2. Make the cut(s)

    This is the scary part and the reason why a lot of plant parents shy away from propagating their Croton Plants! Now that you’ve located the section of the stem that you want to use, you need to cut it off! Use your scissors or shears to cut off the stem. Make sure you clean your tools after making the cut as the sap can cause skin and stomach irritation.

  3. Remove any lower leaves

    As you’ll be growing your cuttings in water for several weeks you want to carefully remove any leaves on the lower part of the cutting that may end up sitting in the water. This is because they will start to rot and release bacteria into the water which can harm your cutting.

  4. Let the cutting callous over

    Now that you’ve taken off the lower leaves, you want to leave your cutting(s) out in a warm but dry place for a day or two. This will allow the cutting to callous over which helps to prevent your cutting from rotting.

  5. Fill up a container with water

    Next, you want to fill up a container with fresh water to place your Croton Plant cutting(s) into. Make sure the water is temperate to avoid shocking or burning your cutting. We prefer to use a transparent container when growing the cuttings. Not only can you see the roots starting to grow, but it’ll also allow you to spot any issues early, giving you the best chance at solving them.

  6. Change out the water frequently

    Make sure you are refreshing the water every other day. This will help keep it free from bacteria and stop it from stagnating. Stagnant water also smells pretty awful so you really want to avoid this.

  7. Now all that’s left to do is be patient

    As long as you are frequently refreshing the water, you just need to wait and be patient. As long as your cutting looks healthy, you’ll see roots in no time at all!

  8. Plant your Croton Plant cuttings into potting mix

    Once the roots on your Croton Plant have grown to about 5 centimetres, it’s time for you to pot in into soil. Use a high-quality potting mix to make sure your plant is getting the right balance of nutrients.

  9. Resume your usual Croton Plant care routine

    You can now continue to care for your new plant as you would the mother plant.

How to propagate a Croton Plant plant through the air layering method

This method can be a little trickier and fiddlier so we only recommend it if you are slightly more experienced! The success rate is also lower than the stem cutting method which is important to keep in mind.


  1. Locate a strong healthy stem

    When propagating through the air layering method you want to make sure you’re using a healthy and strong part of the stem. Avoid using any part of the plant that is discoloured or showing signs of pests/sunburn etc.

  2. Make a vertical incision into the stem of your Croton Plant

    Whilst wearing gardening gloves, use a knife make a vertical cut into the stem that is a couple of centimetres long. You want it to go about halfway through the stem rather than slicing all the way through. Make sure you clean the knife after making the slice as the sap is toxic to humans and pets.

  3. Open up the incision

    Isert a toothpick into the centre of the incision to hold it open. This can be a little fiddly as you don’t want to poke through the stem of your Croton Plant so do this slowly and carefully.

  4. Attach damp peat moss to the stem

    Tie a handful of peat moss around the stem covering up the incision. Use brown string, plant ties or garden wire to secure the peat moss to your Croton Plant stem.

  5. Wrap up the peat moss

    Use a piece of plastic wrap around the peat moss and stem. Wrap it firmly around the stem whilst still leaving some air pockets around the peat moss. This will allow you to occasionally mist the peat moss to keep it a little moist at times.

  6. Occasionally mist your stem

    Every now and again use a spray bottle to moisten the peat moss. This will give some moisture to the stem and encourage roots to grow from the incision.

  7. Once you see a new root you can cut off the stem

    After several weeks you should start to see new roots growing out of the peat moss. Once you see this you can slice the stem off your Croton Plant, remove the film and pot the cutting into fresh potting mix. Handle your new cutting with care as the fresh roots will be delicate and easily damaged.

Croton Plant Propagation FAQs

What’s the best time of year to propagate a Croton Plant?

We recommend starting at the beginning of spring for both the stem cutting and air layering methods take a while for roots to start growing so they’ll need several months of sunny warm weather,

Starting in autumn or winter will mean your Croton Plant cuttings will be trying to grow at a time where the plant is usually dormant. This not only slows down growth but it increases the risk of leaf and root rot.

When should I use a grow light for my cuttings?

Grow lights are really useful when propagating in low light.

Heat mats are also a great buy for propagation lovers as they create a nice warm environment that helps speed up root growth.

Can I propagate a Croton Plant from a single leaf?

Unfortunately, you aren’t able to use a single leaf cutting. Whilst the leaves often will grow their own roots, they’ll never actually turn into a proper plant. This is called a blind cutting. It means that the leaves can survive for a while in water but will eventually wilt and die.

When can I start fertilising my cutting?

It’s important that you stay away from fertiliser until your plant is around 1 year old. Fertilising young cuttings can also shock them and cause various issues such as yellow leaves and small growth so hold off the feed for a while.

Common problems when propagating a Croton Plant

It may happen that you come across some issues but if you catch the problem early, and know how to fix it properly, you should be able to revive your cutting and still propagate it successfully.

Why isn’t my Croton Plant cutting growing any roots?

It can take many weeks and sometimes even months for roots to appear. Make sure you are changing out the water regularly and keeping the plant in a nice warm environment and you should start to see new roots growing eventually.

If you want to speed up and strengthen the root growth you might choose to use rooting hormone.

What’s causing my Croton Plant cutting to turn soft and mushy?

If your cutting is turning soft then this isn’t a good sign as it means your cutting is rotting. This can be caused by stagnant water so make sure you are refreshing it regularly.

So that’s it, that’s everything you could ever know about propagating Croton Plants. It is never an exact science and sometimes you have to just sit back and wait for a while. But with the right care and the ideal environment, you shouldn’t have too many problems along the way. The end result is definitely worth it in the end.

Check out our full Croton Plant Care Guide for all the information on how to continue care for your cuttings once they have matured.

Fiddle and Thorn is a participant in the Amazon Services LLC Associates Program, an affiliate advertising program designed to provide a means for sites to earn advertising fees by advertising and linking to Amazon.com

Take our houseplant survey!

Quickly respond to our 30 second houseplant survey and get 75% off our Complete Houseplant Care eBook!

Take the Survey

No thanks…

How to propagate a Chinese Evergreen

Last Updated: May 29, 2022

Chinese Evergreens (Aglaonema) are one of the most low-maintenance houseplants out there! They adapt to most homes and don’t need a super-specific care routine to keep them happy.

In this post, we will guide you through the whole propagation process, including a step by step of both methods, all the tools and equipment you’ll need as well as a run-through of all the common problems that you might face and how you can fix them.

What tools/equipment do you need to propagate a Chinese Evergreen?


  • A healthy and mature plant

  • Clean, sharp scissors/shears

  • Spare pot(s) (make sure these have drainage holes)

  • Fresh soil and water

  • Newspaper or plastic sheet if you are propagating indoors

  • Rooting hormone (optional)

What methods can you use to propagate a Chinese Evergreen?

There are two main methods of propagation, stem cuttings and division. There are pros and cons to each method so we hope that going through the step by step of each method will help you to decide what’s best for you and your plant. Whilst stem cuttings are more exciting to do and don’t require you to take as much off your mother plant, division is a quick and simple method.

How to propagate a Chinese Evergreen using stem cuttings

This is the most common method of propagation when it comes to Chinese Evergreen plants. This is because it’s suitable for all maturities of plants!


  1. Locate some healthy Chinese Evergreen stems

    When taking a stem cutting it’s important that you are using a healthy part of the plant. If you take a stem cutting that is displaying signs of unhappiness/disease (eg. brown or yellow leaves), it can sometimes hinder your chances at a successful propagation.

    All cuttings must include at least one node. Nodes are stem joints and it’s where the roots will grow out from when you grow the cutting in water.

  2. Make the cut(s)

    Use your clean scissors to cut off one or more stems. You want to make sure that you have at least 2-3 leaves on your cutting as this ensures you have a few good nodes from which roots can grow out from.

    Keeping your tools clean avoids passing on bacteria or pests to your plant and also is important when dealing with toxic plants.

  3. Fill up a transparent container with water

    Now that you have taken your stem cuttings, you need to grow them in something to encourage root growth. You can pot them directly into soil as Chinese Evergreens grow roots pretty quickly but we always recommend water as a middle step as it tends to have a greater success rate.

    Fill up your container with temperate water (avoid using hot/cold water as this will shock your cuttings and can cause them to wilt and die pretty quickly). Place your cuttings in so that the lowest third is covered by the water. If too much of the cutting is submerged in the water, it can increase the risk of the stems rotting.

  4. Place your cuttings in bright but indirect light

    It’s super important your cuttings aren’t exposed to too much intense direct light as it will very quickly burn the cutting. Although they are pretty low maintenance houseplants, cuttings with less mature root systems are more sensitive to their environment and care.

  5. Refresh the water regularly

    One of the most important steps in the Chinese Evergreen propagation process is to refresh the water every 2-3 days. This will help to avoid bacteria building up in the water as stagnant water can be quite harmful for your new cuttings.


  6. Now just be patient

    Root growth can be a little unpredictable though and some cuttings will be a lot faster than others. But the process is definitely a lot quicker than with some other common houseplants, where you can be waiting months for anything to happen.

  7. Plant your Chinese Evergreen cuttings into fresh potting mix

    Once the roots on your Chinese Evergreen cuttings are a few centimetres long it’s time to pot them into soil. Place your cuttings a few centimetres into the soil. You can also pop the cuttings back into the mother plant so it becomes a little fuller – it’s totally up to you!

    It’s important that you use a high-quality potting mix to make sure your cuttings are getting the right mix of nutrients.

  8. Resume usual care

    Now that your cuttings are pot nicely into soil, you can go back to your usual care routine. Before you know it, these cuttings will be mature enough for you to propagate them again and the cycle starts over!

How to propagate a Chinese Evergreen through division of the mother plant

This method of propagation only really works if your plant is quite bushy and mature, otherwise, they can be left looking a little straggly and empty. If you do have a big enough Chinese Evergreen that you don’t mind dividing then this method is great for those who don’t want to wait for new roots and leaves to grow – instead, you get new plants in minutes!


  1. Carefully take your plant out of its pot

    To be able to propagate your plant properly using the division method, you need to separate the different offshoots/stems on your plant. Carefully lift your plant out of its pot. Luckily the leaves and stems are quite robust compared to a lot of other plants so you can tug on them a little if the plant isn’t coming free easily.


  2. Separate out the root system

    You may have to trim off the odd root to detangle the different sections in the plant but you should be able to pull them apart eventually.

  3. Place each new plant in fresh potting mix

    Pop your mother Chinese Evergreen back into its original pot (or downsize slightly if you have taken away a substantial amount of the original plant as this will decrease the risk of root rot).

  4. Continue normal care

    Now that your plants are safely in their new homes, continue with your normal care routine and enjoy your new plants!!! You can find more information on how to care for your plants after propagation below.

Chinese Evergreen propagation FAQs

Common problems when propagating Chinese Evergreens

How to care for your Chinese Evergreen plants after propagation

Hopefully, the main propagation process was a success and you have come away with it with one or more Chinese Evergreen plants. However, plants can be quite sensitive after propagation, even if done through the division method. So for a while, you’ll have to pay special attention to make sure their care and environment are checking off everything they need to properly thrive. For new Chinese Evergreen plants propagated through stem cuttings, this is especially crucial as their root systems will be quite small and particularly sensitive for a while.

The first thing to monitor is the amount of light that your new plants are getting. Whilst Chinese Evergreen plants are quite adaptable to their environment and can survive in a range of light levels, it’s important that your newly propagated plants are getting enough sunlight to aid new root and leaf growth.

As they won’t have as many leaves to take in that sunlight, you want to place them somewhere with bright but indirect light rather than medium or low light levels.

Avoid direct light at all costs as your young plants won’t be able to take it very well and it could dry them out and burn the foliage which is irreversible.

In terms of their watering requirements, you want to prevent their soil from drying out for extended periods of time. However, you don’t want the soil to become too soggy that it is waterlogged as this can rot the roots of your new plants and your propagation efforts may be destroyed. You also want to cut back on watering during winter as the soil won’t dry out as quickly in lower temperatures and this can risk root rot.

The other important environmental factor to consider is temperature. Your new plants will thrive best in warmer environments as this helps to aid new growth. Keep them far away from any drafts, this includes both drafty windows and external doors but can also be caused by air conditioning units in summer so be wary of these. Whilst the cool air might be a nice rest bite from the warmth for you, it can be quite harmful to your plants (and especially young plants).

There are two things that you don’t need to worry about so much when it comes to caring for your Chinese Evergreen plants after propagation and they are humidity and fertiliser. Your newly propagated plants will be fine with the natural humidity level in your home so you don’t need to worry about misting, showering or buying a humidifier for your plant. And when it comes to fertiliser you must stay away for a while. Newly propagated plants can become quite damaged if fertilised too early so wait at least one year after propagating. Only then should you think about feeding your plant and even then it’s a totally optional thing. Chinese Evergreen plants can have plenty of new healthy luscious growth without any fertiliser.

Check out our full Chinese Evergreen Care Guide which has all the information on how to continue care for your cuttings once they have matured.

Fiddle and Thorn is a participant in the Amazon Services LLC Associates Program, an affiliate advertising program designed to provide a means for sites to earn advertising fees by advertising and linking to Amazon.com

Take our houseplant survey!

Quickly respond to our 30 second houseplant survey and get 75% off our Complete Houseplant Care eBook!

Take the Survey

No thanks…

The Complete Guide to Cast Iron Plant Propagation

Last Updated: April 5, 2022

Looking to expand your urban jungle? Well, look no further as we have the complete guide to propagating your Cast Iron Plant, from a detailed step by step method to FAQs and all of our tips and tricks to help you along the way. Although we have never timed ourselves, the entire process should probably only take you about 20 minutes so you’ll have plenty of new Cast Iron Plants in no time at all!

What methods can be used to propagate a Cast Iron Plant?

Unfortunately, there is only really one method to successfully propagate a Cast Iron Plant and that is through division of the mother plant. Whilst it can also be done through the cultivation of seeds, this process is lengthy, difficult and often unsuccessful so it’s not great for non-professionals. The division method, however, is simple and you shouldn’t encounter any problems along the way.

Below you’ll find a detailed step by step method of how to divide your Cast Iron Plant to ensure your propagation is a success!

  1. Firstly you want to remove your plant from its pot

    As Cast Iron Plants are fairly sturdy you want to grip the leaves and pull your plant out of the pot. We don’t recommend doing this for other plants as if they have delicate leaves this can cause them to break easily. If your plant is in a plastic pot then you can squeeze it a little to help it come free.

  2. Remove some of the soil from the root system

    This will help you locate the natural divisions in your plant and allow you to assess how many new plants you can or want to create. Run your fingers through the roots to shake the potting mix off. This is also a good opportunity for you to inspect the root system to make sure there aren’t any problems with root rot or crispy roots.

  3. Untangle the natural sections

    To do this, you might need to slice through a few roots using pruning scissors but that shouldn’t impact your plant’s health. If your Cast Iron Plant only has one section, then slice your plant in half or slice off a smaller section to create two individual plants.

  4. Pot into fresh potting mix

    Get your mother Cast Iron Plant back in its pot (or into a smaller pot if you have removed a large section). Then plant your new plant(s) straight into potting mix.

  5. Continue your normal care habits

    That’s it, your propagation is complete – yes it really is that simple! Just make sure to monitor your new plant closely to make sure everything is going as it should be.

Will it work if I propagate a Cast Iron Plant from a leaf?

Unfortunately, you can’t propagate using just a leaf or stem cutting from your Cast Iron Plant. You need a central section of your plant as this is where the new roots will grow out from.

What time of year is it best to propagate my Cast Iron Plant?

As you are propagating your Cast Iron Plant through division and your new plant will already have an established root system, you can do this at most points throughout the year. Don’t propagate during the coldest months of winter but any time from spring to autumn will be fine

So that’s it, that’s everything you need to know to propagate your Cast Iron Plant. The process itself is pretty simple but the only requirement is quite a mature plant (which can be difficult as these are quite slow growers).

To learn more about how to care for your new plants after propagation, check out our Cast Iron Plant care guide.

Fiddle and Thorn is a participant in the Amazon Services LLC Associates Program, an affiliate advertising program designed to provide a means for sites to earn advertising fees by advertising and linking to Amazon.com

Take our houseplant survey!

Quickly respond to our 30 second houseplant survey and get 75% off our Complete Houseplant Care eBook!

Take the Survey

No thanks…