Moses in the Cradle Plant Care Guide

Last Updated: October 16, 2023

Moses in the Cradle Plant

Moses in the Cradle Plant

Introduction

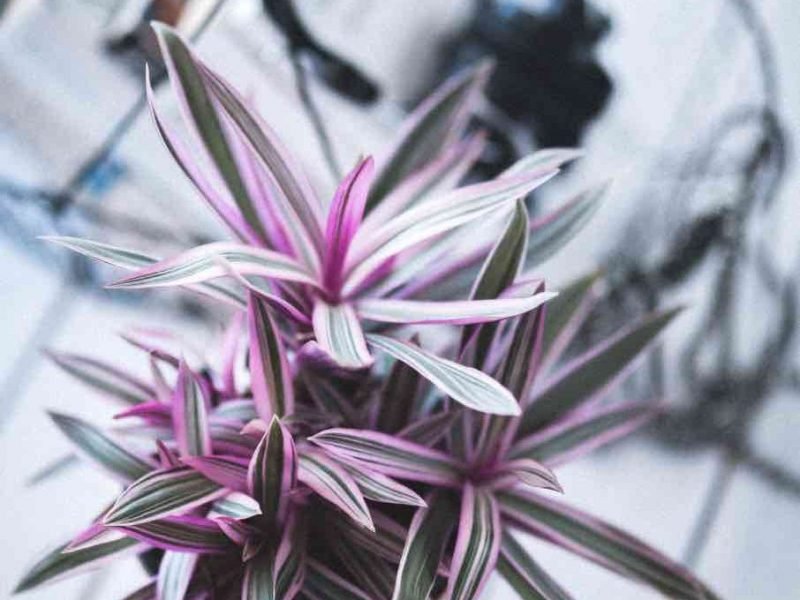
Moses in the Cradle, also known as Rhoeo spathacea, is renowned for its striking purple and green leaves. This tropical beauty is a popular choice for houseplants and gardens alike due to its low-maintenance nature and striking and unique visual appeal.

You’ll be happy to know that the Moses in the Cradle plant is surprisingly easy to care for. It’s tolerant of a variety of conditions and can thrive in a range of light and water levels.

Origin of Moses in the Cradle plant

The Moses in the Cradle plant has a rich history and origin story. Originally known to flourish in the Eastern part of Mexico, this distinctive houseplant is now popular worldwide for its unique aesthetic and relatively easy care requirements.

This plant gets its name – Moses in the Cradle – from the unique shape and appearance of its flowers. Nestled in boat-shaped bracts or modified leaves, the small white flowers resemble a tiny baby Moses in his cradle.

Its origin in Eastern Mexico:

Native to the Eastern part of Mexico, specifically the Yucatan Peninsula, the Moses in the Cradle plant thrives in the region’s warm, humid conditions. In its natural habitat, this plant can commonly be found growing under the shade of larger trees, indicating its preference for indirect sunlight.

Distribution globally:

Today, the Moses in the Cradle plant can be found in subtropical and tropical regions worldwide. It’s particularly popular in the United States, particularly in Florida, Texas, and other southern states and it’s also grown extensively in Australia, Southeast Asia, and the Caribbean.

Characteristics of a Moses in the Cradle plant

Appearance

The Moses in the Cradle plant stands out due to its distinctive, boat-shaped bracts that cradle small white flowers, similar to a baby in a cradle. This characteristic is what gave the plant its common name.

Even without the flowers, this plant is a marvel to behold. The leaves are sword-shaped, with a rich green color on the top and a stunning purple underneath. This contrast gives the plant a vibrant, bi-colored appearance that is sure to capture attention.

Size

Moses in the Cradle plants are compact, typically growing anywhere from 1 to 2 feet tall, making them ideal for indoor cultivation. Despite their short stature, they can spread horizontally if given room.

Growth Habit

This plant grows in clusters, spreading outwards as it matures. The leaves, which grow in a rosette style, are dense, creating a thick cover that can fill any pot or container.

Flowering

The Moses in the Cradle plant flowers periodically, but the bloom is not its main attraction. The flowers, which are small and white, hide within the boat-shaped bracts, so you may not even notice them.

Light requirements for Moses in the Cradle plant

Moses in the Cradle plants thrive best in bright, indirect light as these are the conditions that mimic its natural tropical habitat.

Direct Sunlight

Moses in the Cradle plants can tolerate direct sunlight, but too much of it can cause their leaves to scorch. If you wish to keep your plant in a sunny spot, make sure it is not exposed to intense midday sun during summer. It’s ok to expose your plant to more direct sunlight in winter as the sun is a lot weaker so you don’t risk leaf burn.

Indirect Light

These plants prefer bright, indirect light. A spot near a north or east-facing window where they can receive plenty of light without being directly under the sun’s rays is ideal. Too little light can lead to dull-colored leaves, so ensure your plant gets enough of it.

Tips for Light Management

  • Closely observe your plant’s leaves. If they begin to look scorched or bleached, they’re likely receiving too much direct sunlight. Similarly, if they appear dull and lack vibrancy, they’re not getting enough light.
  • Rotate your plant every few weeks. This ensures all sides receive equal exposure to light, promoting even growth and vibrant coloring throughout.
  • If indoor lighting conditions are poor, consider using a grow light to supplement natural light.

Watering your Moses in the Cradle plant

When it comes to hydrating your Moses in the Cradle plant, it’s important to reach a balance where the soil is allowed to dry out between waterings but not for too long.

Too much water may lead to root rot, while too little can cause your plant to become dehydrated and wilted.

As a general rule, water your plant thoroughly until the water starts running out of the drainage holes. Then, allow the soil to partially dry out before watering again. This ensures that your plant is getting the right amount of moisture without becoming overly soaked.

Overwatering is one of the biggest causes of plant death for any houseplant. Always ensure that your Moses in the Cradle plant is in a pot with adequate drainage to prevent water from pooling at the bottom and causing root rot.

Water Quality

The Moses in the Cradle plant is not overly picky about the type of water it receives. However, using water that is free of chemicals will help your plant thrive. This can be tap water that’s been left out overnight to allow chlorine to evaporate, rainwater, or distilled water.

Moses in the Cradle Humidity and Temperature Needs

If you want your Moses in the Cradle plant to thrive, paying attention to its humidity and temperature requirements is essential but both of these things are quite commonly neglected when caring for plants. These tropical plants prefer a warm and humid environment to mimic their native habitat.

Temperature Needs

Moses in the Cradle plants generally prefer temperatures between 60°F to 85°F (15°C to 29°C). They can tolerate a bit of chill but anything below 50°F (10°C) can damage them. In the cooler months, make sure to move your plant to a warmer spot if necessary as cold air will damage your plant over time. Avoid placing your plant near air conditioning vents or drafts which can lead to leaf damage.

It’s really important to stay on top of temperature changes in your home and the best way to do that is by using a digital thermometer. This will allow you to track fluctuations and react to them before your plant starts to suffer.

Humidity Needs

Moses in the Cradle plants love humidity and you should aim for the humidity level to be at least 50%. If you live in a dry climate or during the winter months when indoor air can become quite dry, consider these methods to increase humidity and avoid issues such as brown leaf tips:

  • Misting: Lightly spray your plant with water every few days. Ensure you’re using a spray bottle that can emit a fine mist to avoid the leaves getting too soggy.
  • Pebble Tray: Place your plant on a tray filled with pebbles and a small amount of water. As the water evaporates, it will create a humid microclimate around your plant.
  • Humidifier: Using a room humidifier can be an effective way to increase the overall humidity in the room for your plant without you having to do anything.

Fertilizing your Moses in the Cradle plant

Fertilizing your Moses in the Cradle plant is an essential part of maintaining its healthy growth and vibrant color. Like all plants, it requires key nutrients to thrive, and regular fertilization can help provide these.

Before you begin fertilizing, make sure you have the right type of fertilizer. A balanced, water-soluble houseplant fertilizer, like a 10-10-10 or 20-20-20 mix, is a good choice for Moses in the Cradle plants. This type of fertilizer contains equal parts of nitrogen, phosphorus, and potassium, which are essential for plant growth.

To apply the fertilizer, follow these steps:

  1. Dilute the fertilizer: Most fertilizers are concentrated and need to be diluted before use. Follow the instructions on the fertilizer package to get the right dilution. We tend to dilute more than recommended on the bottle to avoid overfertilization.
  2. Apply the fertilizer: Pour the diluted fertilizer on the soil around the base of the plant, avoiding the leaves. Too much fertilizer on the leaves can cause them to burn.
  3. Frequency of application: During the growing season, which is typically from spring to early fall, fertilize your Moses in the Cradle plant once every three to four weeks. In the non-growing season, reduce fertilization completely.

Watch out for potential over-fertilization as this can lead to salt buildup in the soil, which can damage the plant. If you notice the leaves turning yellow or brown, or the plant becoming weak, it might be a sign of over-fertilization. In such cases, reduce the frequency or concentration of the fertilizer.

How, When and Why to Repot your plant

Identifying the Need to Repot

Typically, there are a few tell-tale signs that your plant is ready for a slightly larger pot. If you notice any of these, it’s time to consider repotting:

  • Your plant has become top-heavy and falls over easily
  • Roots are growing out of the bottom of the pot
  • Your plant’s growth seems stunted
  • You see more roots than soil when you look at the top of the pot

Choosing the Right Time

The best time to repot your Moses in the Cradle plant is just before its growth period, which is usually in the spring. Repotting at this time gives your plant a chance to adjust to its new pot before it starts its major growth phase. However, a healthy plant can often withstand the stress of repotting at any time in the year if needed.

Steps to Repot your Moses in the Cradle Plant

  1. Prepare a new pot that is 1-2 inches larger in diameter than the current pot.
  2. Fill the new pot with a high-quality potting mix.
  3. Remove the plant gently from its current pot, trying to keep the root ball intact.
  4. Place the plant in the new pot and fill with more potting mix, ensuring the plant is at the same depth as it was in the old pot.
  5. Water the plant thoroughly and return it to its usual spot.

Make sure to handle your plant gently during the repotting process. The roots can be quite sensitive and any damage could impact the plant’s growth and overall health. You shouldn’t worry too much about breaking the odd root here and there but substantial damage will cause issues for your plant.

Propagation methods for Moses in the Cradle plant

Propagation can be a relatively simple process, especially when you follow the right steps. Before you know it, you’ll have several new plants to either expand your own houseplant collection or give as gifts to friends and family. Both methods should ideally be done in spring and summer but you can sometimes successfully propagate through division at other points in the year as you do not rely on a new root system to grow.

Method 1: Division

The division is a common and effective propagation method for Moses in the Cradle. It involves dividing the root ball into several pieces, each with a healthy amount of roots and shoots.

  1. Firstly, remove the parent plant from its pot and gently shake off any loose soil.
  2. Locate the natural divisions in the root ball and using your hands, carefully separate the plant into two or more parts.
  3. Ensure each divided section has roots and foliage attached.
  4. Replant each division in a pot with fresh, well-draining soil.

Method 2: Stem Cuttings

Stem cuttings are also a good way to propagate your Moses in the Cradle plant but it is slower and can be less successful than division. The stem cutting method involves removing a piece of the stem from the parent plant and encouraging it to develop its own roots.

  1. Using a clean, sharp knife or scissors, cut a healthy stem from the parent plant. The cutting should be 3-4 inches long with at least two leaves on it.
  2. Remove the leaves near the cut end of the stem.
  3. Place the cut end into a glass of water or directly into moist soil. If using water, replace it regularly to prevent bacteria growth.
  4. After a few weeks, roots should begin to form. Once the roots are a few inches long, the new plant can be transferred to a pot with soil.

Toxicity of the Moses in the Cradle plant

For Humans:

The Moses in the Cradle plant is mildly toxic to humans as it can cause skin irritation. Individuals with sensitive skin may experience a rash or itchiness when they come into direct contact with the plant’s sap.

Precaution: Always wear gloves when handling, propagating or pruning your Moses in the Cradle plant to avoid potential skin irritation.

For Pets:

The Moses in the Cradle is toxic to animals and if ingested, it can cause vomiting, drooling, pawing at the mouth, and other signs of distress. Please keep this plant out of reach of your pets to prevent any potential health issues.

Common pests and diseases of Moses in the Cradle plant

Like most house plants, Moses in the Cradle is susceptible to a few common pests and diseases so it’s essential to keep a watchful eye on your plant for any warning signs.

Common Pests

The most common pests that might attack your Moses in the Cradle include:

  1. Spider Mites: These minute pests are often difficult to see with the naked eye, but their damage isn’t. You might notice yellowing leaves or a fine, silvery web on the underside of the leaves. Spider mites thrive in dry conditions, so maintaining a humid environment can help to keep them at bay.
  2. Mealybugs: These pests appear as tiny, cottony white masses on the plants. They suck sap from the plant, causing distorted and yellowing leaves. Regularly wiping the leaves with a damp cloth can help to control mealybugs.
  3. Scale Insects: Scale insects are small, brown or tan bumps that stick to the plant’s stems and leaves. They also extract sap, causing wilting and yellowing. Scraping them off or using a diluted alcohol solution can help to manage the infestation.

Common Diseases

Moses in the Cradle is relatively resistant to diseases, but it can still fall victim to a few common problems:

  1. Root Rot: Overwatering can lead to root rot, a disease that turns the plant’s roots black and mushy. The best prevention method for root rot is to ensure your plant has well-draining soil and that you are not overwatering it. Watch out for this one more in winter as the soil will take longer to dry out in cold temperatures.
  2. Leaf Spot: This disease is characterized by brown or black spots on the leaves, often surrounded by a yellow halo. To prevent leaf spot, avoid getting water on the leaves when watering, and ensure your plant gets plenty of air circulation.

Moses in the Cradle FAQs

Common Problems with your Moses in the Cradle

Fiddle and Thorn is a participant in the Amazon Services LLC Associates Program, an affiliate advertising program designed to provide a means for sites to earn advertising fees by advertising and linking to Amazon.com

Take our houseplant survey!

Quickly respond to our 30 second houseplant survey and get 75% off our Complete Houseplant Care eBook!

Take the Survey

No thanks…

Monstera Care Guide: How to keep your Swiss Cheese Plant thriving

Last Updated: October 16, 2023

Variegated Monstera Plant

Variegated Monstera Plant

Introduction to Monstera Plants

The Monstera, more commonly known as the Swiss Cheese Plant, has become one of the most popular houseplants in the world. Native to the tropical rainforests of Central and South America, this plant has become iconic for its lush, glossy leaves that develop unique, heart-shaped holes called ‘fenestrations’ as they mature, resembling Swiss cheese (hence the name of course).

Monsteras are part of the Araceae family, which includes over a thousand species. However, the most commonly cultivated variety is Monstera deliciosa. This incredible plant not only adds a touch of the tropics to your interior décor but also purifies the indoor air by removing as common indoor pollutants including formaldehyde, benzene, and trichloroethylene.

Besides its aesthetic appeal, the Swiss Cheese Plant is a relatively easy plant to care for, making it an excellent choice for new plant parents. It’s forgiving of occasional neglect, and with the right care, it can grow into a magnificent centerpiece for your home or office.

Light Requirements for a Monstera Plant

Like many tropical plants, your Monstera thrives in bright, indirect light. While it can adapt to lower light conditions, inadequate light can lead to slower growth and smaller, less split leaves – a characteristic that makes this plant so unique.

Indirect Sunlight

This is light that has been diffused or scattered in some way. This means that the direct sun rays are not hitting your plant’s leaves. Try placing your plant near a north or east-facing window to avoid the harsh sun.

Direct Sunlight

Be cautious of too much direct sunlight. The intense light can scorch the leaves, leaving unsightly brown or yellow spots. If the only available light is direct, consider using a sheer curtain to diffuse it.

Artificial Light

Monstera can also grow under fluorescent light if needed, making it a good choice for spaces without access to plenty of natural light. Just ensure the light source is close enough to the plant to be effective.

Top tip: Remember to rotate your Monstera every few weeks to ensure all sides receive an equal amount of light. This promotes even growth and prevents the plant from leaning towards the light source (this can happen very quickly with these plants).

In order to help you monitor the light condition, you can use a simple light meter, or even certain smartphone apps, which can provide a rough estimate of the light intensity in any given area.

How to Water Your Monstera Plant

How much water does a Monstera need?

Monstera plants generally like their soil to be evenly moist but not waterlogged. It’s a common misconception that because these plants are tropical, they require a lot of water. In fact, overwatering can lead to root rot, a potentially deadly problem for your Swiss Cheese Plant.

Tip: The top 2 inches of the soil should be allowed to dry out between waterings (if you are watering from the top down). This encourages the plant to develop a healthy root system and avoids waterlogging the soil.

Steps to Water Your Monstera Plant

  1. Check the soil’s moisture level. You can do this by sticking your finger an inch or two into the soil. If it feels dry, it’s time to water. If your plant is less mature, you can also use the lifting method. Alternatively, a moisture meter is the most accurate way of determining soil moisture.
  2. Use lukewarm water, as cold water can shock the plant.
  3. Water your Monstera slowly, pouring water evenly around the base of the plant. Ensure the water is well-distributed and not pooling in one area.
  4. Let the water drain out the bottom of the pot. This is important to prevent water from sitting at the bottom and causing root rot.
  5. Wait for the top inch of the soil to dry out before watering again.

Remember: The frequency of watering will depend on the specific conditions of your home. Factors like humidity, temperature, and light can all affect how often your Monstera needs water so there is no one-fits-all routine we can recommend. A good rule of thumb is to check the moisture level of the soil every week, and adjust your watering schedule accordingly.

Humidity: A Key Factor in Monstera Plant Care

The importance of humidity in the care of your Monstera plant is so commonly overlooked. Swiss Cheese Plants thrive in high-humidity environments, mimicking their natural rainforest habitat.

The Ideal Humidity for Monstera

The optimal humidity range for Monstera is between 55% and 70%. In less humid environments, the plant’s growth may be stunted, its leaves may brown at the edges, and it may be more susceptible to pests.

How to Increase Humidity

Fortunately, there are several super easy ways to boost the humidity for your Monstera plant. Here are a few of our recommendations:

  • Misting: Spraying your plant with a fine mist of water can help increase humidity. However, it’s important not to overdo it as too much moisture can lead to disease.
  • Humidifier: An humidifier can provide consistent humidity, making it an excellent choice, especially in drier climates or during winter months when indoor air tends to be drier. It will do all the work for you!
  • Pebble tray: Place your pot on a tray filled with pebbles and water. The water will evaporate around the plant, increasing the humidity. The reason you need to add pebbles is so that the roots aren’t sitting in the tray of water.
  • Grouping plants: Plants can create their own microclimate. By placing several plants close together, they can help increase the humidity of the surrounding air.

Monitoring Humidity Levels

Keeping track of the humidity levels around your Swiss Cheese Plant is key to ensuring its health. A simple hygrometer can measure humidity in the air and is an invaluable tool for any indoor gardener. Often you’ll find that indoor digital thermometers have a humidity meter built in as well which is a great 2 in 1 option.

Monstera Temperature Requirements

Indoor Temperature

Monstera plants flourish in normal room temperatures between 68°F (20°C) and 86°F (30°C). They are tropical plants and hence enjoy a warm, humid environment.

Outdoor Temperature

If you’re growing your Monstera outdoors, make sure it’s not exposed to temperatures below 50°F (10°C). Brief exposure to cooler temperatures won’t kill the plant, but prolonged periods can cause damage as the cells in the leaves may start to freeze and burst.

Temperature Tips for Monstera Care

  1. Avoid placing your Swiss Cheese Plant near air conditioners, heaters, or drafts. These can create sudden temperature changes.
  2. Monitor the temperature regularly, especially during winter months, to ensure it doesn’t drop too much.
  3. If the air in your home is dry, consider using a humidifier to keep your Monstera plant happy.

Monstera Thai Constellation Plant

Monstera Thai Constellation Plant

Fertilizing your Monstera: The Complete Guide

The Importance of Fertilizer

Fertilizers are like multivitamins for your Monstera plant. Good quality fertilizer contains a blend of essential nutrients that your plant needs to thrive, including nitrogen, phosphorus, and potassium, often referred to as N-P-K. These elements help in leaf development, root growth, and disease resistance.

Choosing the Right Fertilizer

When choosing a fertilizer, consider a balanced, water-soluble fertilizer with equal amounts of nitrogen, phosphorus, and potassium. These are often labelled as 10-10-10 or 20-20-20. You can find these pretty easily at any local garden store or online.

How Often to Fertilize

Monstera plants do not require excessive fertilization. Generally, feeding your Swiss Cheese Plant once a month during the growing season (spring and summer) will be plenty. You then want to cut back all fertilizer during autumn and winter as your plant will be in its dormant phase and fertilizing during this time can cause more harm than good.

How to Fertilize Your Monstera

  1. Prepare your fertilizer by diluting it with water according to the package instructions. Make sure to mix it well and we often recommend diluting more than recommended to be on the safe side.
  2. Before feeding, water your Monstera thoroughly. This helps to prevent the fertilizer from burning the plant’s root ball.
  3. Pour the diluted fertilizer evenly around the base of the plant, ensuring it reaches the root zone.

Repotting your Monstera

Your Swiss Cheese Plant can only continue to grow larger and healthier if given room to expand. The process of repotting can often seem daunting, but it doesn’t have to be. With a few simple steps, you can successfully repot your Swiss Cheese Plant and maintain its health long-term.

When to Repot

The best time to repot your Monstera is in the spring or early summer, during the plant’s active growing season. This will allow the root system to grow nicely into the new space, as well as provide the best environment for your plant to recover from the shock. If you notice that the roots are growing out of the drainage holes of the pot, or if the plant’s growth seems to have stalled, these are strong signs that it’s time to repot.

Choosing the Right Pot

Always choose a pot that’s only one to two sizes larger than the current one. If the pot is too large it can cause instability issues and increase the risk of root rot (as more soil means more water retention).

The pot should also have adequate drainage holes to prevent waterlogging and allow excess water to flow out. Ceramic pots are often recommended because they are sturdy and allow for good air circulation around the roots.

Steps to Repot your Monstera

  1. Prepare the new pot: Add a layer of potting mix to the bottom of your new pot. Use a well-draining soil mix, preferably one designed for aroids.
  2. Remove the plant: Carefully remove the Monstera from its current pot. Loosen the roots gently using your fingers, removing some of the old soil. This will stimulate new growth after repotting.
  3. Place the plant: Position the plant in the new pot, ensuring it’s in the center. The top of the root ball should be slightly below the rim of the pot.
  4. Add soil: Fill in any gaps with more potting mix, pressing down lightly to remove any air pockets.
  5. Water the plant: Water thoroughly until water drains out of the bottom, ensuring the new soil is fully moistened.

Monstera Leaf Cutting

Monstera Leaf Cutting

Pruning Your Monstera Plant

When to Prune

Monstera plants are generally resilient and can be pruned at any time of the year. However, the best time to prune your Swiss Cheese Plant is in early spring, just before the plant starts its active growing season. Doing this allows the plant to focus its energy on producing new growth.

However, if you notice any dead or dying leaves, prune these off at any point in the year.

What You’ll Need

  1. Sharp, clean pruning shears or scissors
  2. Gloves to protect your hands from the plant’s sap
  3. A clean cloth for wiping any sap that may get on you or your surfaces
  4. And a plastic bag or compost bin to dispose of the cuttings

Steps to Prune

  1. Identify the parts you want to prune. Look for stems that are overly leggy, have yellow or brown leaves, or look unhealthy in any way;
  2. Using your shears, make a cut just above a leaf node (the point where a leaf or branch is or was attached). Be careful not to damage the node;
  3. Collect the cuttings and dispose of them properly;
  4. Wipe any sap that may have gotten on you or your surfaces with a clean cloth.

Note: Some Monstera plants can produce a lot of sap when pruned. If you notice a cut oozing sap, don’t panic! This is normal and the sap will eventually stop flowing on its own.

Cleaning a Monstera: Why, When and How

Why Clean Your Monstera?

Enhanced Photosynthesis: Plants breathe and take in sunlight through tiny pores on their leaves called stomata. When these are clogged with dust, it hinders photosynthesis, the process by which plants produce food.

Pest Prevention: Regular cleaning helps to keep pests at bay. Insects such as spider mites and mealybugs are less likely to infest a clean plant.

When Should You Clean Your Monstera?

Aim to clean your Monstera’s leaves once every two weeks. However, this can vary depending on the environment. If your Swiss Cheese Plant is in a particularly dusty area, you may need to clean it a little more often. You may also need to do less regular deeper cleans after building works for example.

How to Clean Your Monstera

  1. Prepare Your Cleaning Solution: Mix a few drops of mild dish soap with warm water but avoid using any other chemicals as they can damage the leaves.
  2. Wipe the Leaves: Use a soft cloth or sponge to gently wipe each leaf. Be careful not to scrub too hard as this can damage the leaf surface. We always support the back of the leaf with the other hand to avoid damage.
  3. Rinse and Dry: Rinse off any soap residue with clean water and pat the leaves dry with a towel.

Toxicity of the Monstera Plant

The Monstera is toxic to both humans and pets as it contains calcium oxalate crystals. When ingested, these crystals can cause a variety of symptoms such as mouth and throat irritation, swelling of the lips, tongue, and throat, difficulty swallowing, vomiting and excessive drooling

While these symptoms are typically mild, they can be quite distressing for both the individual affected and the concerned pet owner or parent. If you suspect that your pet or child has ingested any part of the Monstera plant, it is recommended to seek immediate medical or veterinary attention.

It is also crucial to handle the plant with care during pruning or repotting as the sap can cause skin irritation. Wearing gloves and washing hands thoroughly after handling the plant can prevent this.

Common Pests and Diseases that affect Monstera Plants

Common Pests

  • Spider Mites: Tiny, spider-like creatures, often found on the underside of leaves and at the stem joints. They create thin webbing and cause the leaves to develop light spots or flecks. Raising humidity and using an insecticide can help control them.
  • Mealybugs: These pests look like small, fluffy white bugs. They suck sap from the plant causing yellowing and curling of leaves. Treating with insecticidal soap or neem oil can combat mealybugs.
  • Scale: Brown or black bumps on the plant’s stems or the undersides of leaves are signs of scale. They can be manually removed or treated with an insecticidal soap.
  • Thrips: Tiny, slender insects that can cause discoloration and scarring on the leaves. They can be difficult to see but are often revealed by shaking the plant gently over a white surface. Insecticides can help control thrips.

Common Diseases

  • Root Rot: If your Monstera’s leaves are turning yellow or brown and the plant seems generally unhealthy, you may be overwatering, leading to root rot. Check the soil moisture to confirm the issue and reduce watering. If the soil is still waterlogged, consider repotting into fresh, well-draining soil.

Leaf Spot: Brown or black spots on the leaves, often with a yellow halo, can indicate a bacterial or fungal leaf spot. Improve air circulation and avoid getting the leaves wet when watering to prevent this disease..

Monstera FAQs


Common Problems with your Monstera

Fiddle and Thorn is a participant in the Amazon Services LLC Associates Program, an affiliate advertising program designed to provide a means for sites to earn advertising fees by advertising and linking to Amazon.com

Take our houseplant survey!

Quickly respond to our 30 second houseplant survey and get 75% off our Complete Houseplant Care eBook!

Take the Survey

No thanks…

Money Tree Propagation Guide | Step by Step Methods

Last Updated: August 26, 2022

With their incredible leaf shapes, the Money Tree is a great stand-alone plant that can become the centrepiece for any space. In this article, we’ll outline the steps for successful Money Tree propagation to help you expand your urban jungle.

There are a couple of methods you can use for Money Tree propagation, growing cuttings in water or air layering the stems. Successful propagation requires the right stem material and the correct temperature, soil moisture, humidity, and light so it’s important you know all the right steps before making any cuts.

The different propagation methods for Money Trees

Though they aren’t the easiest plants to grow from stem cuttings, this is the most common and practical method of Money Tree propagation.

Unfortunately, as Money Trees have a single-stemmed growth pattern this isn’t conducive to division and although seed cultivation is possible, it’s tricky and takes a very long time.

Air layering is the other method we will cover in this Money Tree propagation guide. It’s not as common as stem cuttings as doesn’t work on a lot of plants, but can be a great method for Money Trees.

The benefits of propagating a Money Tree

There are several reasons that you might choose to or need to propagate your Money Tree. Firstly, it’s a cheap and easy way to get more houseplants, it’s as simple as that! Whether you are looking to keep the cuttings for yourself or gift them to friends, it won’t cost you a thing!

Propagating stem cuttings is also a great way to utilise any cuttings left from pruning your plant so never let them go to waste.

You might also need to propagate your Money Tree if it is starting to die. Propagating a healthy part of the stem helps to keep at least some of your beloved plant alive.

How to propagate a Money Tree through stem cuttings

This is a great method for any maturity of plant as you only need to take a very small stem cutting for it to grow into a nice new plant.

  1. Use a sharp clean tool to slice off a part of the stem.

    There are two types of cuttings; a top cutting and a stem cutting. The only difference is that the top cutting is the first one you take, and the stem cuttings are any that follow. Ensure that the part of the plant you are using is pest and disease-free. It’s important that all of your stem cuttings include at least 3-4 leaves. This ensures that there are several nodes in the stem cutting.


  2. Trim off one or two of the bottom leaves as these will start to rot when placed in water.

  3. Place in water immediately.

    You don’t want the cutting to dry out as this harms your chances of a successful propagation. Find a container and fill it with temperate water. Then place your cutting into it so that one third is submerged in water.

  4. Place your cutting in bright but indirect light and ensure it has enough warmth.

    You can also use a heat pad to help aid root growth. Refresh the water so that it doesn’t stagnate. This can cause the cutting to rot.

  5. The cutting should start to develop roots in about a month.

    Once the roots are a few inches long, you can pot them into soil.


  6. Continue usual care.

    Keep a particularly close eye on your cutting for the next few weeks as this is when issues are most likely to arise. But otherwise, you can begin to care for it as you would your mother Money Tree.


How to propagate a Money Tree through air layering

This method isn’t as common so you might not have tried it before, but as long as you follow the right steps, you shouldn’t have any issues at all.


  1. Locate a gap in the leaves on the stem of your Money Tree with leaves both above and below.

  2. Make a vertical cut about halfway through the stem. Place a cocktail stick in the hole to keep it a little bit open.

  3. Wrap the area in damp sphagnum moss and cover in plastic wrap.

  4. Every now and again mist the moss to keep the area somewhat damp.

    Then all there is left to do is wait.

  5. In a few months, roots should appear from the cut.

    Remove the warp and moss and slice off the stem cutting. Now you have an already rooted cutting ready to be transferred into soil.

How to grow a Money Tree from seed cultivation

We usually recommend that this is left to the professionals, but if you do want to give this a go, then below you’ll find the steps to grow your Money Tree from seeds. Ensure that you buy the seeds from a reputable supplier and monitor the environment they are growing in constantly.

  1. Prepare a germination tray using potting soil.

    It’s important that you use a mix designed for this sort of seed cultivation.

  2. Moisten the seeds and place each seed into the potting mix.

    Make sure it is covered by the soil but is not pushed too far into the pot.

  3. Lightly moisten the soil.

    You want to ensure it is moist but never soggy or wet. Then you want to place your germination tray in a spot that gets ample warmth and light. Stay away from direct light though as this can be too strong for your young seeds.

  4. Be patient.

    This is where things can get a little bit boring but as long as you are regularly moistening the soil and monitoring the warmth then within a few months you should start to see something happening above the soil. Refrain from removing the seeds or moving the soil to see what is going on as this can disturb growth.

  5. Transplant each of your new plants into individual pots once the seedlings reach a few inches tall.

How to care for your Money Tree after propagation

Once the hard and scary part of actually taking cuttings from your Money Tree is over, you might be left wondering how to care for your young plants. Whilst the care requirements are largely the same as for your mother plant, there are a few distinct differences to note.

Firstly, your new Money Tree plants will benefit from higher humidity levels to begin with. Misting your plants, using pebble trays or even just as easy as buying a humidifier will solve this.

When it comes to light requirements, your young plants will need plenty of bright but indirect light to aid root and stem growth. They require warm temperatures above 60ºF and it’s important that the soil dries out between waterings. This is because their roots are very delicate at the beginning so are extremely sensitive to waterlogged soil and root rot. Too much water can very quickly lead to yellow sickly leaves so be cautious of that.

Money Plant Propagation FAQs

We hope this guide to Money Tree propagation has been useful and you now know all of the important steps to successfully growing more plants. Although propagation will never have a 100% success rate, ensuring your plant is healthy and your cutting is growing in the right conditions will set you up for success.

To learn more about how to care for your cuttings once they have matured, check out our Money Tree care guide.

Fiddle and Thorn is a participant in the Amazon Services LLC Associates Program, an affiliate advertising program designed to provide a means for sites to earn advertising fees by advertising and linking to Amazon.com

Take our houseplant survey!

Quickly respond to our 30 second houseplant survey and get 75% off our Complete Houseplant Care eBook!

Take the Survey

No thanks…

Money Tree Care

Last Updated: September 6, 2022

Basic Money Tree Care

Originally from Mexico, the Money Tree is very common throughout the world due to its ease of care, making them great for a wide range of plant parents. When it comes to keeping your Money Tree healthy, they need a medium to bright, indirect light level to thrive and a boost to the humidity level to ensure the leaves don’t dry out.

Detailed Money Tree Care

Bright, indirect light is best for your Money Tree

Ideal lighting conditions for the Money Tree are medium to bright indirect light. So steer away from keeping yours directly in the window as it may receive too much direct sunlight. During summer when the light is very intense it can burn the leaves and the hotspots found near windows can dry out your plant so keep them away from direct light to prevent a range of issues.

Artificial lighting can be used

It’s common for the Money Tree to adapt to fluorescent lighting, making them great for the office. You can also use LED grow lights to supplement light levels during the darker months of the year.

Avoid waterlogged soil

It’s a good idea to water your Money Tree until it’s completely hydrated – you can tell when water starts to appear in the saucer. Do make sure it isn’t sitting in too much excess though as this can quickly become a breeding ground for root rot once the soil becomes waterlogged. Using a moisture meter is also a great way to know when to next water your Money Tree.

Money Trees like a boost to the humidity

Being from a more tropical climate, the Money Tree does have a preference for higher humidity levels. There are several easy ways to increase the humidity for your Money Tree including misting the leaves, using a pebble tray or relocating to the bathroom or kitchen (if there is enough natural light).

Only fertilise in the growth season

As with most houseplants, we recommend feeding your Money Tree once as you go into the growing seasons (spring/summer) with a water based plant feed at half of the package dosage. There is no one-fits-all amount when it comes to fertilising your Money Tree because so many factors including plant size, age, location and light level impact how much fertiliser it can handle.

Money Trees are non-toxic

Money Trees are actually safe for pets, so you shouldn’t have to worry if you’re bringing one home!

Money Tree Care FAQs

Common Problems with your Money Tree

Here are some common issues that you might run into. It’s important to diagnose any issues early to give your plant the best chance of bouncing back.

Fiddle and Thorn is a participant in the Amazon Services LLC Associates Program, an affiliate advertising program designed to provide a means for sites to earn advertising fees by advertising and linking to Amazon.com

Take our houseplant survey!

Quickly respond to our 30 second houseplant survey and get 75% off our Complete Houseplant Care eBook!

Take the Survey

No thanks…

Mistletoe Cactus Propagation (A Complete Guide)

Last Updated: April 29, 2022

Propagating a Mistletoe Cactus is actually one of the easiest houseplants as there are so many different methods you can use. The fast-growing low maintenance nature of this plant also helps to success rate be pretty high for all types of propagation. In this article, we will go through each of the different methods so that you can figure out which is right for you and your plant.

Whilst you might want to propagate your Mistletoe Cactus to create new plants altogether (to keep or to gift to friends and family), you might also choose to propagate to make the mother plant fuller. Whatever the reason, each of the outlined methods below can be used to do just this!

Mistletoe Cactus Propagation Methods

There are many ways you can go about propagating a Mistletoe Cactus plant. We’ll show you step-by-step instructions for each of the main methods. Whilst there are a few more you can use, these are the ones with the most success and the ones we recommend to use.

Mistletoe Cactus plants can be propagated by:

  • Stem cuttings in water
  • Stem cuttings in soil
  • Propagation through soil contact

How to propagate a Mistletoe Cactus through cuttings in water

This is one of the most common methods where you will see new roots on the cuttings pretty quickly.


Step 1: Cut a couple of stems off the mother plant.

Make sure you pick parts of the plant that are healthy and show no signs of pests or disease.


Step 2: Place in a propagation station filled with water.

Ensure this water is at room temperature as hot or cold water can shock and burn the cuttings, leading to an unsuccessful propagation. You want to make sure that the bottom third of the cutting is submerged in water. Any more and you risk the cutting rotting.


Step 4: Place the cuttings in bright but indirect light.

Direct light can burn the delicate leaves.


Step 5: Be patient.

Now, all there is left to do is refresh the water and wait. Luckily this type of Mistletoe Cactus propagation is relatively quick so you might see the roots developing in a week or two, but it can also take longer.


Step 6: Planting.

Once the roots are roughly half an inch long (1 cm) you can plant your Mistletoe Cactus in soil. Be very gently when transplanting as the roots will be delicate and breakable.


Step 7: Enjoy your new plants.

Whether you choose to grow the cutting as a new plant or pop it back into the parent plant to make it fuller, care for your cutting as you would your mother plant.

How to propagate a Mistletoe Cactus through cuttings in soil

Prepare the cuttings the same way as you would for water propagation. However, instead of popping them in water to grow roots, you will place them directly into cactus potting mix. Water the soil so it’s moist (not wet), and pop the cuttings in.

Check the soil regularly as it should be constantly lightly moist but never soggy. Avoid pulling the cutting out to check on growth as this can damage it. Instead, wait several weeks before checking in on root growth.

Mistletoe Cactus Propagation through soil contact

There are two ways you can do this method. Firstly, laying the cuttings on top of the potting mix. This is similar to how you would propagate succulent leaves and is a nice way to keep track of growth compared to when the ends of the cuttings are buried into the soil. The second method is simply looping the stems back into the pot of the mother plant.


Laying the cuttings on soil

This is quite a popular method of Mistletoe Cactus propagation as it’s super easy to do! Cut the stems as you would for the first two propagation methods but just rest them on top of a pot of potting mix. Press down slightly on the ends of the cuttings to ensure they are touching the soi.

The soil should be constantly moist too. Misting the soil frequently helps to maintain moisture levels. The cuttings should root in a few weeks and then can be transplanted into separate pots or back into the mother plant.


Looping the cuttings back into the soil

This method is handy if you want to make your mother plant look fuller. First water the mother plant so that the soil is moist. Then take a few strands of the plant and loop them back into and across the soil. Do not cut the strand – you want it to remain attached to the mother plant!

You will need to keep the soil’s top layer constantly moist until the plant develops roots. Ensure the soil is moist but never soggy and roots should begin to grow.

Mistletoe Cactus Propagation FAQs


What time of year is best to propagate my Mistletoe Cactus?

The best time to propagate Mistletoe Cactus is during the growing season of spring and summer. This gives the cuttings plenty of time to root and develop new leaves.


Is Mistletoe Cactus propagation easy?

This is one of the easiest plants to propagate, and propagation has a high success rate with most of the methods we mentioned above


Should I use a rooting hormone?

Whilst you can have plenty of success without using any rooting hormone, you can use rooting gel when propagating in water. This will speed up the growth of roots but it does have drawbacks. Using too much will damage the cutting which can be risky.

We hope that you have found this Mistletoe Cactus propagation guide useful. When deciding what method to use, it’s important to look at what you want to achieve from the propagation (new plants or making the mother plant fuller) as well as your experience and success with propagation in the past.

But as long as you use the right steps and the environment is right for new root growth, you shouldn’t have any troubles with this one.

To learn more about how to care for your plant after propagation, take a look through our Mistletoe Cactus care guide.

Fiddle and Thorn is a participant in the Amazon Services LLC Associates Program, an affiliate advertising program designed to provide a means for sites to earn advertising fees by advertising and linking to Amazon.com

Take our houseplant survey!

Quickly respond to our 30 second houseplant survey and get 75% off our Complete Houseplant Care eBook!

Take the Survey

No thanks…

Mistletoe Cactus: A Complete Guide to Keeping Your Rhipsalis Healthy

Last Updated: October 16, 2023

Mistletoe Cactus

Mistletoe Cactus

Introduction to Mistletoe Cactus

The Mistletoe Cactus, (Latin name: Rhipsalis baccifera), is a unique species of jungle cactus that’s well-suited to be grown and kept as a houseplant. Unlike many houseplants (especially cacti), this plant thrives in low-light conditions, making it a popular choice for adding a touch of greenery to darker spaces.

Mistletoe Cactus Appearance

The Mistletoe Cactus is easily recognizable with its long, branching stems covered in tiny hair-like bristles. These stems, which can measure up to several feet in length, have a pendulous form and typically form a dense, tangled mass. The plant’s small, white flowers bloom during spring and are followed by small, berry-like fruits.

Growth Habit

Unlike most cacti, the Mistletoe Cactus doesn’t have spines or a conventional tree-like shape. Instead, it’s more comparable to a vine, with its long, cascading tendrils that can hang down several feet. Although it’s a slow grower, given the right conditions, it can eventually reach quite a substantial size.

The History and Origin of Mistletoe Cactus

The Mistletoe Cactus is native to Central and South America, but its hardy nature and unique adaptability have allowed it to thrive in various parts of the world.

Interestingly these plants are actually epiphytic plants, which means they grow on the surface of other plants without harming them. In their natural environment, you’ll often find these cacti hanging from tree branches in rainforests, absorbing nutrients and water from the air and rain.

It received its common name due to its cascading growth habit and the small white berries it produces, which are reminiscent of mistletoe. Despite this resemblance, it’s important to note that the Mistletoe Cactus is not related to the traditional holiday mistletoe.

Varieties of Mistletoe Cactus

The Mistletoe Cactus, scientifically known as Rhipsalis, is a diverse and unique family of cacti. With over 35 species, it’s quite a fascinating group to explore. Let’s delve into some of the most popular varieties that you might want to add to your collection.

Rhipsalis Baccifera

Often referred to as the ‘Mistletoe cactus’, Rhipsalis Baccifera is the most widespread species of the genus. It’s an epiphytic cactus with slender, pendant stems that can reach lengths of up to 30 feet in the wild. Its small, white flowers are succeeded by translucent, white fruits, thus earning it the nickname ‘Mistletoe’.

Rhipsalis Cassutha

The Rhipsalis Cassutha, also known as ‘Cassutha Rhipsalis’, is a popular indoor ornamental plant. It has thin, threadlike stems that have a cascading growth habit, making it ideal for hanging baskets. Its tiny, creamy-white flowers are often followed by white or pinkish berries.

Rhipsalis Pilocarpa

Rhipsalis Pilocarpa, commonly known as ‘Hairy-Stemmed Rhipsalis’, boasts an impressive feature – hairy stems! This makes it a visually intriguing variety. It produces beautiful, white flowers that have a lovely scent, which is quite uncommon in cacti.

Rhipsalis Clavata

The Rhipsalis Clavata stands out due to its clavate (club-shaped) segments. These fleshy stems are typically green and covered with small, white bristles. It’s a slow-growing variety that produces small, yellowish-white flowers.

Mistletoe Cactus Lighting Needs

Unlike most cacti, this species is not a desert dweller but originates from the rainforests of South and Central America. Therefore, its lighting needs are quite different from what you might expect.

Primarily, Mistletoe Cacti thrive in bright but indirect light. This means that placing your plant in a spot where it will receive filtered sunlight through a curtain or shaded by other plants is ideal. Direct sunlight hitting the leaves can cause the plant to become scorched and may lead to leaf drop.

Avoid direct sunlight: Although this plant is a cactus, it’s not well-suited to the intense, direct sunlight that many desert cacti can handle. Avoid putting your Mistletoe Cactus in a spot where it’ll be exposed to direct sunlight for prolonged periods.

Low light: The Mistletoe Cactus can adapt to low-light conditions, but it’s not ideal for the plant’s overall health and growth. You will often find growth is slower and new leaves tend to be quite small if your plant isn’t getting enough sunlight. This doesn’t mean that your plant will die in low-light areas though so it can still be a good option for those shadier spots.

Watering Your Mistletoe Cactus: Dos and Don’ts

Do’s

  • Do water your Mistletoe Cactus thoroughly: Soak the soil completely until water runs out the bottom of the pot. This ensures that the roots, even those at the bottom, receive sufficient hydration.
  • Do allow the top inch of the soil to dry out before watering again: Overwatering is one of the main killers of houseplants, including these ones. Test the soil’s dryness by sticking your finger about an inch into the soil. If it’s dry, it’s time to water. You can also check the moisture using the chopstick method, the lifting method or buy using a moisture meter.
  • Do mist your Mistletoe Cactus regularly: As a tropical plant, it appreciates a humid environment. A light misting every few days will help replicate its natural habitat.

Don’ts

  • Don’t let your Mistletoe Cactus sit in water: After watering, be sure to empty the saucer underneath your pot. Sitting in water can cause root rot, which could be fatal to your cactus.
  • Don’t water on a strict schedule: While it’s important to keep your cactus hydrated, sticking to a strict watering schedule can do more harm than good. Instead, pay attention to the dryness of the soil and the overall health of your plant to determine when to water.
  • Don’t use cold water: Cold water can shock your cactus and interrupt its growth. Instead, use water that is at room temperature or slightly warmer.

Humidity and Temperature Requirements

Temperature: The Mistletoe Cactus prefers a temperature range between 60°F (15°C) and 80°F (27°C). This range replicates the natural environment of a tropical rainforest floor. During the winter, ensure the temperature does not drop below 50°F (10°C) as the plant can suffer from cold damage.

We strongly advise using a digital thermometer to keep track of temperature changes around your plant so you can act fast if there is a change before it starts to cause any issues for your plant.

Humidity: This species enjoys a high level of humidity, similar to that of its native rainforest habitat. An ideal humidity range is between 50% and 70%. If you live in a dry climate, consider using a humidifier or misting regularly to maintain the right humidity level.

Adjusting Temperature and Humidity

It’s essential to monitor and adjust temperature and humidity levels as needed to match your Mistletoe Cactus’ needs. Here are a few tips:

  • Avoid placing your plant near air conditioning vents, heaters, or drafty windows. These spots can cause sudden temperature changes.
  • Use pebble trays filled with water or a humidifier to increase humidity levels if needed.
  • During hotter months, ensure your cactus gets plenty of ventilation to prevent overheating.

Fertilizing Your Mistletoe Cactus: What You Need to Know

The Importance of Fertilizer

Fertilizing your Mistletoe Cactus is essential for its health and growth. While the plant can survive without fertilizer, it may not reach its full potential without it. Fertilizing your cactus provides it with necessary nutrients that it might not get from the soil, especially if it’s an indoor plant.

It’s especially beneficial in terms of encourage plants to bloom so it can be a nice option to encourage some flowers from time to time.

Choosing the Right Fertilizer

When it comes to choosing a fertilizer, it’s important to select one that is specifically made for cacti. Look for a fertilizer that has a higher ratio of phosphorus to nitrogen, as this will promote healthy growth and flowering.

How Often to Fertilize

Your Mistletoe Cactus doesn’t need to be fertilized year-round. The optimal time for fertilizing is during the growing season, which is typically from spring to early fall. During this time, fertilize your cactus once a month. It’s best to avoid fertilizing completely in the winter and most of fall, as this is a period of rest for your cactus.

Repotting a Mistletoe Cactus: When and How to Do It

Repotting your Mistletoe Cactus doesn’t have to be a daunting task. If equipped with the right steps, repotting can be super beneficial to your plant’s health and encourage new stronger growth

When to Repot

The best time to repot this plant is during the late winter or early spring, just before the growing season begins. This is because your plant is entering the growth phase and if rootbound, this can cause some issues during this time. You might also consider repotting at other points of the year if you notice the following signs:

  • The plant has outgrown its pot
  • The roots are pushing through the drainage holes
  • Water sits on top of the soil for a long time
  • There is a decline in plant growth or health

How to Repot

Once you’ve determined that it’s time to repot your Mistletoe Cactus, you’ll need to follow these steps:

  1. Prepare the new pot: Your new pot should be slightly larger than the current one. Fill it about one-third full with a well-draining cactus mix.
  2. Remove the cactus from the old pot: Carefully tip the pot and slide the plant out. If it’s stuck, you can tap the sides or bottom to loosen it. It is a good idea to use gardening gloves for this part!
  3. Prune the roots: Inspect the roots for any signs of disease or rot and trim off any unhealthy parts using sterilized scissors.
  4. Place the cactus in the new pot: Set the plant in the center of the pot. The top of the root ball should be about an inch below the rim.
  5. Fill the pot with soil: Add more cactus mix, pressing it down lightly around the plant. Leave a little space at the top for watering as otherwise it’ll all overflow when you water your plant.
  6. Water the plant: Give your plant a little water to help settle the soil and then wait a week before properly watering to allow the roots to settle and recover from any damage. After that, you can resume your regular watering schedule.

Mistletoe Cactus Flowers

Characteristics of Mistletoe Cactus Flowers

Flowers of the Mistletoe Cactus are small, typically measuring between 0.2 to 0.8 inches in diameter. They can be white, yellow, red, or pink, depending on the specific variety of the plant. The bloom period usually happens in late winter or early spring, although some species may flower sporadically throughout the year. The whole blooming phase and frequency can be very unpredictable so take it as they come!

Light Requirements

Just like the plant itself, the flowers of the Mistletoe Cactus prefer a balance of light and shadow. Bright, indirect light is ideal. Too much direct sunlight can result in burnt blooms, while insufficient lighting can prevent flowers from opening fully.

Temperature and Humidity

Warm temperatures and high humidity levels are key to the successful blooming of Mistletoe Cactus. Maintain a temperature between 60-80°F and a humidity level above 50% for optimal flowering.

Watering and Fertilization

Regular watering and fertilization are necessary to support the blooming process. Water thoroughly, allowing the top layer of soil to dry between watering sessions.

Is the Mistletoe Cactus toxic?

The Mistletoe Cactus is generally considered non-toxic. However, caution should always be exercised since individual reactions can vary depending on sensitivity levels.

It is important to bear in mind that despite the Mistletoe Cactus being non-toxic, it is still not meant to be consumed by either humans or pets. Ingesting any part of the plant may cause gastrointestinal discomfort manifested in symptoms such as vomiting or diarrhea. Particularly for pets, such as cats and dogs, it is always best to prevent any potential ingestion.

Cleaning your Rhipsalis

Keeping your Mistletoe Cactus clean and dust-free is just as important as providing it with the right amount of light and water. Dust and grime can block light and hamper photosynthesis, which can affect the overall health and growth of your plant.

Here’s how to effectively clean your Mistletoe Cactus:

  1. Light Cleaning: For a light clean, gently dust the plant’s surface using a soft paintbrush. You can do this every couple of weeks to maintain the cleanliness and appearance of your plant.
  2. Thorough Cleaning: If your Mistletoe Cactus has accumulated a substantial amount of dust or grime, you might need to consider giving it a thorough cleaning. To do this, first, prepare a mix of mild soap and lukewarm water. Then, gently wipe the plant using a soft cloth or sponge dipped in the soapy water. Rinse the plant thoroughly to ensure no soapy residue remains.

Note: Avoid using harsh chemicals or detergents as these can damage the plant’s surface.

Common Pests and Diseases that Affect Mistletoe Cactus

Common Pests

  • Mealybugs: These small, white insects can be found on the leaves and stems of your Mistletoe Cactus. They feed on the plant’s sap, causing yellowing and wilting. If not treated, they can severely weaken the plant. It’s important to know that a mealybug infestation can grow very quickly so it’s important that you treat it as soon as you spot the first sign of trouble.
  • Scale insects: Another sap-sucking pest, scale insects can cause similar damage to mealybugs. They are often harder to spot, as they tend to blend in with the plant’s natural coloration.

Common Diseases

  • Root rot: Overwatering your Mistletoe Cactus consistently can lead to root rot (they will forgive you for the occasional overwater if not severe). This disease can cause the roots to become soft and mushy, and if not treated, it can kill the plant. Make sure to replace any waterlogged soil immediately rather than waiting for it to dry out as you risk further damage.
  • Fungal diseases: The Mistletoe Cactus is susceptible to a range of fungal diseases, particularly if it’s kept in conditions that are too damp or humid. Signs of fungal disease include spots on the leaves, a moldy smell or a white, cottony growth on the plant.

Mistletoe Cactus FAQs


Common Problems with your Mistletoe Cactus

Fiddle and Thorn is a participant in the Amazon Services LLC Associates Program, an affiliate advertising program designed to provide a means for sites to earn advertising fees by advertising and linking to Amazon.com

Take our houseplant survey!

Quickly respond to our 30 second houseplant survey and get 75% off our Complete Houseplant Care eBook!

Take the Survey

No thanks…

Mini Monstera Care Guide: How to keep your Rhaphidophora tetrasperma thriving

Last Updated: October 16, 2023

Mini Monstera

Mini Monstera

Introduction to Mini Monstera: What is Rhaphidophora tetrasperma?

If you’re a plant enthusiast, you’ve likely come across the Mini Monstera, also known as the Rhaphidophora tetrasperma. This plant, despite its common name, is not a true Monstera. It’s actually a different species entirely, although it shares some similarities with its namesake.

One of the distinguishing features of the Rhaphidophora tetrasperma is its leaves. As the plant matures, its leaves develop distinctive fenestrations or natural holes, similar to those of a Monstera deliciosa. However, the leaves of a Rhaphidophora tetrasperma are smaller and more delicate, hence the nickname ‘Mini Monstera’.

Origin of the Rhaphidophora tetrasperma

The Rhaphidophora tetrasperma originates from the rainforests of Southern Thailand and Malaysia. Its nickname derives from its striking resemblance to the Monstera deliciosa, a much larger plant.

In its native habitat, the Mini Monstera is a fast-growing climber, using the towering trees of the rainforest to support its growth. However, despite its tropical origins, it can adapt well to the indoor environment, making it a favourite among houseplant enthusiasts.

Interestingly, the plant’s name – Rhaphidophora tetrasperma – provides some insight into its characteristics. Rhaphidophora, in Greek, means ‘needle-bearing’, a nod to this plant’s numerous aerial roots. Tetrasperma refers to the four seeds in each fruit it produces.

Rhaphidophora tetrasperma Height and Size

Despite having ‘mini’ in its name, this plant can grow quite impressively in the right conditions. On average, a well-cared-for Mini Monstera can reach a height of around 1 to 2 metres (3 to 6 feet) when grown indoors.

The leaves themselves, with their distinctive split design, can grow up to 25cm (9.8 inches) long and 15cm (5.9 inches) wide.

Remember: The Mini Monstera is a climber by nature. Providing it with a moss pole or similar support can help it grow tall and strong, providing a beautiful green focal point in your home.

Mini Monstera Climbing

Mini Monstera Climbing

Mini Monstera Light Requirements

Indirect Light

The Mini Monstera thrives best in bright, indirect light. Direct sunlight can scorch the leaves in warm environments, resulting in dried-out burnt yellow and brown leaves. Therefore, it’s essential to place your Rhaphidophora tetrasperma in a location where it will receive plenty of indirect sunlight.

Artificial Light

Artificial light can also suffice for this plant. If you don’t have sufficient natural light in your home or office, fluorescent lights or LED grow lights can fill in for natural sunlight. Generally, 12 hours of artificial light each day will suffice.

Low Light

While the Mini Monstera can tolerate low light conditions, it won’t thrive. If you notice your plant’s growth slowing, or the leaves becoming leggy and stretched out, it can be an indication that it needs more light.

Watering your Mini Monstera: Methods, How Often and How Much?

When it comes to watering your Mini Monstera, or Rhaphidophora tetrasperma, it’s crucial to strike a balance. This tropical plant enjoys moist soil but doesn’t appreciate being waterlogged.

Best Watering Methods

There are two primary methods you can use to water your Mini Monstera: top watering and bottom watering. Both have their benefits, so let’s break them down:

  • Top Watering: This is the traditional method where you water the plant from the top until water drains out of the bottom. It’s a quick and easy method, but be careful not to splash water on the leaves as this can cause leaf rot.
  • Bottom Watering: This method involves placing the pot in a tray of water and allowing the plant to soak up water from the drainage holes. It encourages deep root growth (which helps with plant stability and height) and ensures the entire root ball gets thoroughly moistened.

How Often to Water

Your Mini Monstera’s watering schedule will largely depend on the time of year and the environment it’s in – we never set rigid watering schedules as it will always be changing. As a general rule of thumb, you should:

  • Water once a week during the growing season (spring and summer).
  • Reduce watering to once every two weeks during the dormant season (autumn and winter).

Mini Monstera Temperature Requirements

When it comes to the optimal temperature for your Mini Monstera, it’s important to remember that it’s a tropical plant. This means it thrives in temperatures that mimic its natural habitat, which is warm and humid.

Typically, the Mini Monstera prefers a temperature range of 59-86°F (15-30°C). Anything outside of this range can result in the plant becoming stressed, and this can lead to problems such as leaf drop or stunted growth.

Here are a few key temperature-related points to remember when caring for your Mini Monstera:

  • While the plant can survive in lower temperatures, it will not thrive. Keep your Mini Monstera in a room where the temperature is consistently above 59°F (15°C).
  • The Mini Monstera is not frost tolerant. If you live in an area that experiences frost, it’s advisable to keep the plant indoors.
  • Avoid placing your Mini Monstera next to heat vents or air conditioning units as these can create hot or cold drafts that can harm the plant.
  • If you notice that the leaves of your Mini Monstera are turning yellow or brown, this may be a sign that the plant is not in the right temperature conditions.

Rhaphidophora tetrasperma Humidity Needs

The Mini Monstera has a preference for higher humidity levels. Generally, the Rhaphidophora tetrasperma prefers humidity levels of 50% to 60%. However, it can tolerate levels as low as 40% and as high as 80% if needed.

Now, you might be wondering how to maintain these high humidity levels, especially if you live in a dry climate. Here are a few simple ways:

  1. Use a Humidifier: A easy and effective way to increase indoor humidity. It’s an especially good option if your home’s air tends to be dry.
  2. Misting: Lightly spray your Rhaphidophora tetrasperma with water using a spray bottle.
  3. Grouping Plants: Group your Mini Monstera with other plants. This can create a microclimate with higher humidity, as plants release moisture into the air.
  4. Water Tray: Place a tray of water near your plant. As the water evaporates, it will increase the humidity in the surrounding air.

Fertilizing a Mini Monstera Plant: The Ultimate Guide

The Right Fertilizer

Not all fertilizers are created equal, and your Mini Monstera prefers certain nutrients more than others. A balanced, water-soluble houseplant fertilizer with equal ratio (10-10-10) of nitrogen, phosphorus, and potassium (often labelled as NPK) is generally a good choice. Avoid fertilizers high in boron or fluoride, as these can cause leaf burn.

Fertilizing Schedule

The frequency of fertilization depends on the growing season. During spring and summer, when your Mini Monstera is in its active growth phase, fertilize once a month. In autumn and winter, when growth slows, you don’t want to be fertilizing at all as it can do more harm than good.

Application Technique

Apply the liquid fertilizer by diluting it with water, following the instructions on the fertilizer package. Water your Mini Monstera first, then apply the fertilizer mixture. This will help to prevent the fertilizer from burning the plant’s roots.

Rinse Off Excess Fertilizer

Over time, salts from the fertilizer can build up in the soil. To prevent this, rinse the soil with plain water every few months. This will wash away any excess salts and keep your Mini Monstera’s roots happy and healthy.

Choosing the Right Soil and Pot for your Mini Monstera

Soil Selection

The Mini Monstera prefers a well-draining soil mix that’s rich in organic matter. A soil mix that retains some moisture but doesn’t keep the roots waterlogged is ideal. Here’s an example soil breakdown:

The perlite aids drainage, the orchid bark introduces organic matter, and the charcoal helps keep the soil fresh and prevents rot.

Choosing the Right Pot

Equally crucial is the choice of pot. A pot that’s too small can restrict the growth of your Mini Monstera, while a pot that’s too large can hold excess water and heighten the risk of root rot.

The pot should lsoa have adequate drainage holes, which serve to prevent water from pooling at the bottom, causing the roots to become waterlogged.

In terms of material, ceramic or terracotta pots are a good option as they allow the soil to dry out a bit between waterings, which reduces the risk of overwatering compared to plastic pots.

Mini Monstera Leaves

Mini Monstera Leaves

Repotting a Mini Monstera Plant

You should repot your Rhaphidophora tetrasperma every one to two years, or when you notice it’s becoming root-bound. Here’s a step-by-step guide to help you through the process:

When to Repot

Generally, it’s best to repot your Mini Monstera in the spring or early summer. During these seasons, the plant is in its active growth phase and can handle the stress of repotting better. However, if your plant is showing signs of being root-bound (like roots growing out of the bottom of the pot or stunted growth) you may need to repot outside of this ideal timeframe.

Materials Needed

  • A new pot: Choose a container that’s one to two sizes larger than the current one. If the new pot is too big it can lead to an unstable plant and a very soggy potting mix. Ensure it also has ample drainage to prevent waterlogging.
  • Quality potting mix: Use a well-draining soil mix that’s high in organic matter. You can create your own by combining equal parts peat moss, perlite, and bark.
  • Pruning shears: Clean, sharp shears for any necessary root trimming.
  • Gloves: To protect your hands during the process.

Steps to Repot

  1. Prepare the new pot by filling it one-third full with the potting mix.
  2. Turn the current pot sideways, hold your Mini Monstera close to the base and gently pull out the plant.
  3. Examine the root system. If it’s root-bound, make a few vertical cuts through the root ball to encourage new growth.
  4. Place the plant in the new pot and fill with soil, ensuring the plant is at the same depth it was in the previous pot.
  5. Water the plant thoroughly and place it in a spot that provides indirect light.

Propagation: How to Multiply Your Mini Monstera Plant

By following these steps, you will be able to multiply your plant and share it with friends or simply expand your personal collection.

Step 1: Identifying the Node

The first step in propagation is identifying the node on your Mini Monstera. This is a small, swollen area on the stem where new growth emerges. Look for a node with a leaf and an aerial root, if possible, as this will improve your chance of successful propagation.

Step 2: Making the Cut

Once you have identified the node, use a clean, sharp knife or pair of scissors to cut just below it. Make sure to include at least one leaf and one aerial root in your cutting if possible, as these will support new growth.

Step 3: Water Propagation

Next, place the cutting in a jar of room-temperature water, ensuring the node is submerged but the leaf is not (as it will start to rot if kept in water). The water should be changed every few days to keep it fresh and prevent the growth of bacteria.

Step 4: Monitoring Growth

Over the next few weeks, keep a close eye on your cutting. New roots should start to grow from the node, and once they reach a length of about two inches, your cutting is ready to be planted. Be patient, as this process can take several weeks or even months if conditions aren’t ideal.

Step 5: Planting the Cutting

When your cutting is ready, plant it in well-draining soil. Make sure to water it thoroughly, then allow the top inch of soil to dry out before watering again. Your propagated Mini Monstera should start to show new growth within a few weeks.

Pruning your Mini Monstera: How, Why and When

The ‘Why’ of Pruning

By removing old or yellow leaves, you are allowing your plant to direct its energy into producing new growth. Pruning is also important to keep the desired size and shape of your plant as they can quite quickly outgrow the room.

The ‘How’ of Pruning

You’ll need a clean, sharp pair of scissors or pruning shears. Here’s a step-by-step guide:

  1. Sanitise your tools: Always start by cleaning your scissors or shears. This helps prevent the spread of diseases.
  2. Identify the parts to prune: Look for yellow or brown leaves, or any that appear diseased or damaged. Also, consider pruning if the plant is becoming too large or unruly for its space.
  3. Make the cut: Cut the undesirable parts off at the stem. Aim to make a clean, swift cut to minimise damage.

The ‘When’ of Pruning

The best time to prune your Mini Monstera is during the active growing season, typically spring and summer. This is when the plant is most capable of recovering and producing new growth post-pruning.

However, if you notice diseased or dying leaves at any time of the year, it’s better to remove them immediately to prevent further issues.

Rhaphidophora tetrasperma Toxicity

The Rhaphidophora tetrasperma is toxic to humans and pets and can cause discomfort if ingested. The plant contains insoluble calcium oxalates, which are common in the Araceae family.

These Insoluble calcium oxalates can cause oral irritation, excessive drooling, vomiting, difficulty in swallowing, and intense burning and irritation of the mouth, lips, and tongue in pets or people who ingest it.

Flowers on a Mini Monstera Plant

If you’re lucky, your Rhaphidophora tetrasperma may surprise you with a few flowers. This is quite a rare occurrence for most indoor Mini Monstera owners, but certainly not impossible.

Triggering Flowering

There is no guaranteed method of encouraging your Mini Monstera to flower. It is, however, widely known that these plants are more likely to bloom in optimal conditions. Ensuring your plant has the right light, temperature, humidity, and proper feeding might increase the chance of seeing those rare flowers.

Flower Appearance

When your Rhaphidophora tetrasperma does decide to flower, you’ll observe a spadix and spathe structure typical of aroids. The spathe, a large white leaf-like structure, wraps around the spadix, a spike covered in tiny flowers.

Flower Lifespan

Each Mini Monstera flower only lasts for a few days before it begins to wilt and eventually falls off. However, if the plant is healthy and happy, it may continue to produce new flowers over a period of several weeks but nothing is guaranteed.

Cleaning your Mini Monstera

Just like any other houseplant, your Mini Monstera also needs regular cleaning to keep it looking its best and to ensure it can photosynthesise efficiently. Neglected leaves can also become a breeding ground for pests and diseases so you’ll want to avoid that!

Regular Dusting

Regular dusting is essential to keep your Mini Monstera’s leaves clean and healthy. You can use a soft, damp cloth to gently wipe each leaf. Be careful not to apply too much pressure as this can damage the leaves.

Deep Cleaning

Every few months, your Mini Monstera may benefit from a deeper clean. Here’s a quick step by step of the process:

  1. Fill a basin with lukewarm water and a small amount of mild soap.
  2. Gently dip each leaf in the soapy water, taking care not to submerge the entire plant.
  3. After washing, rinse the leaves carefully with clean water to remove any soap residue.
  4. Allow the plant to air dry in a place with good air circulation.

Inspecting for Pests

Whilst cleaning, it’s the perfect opportunity to inspect your Mini Monstera for any signs of pests. Look out for tiny spots, discolouration or little critters on the underside of the leaves. If you spot any, treat your plant promptly to prevent further infestation.

Mini Monstera FAQs


Common Problems with your Mini Monstera

Here are some common issues that you might run into. It’s important to diagnose any issues early to give your plant the best chance of bouncing back.

Fiddle and Thorn is a participant in the Amazon Services LLC Associates Program, an affiliate advertising program designed to provide a means for sites to earn advertising fees by advertising and linking to Amazon.com

Take our houseplant survey!

Quickly respond to our 30 second houseplant survey and get 75% off our Complete Houseplant Care eBook!

Take the Survey

No thanks…

Marble Queen Pothos: The Ultimate Care Guide

Last Updated: October 16, 2023

Introduction

Unlike its all-green siblings, the Marble Queen Pothos boasts a rich, variegated mix of green and white on its lush, heart-shaped leaves, giving it a marble-like appearance (hence the name). This characteristic is not just an aesthetic bonus but also a sign of its health and vitality.

Key Features of the Marble Queen Pothos

  • Scientific name: Epipremnum aureum ‘Marble Queen’
  • Common names: Marble Queen Pothos, Marble Pothos, Variegated Pothos
  • Native to: French Polynesia
  • Plant type: Vine or trailing plant, great for hanging baskets or climbing poles
  • Light requirement: Low to medium, indirect light
  • Growth rate: Fast
  • Mature size: Up to 3 meters

Characteristics of the Marble Queen Pothos

  1. Variegated Leaves: Perhaps the most defining characteristic of the Marble Queen Pothos is its variegated leaves. Each leaf is unique, featuring a mix of white and green colors. The leaf color can range from a subtle cream to a striking white, depending on the amount of light the plant receives.
  2. Trailing Vines: Like other members of the Pothos family, the Marble Queen Pothos has trailing vines that can grow up to 10 feet indoors. This makes it an excellent choice for hanging baskets or areas where it can freely cascade.
  3. Tolerance to Various Light Conditions: The Marble Queen Pothos is a versatile plant that can thrive in a wide range of light conditions (one of the many reasons we love it so much!). Although they prefer bright indirect light it can also tolerate lower light levels if needed.
  4. Air-Purifying Properties: In addition to its aesthetic appeal, the Marble Queen Pothos is also known for its air-purifying capabilities. It can help to filter and clean indoor air, enhancing the overall quality of your living environment.
  5. Easy Maintenance: On top of all the other benefits, it’s also incredibly easy to keep happy and healthy. Its resilience and low-maintenance needs make it a favorite among both beginner and experienced plant owners.

Marble Queen Pothos Leaves

Marble Queen Pothos Leaves

Lighting Requirements of the Marble Queen Pothos

Like any other plant, the Marble Queen Pothos needs light to photosynthesize and grow, but it also has its unique preferences and is fairly adaptable to a range of conditions.

Indirect Light: As a general rule, the Marble Queen Pothos prefers indirect, bright light. Avoid direct sunlight as it can scorch the leaves and lead to leaf yellowing, so make sure your plant is not placed in direct rays during summer (in winter it’s ok as the sun isn’t as strong).

Low Light: Although the Marble Queen Pothos can survive in low light conditions, it’s not the ideal situation. Growth can become slow or even stagnant, and the beautiful white variegation of the Marble Queen can turn green due to a lack of light.

Artificial Light: Interestingly, they can also do well under fluorescent lighting. This can be particularly useful if you’re planning to grow your plant in a space with little to no natural light, like an office.

Watering your Marble Queen Pothos

These plants thrive best when they’re not overwatered as although they have large, sturdy root systems compared to most other houseplants, they are still susceptible to overwatering. This is why it’s important to let the soil dry out between waterings.

Unfortunately, there is no one-fits-all watering routine as there are so many factors that impact how fast the soil dries out. But here are some tips to help you water your Marble Queen Pothos effectively:

  • Check the soil: Before watering, it’s crucial to check the soil moistuer. The top inch of the soil should be dry to the touch. If it’s still moist, hold off on watering for a few more days. Other methods include the lifting method or using a moisture meter.
  • Use the right water: While tap water is generally fine, this plant will prefer filtered or distilled water if you live in a hard water area, as it is less likely to contain harsh chemicals that can harm the plant.
  • Water thoroughly: When it’s time to water, do so thoroughly. This means watering until you see some water running out of the drainage holes at the bottom of the pot. This ensures that the water reaches the entire root system.
  • Drain excess water: Never leave your plant sitting in water. Ensure any excess water is drained out to prevent root rot.

Humidity Requirements of Marble Queen Pothos

As a tropical plant, your Marble Queen Pothos adores humidity. They will thrive in a moist environment, which is why they are often found in places like bathrooms or kitchens where humidity tends to be higher. However, they are also quite adaptable and can tolerate less humid environments. On average you should aim for humidity to sit be between 50-65%.

Creating A Humid Environment

Here are some simple ways to increase humidity for your plant:

  • Misting: Lightly mist the plant’s leaves with water, preferably in the morning, using a spray bottle. This mimics the moist air of the tropics and can improve the plant’s health. Be careful not to overspray as this can lead to leaf spot disease.
  • Humidifier: A room humidifier can help maintain an ideal humidity level for your plant, particularly in dry indoor environments.
  • Grouping: Position your Marble Queen Pothos near other plants. Plants naturally release moisture into the air, and grouping them together can increase the surrounding humidity.
  • Water Tray: Place your plant pot on a tray filled with water and pebbles. The water evaporates and increases the humidity around the plant without waterlogging the roots, which can cause root rot.

Signs of Low Humidity

If your Marble Queen Pothos is not receiving enough humidity, it may show signs of distress. Watch out for these symptoms:

  1. Brown leaf tips or edges: This is often a sign of low humidity or underwatering.
  2. Wilting: The leaves of the plant may wilt or droop if the air is too dry.

The Ideal Temperature Range

Typically, the Marble Queen Pothos prefers temperatures that range from 60-85 degrees Fahrenheit (15-29 degrees Celsius). It’s important to note that this plant does not respond well to sudden changes in temperature, whether it’s a rapid increase or decrease. So be careful not to put your plant too close to heaters, heating vents, cookers, radiators, drafty windows and air conditioning units.

If you’re unsure about the temperature level in your home, consider investing in a thermometer. This tool can provide a more accurate reading, enabling you to adjust your home environment accordingly.

Fertilizing a Marble Queen Pothos

When to Fertilize

The best time to fertilize your Marble Queen Pothos is during the growing season—usually from spring through until early fall. In these months, the plant is in its active growth phase and can benefit from additional nutrients to support this process.

It’s worth noting here that fertilizer is optional and you can still see plenty of healthy growth without it.

Choosing the Right Fertilizer

Opt for a balanced, water-soluble houseplant fertilizer. Something along the lines of a 20-20-20 NPK fertilizer will work well for your Marble Queen Pothos. Just make sure to dilute the fertilizer to about half its recommended strength to avoid burning the plant’s roots.

How Often to Fertilize

Fertilize your Marble Queen Pothos once a month during the growing season and not at all during autumn and winter.

Signs of Over-fertilization

Overfertilization can show up as yellowing leaves, browning leaf tips, and slow growth. If you notice any of these signs, stop fertilizing and flush the soil with water to remove excess salt.

Hanging Marble Queen Pothos

Hanging Marble Queen Pothos

Choosing the right Soil and Pot for your Marble Queen Pothos

Soil

The Marble Queen Pothos thrives in well-draining, fertile soil. It’s not particularly fussy, but a few key elements can make a big difference.

  • Well-draining soil: Overwatering is a common problem for many houseplants, and it can be especially harmful for a Marble Queen Pothos. To prevent this, use soil that drains well. Avoid soil that holds onto water for too long.
  • Aerated soil: The roots of your Marble Queen Pothos need to breathe. So, opt for aerated soil that allows good airflow.
  • Nutrient-rich soil: Though this plant is not a heavy feeder, a nutrient-rich soil can help it grow lush and vibrant. Consider adding organic matter or compost to enrich the soil.

Pot

Here are a few things to keep in mind when choosing the right pot:

  • Drainage: Select a pot that has one or more holes at the bottom for excess water to drain out. This can prevent root rot and other water-related problems.
  • Size: Marble Queen Pothos doesn’t like to feel cramped and they have larger root systems than you might think. Choose a pot based on the size of your plant, allowing room for growth. However, avoid pots that are too large, as they can hold too much water and cause stability problems.
  • Material: The pot material can affect how quickly the soil dries out. Plastic pots retain moisture longer while terracotta pots dry out faster. Choose the material based on your watering habits and the moisture needs of the plant.

Repotting your Marble Queen Pothos

Repotting is an essential part of plant care that ensures your plant has enough room to grow, and as long as you know what to do, the process is super easy!

When to Repot

Typically, this plant should be repotted every 12-24 months, depending on its growth rate. Here are some signs that your plant might be ready for a new pot:

  • The roots are visibly coming out of the drainage holes
  • You notice a decrease in the plant’s growth rate during spring and summer
  • The plant dries out quickly and needs water more frequently than before

Choosing the Right Pot

  1. Size: Select a pot that’s about 1-2 inches larger in diameter than the current pot.
  2. Material: Plastic or ceramic pots are both good choices as they retain moisture well.
  3. Drainage: Always choose a pot with good drainage holes to avoid water logging.

The Repotting Process

Now, let’s walk through the steps involved in repotting your Marble Queen Pothos:

  1. Prepare the new pot: Add some fresh potting mix to the new pot.
  2. Remove the plant: Carefully remove the plant from its current pot, making sure not to damage the roots.
  3. Place the plant: Position your plant in the new pot and gently add more potting mix, ensuring the roots are covered.
  4. Water thoroughly: Finally, water your plant thoroughly and place it in a suitable location.

Note: The best time to repot a Marble Queen Pothos is during the warm growing season (spring or summer). This allows the plant to recover faster from the shock of repotting.

Pruning your Marble Queen Pothos

Pruning your Marble Queen Pothos is not just about aesthetics; it also promotes stronger growth and prevents diseases.

When to Prune

Generally, pruning is best done in the growing season, typically spring and summer. However, if you notice any yellow or brown leaves, feel free to prune them off anytime, regardless of the season.

What You’ll Need

Before you begin, gather the following tools:

  • A pair of sharp, clean pruning scissors or shears
  • A clean cloth
  • Rubbing alcohol

Steps for Pruning

Once you have your tools ready, follow these steps:

  1. Sanitize your tools: Use rubbing alcohol to clean your scissors or shears. This prevents the spread of diseases.
  2. Identify what to prune: Look for leaves that are yellow, brown, or wilted. Also, if the plant is becoming too long or leggy, identify the parts you’d like to trim back.
  3. Make your cut: Cut the unwanted parts at the point where they meet healthy stem tissue. Be sure to leave about a quarter inch of stem.
  4. Clean up: Dispose of the cuttings properly if unhealthy or propagate them if you are simply pruning to keep a certain shape and length.

Healthy Marble Queen Pothos Leaves

Healthy Marble Queen Pothos Leaves

Marble Queen Pothos Toxicity

The Marble Queen Pothos is toxic to both humans and pets as it contains calcium oxalate crystals. When ingested, these crystals can cause a host of unpleasant symptoms. In humans, symptoms may include:

  • Mouth and throat irritation
  • Excessive drooling
  • Difficulty swallowing
  • Vomiting
  • Nausea

The effects on pets, particularly cats and dogs, are similar. They may experience:

  • Pawing at the mouth or face
  • Vomiting
  • Decreased appetite
  • Difficulty swallowing

Symptoms can intensify depending on the amount of plant material consumed, so immediate medical or veterinary attention is recommended if your pet consumes any part of a Marble Queen Pothos.

Cleaning your Marble Queen Pothos

Cleaning the leaves is not only an aesthetic practice but also one that helps in warding off pests and diseases. Here are some steps to follow:

  1. Inspect your plant: Before you begin the cleaning process, it’s always a good idea to inspect the plant. Look for signs of pests or disease, such as discolored or spotted leaves.
  2. Dust off the leaves: Use a soft, damp cloth to gently wipe each leaf. This removes dust and helps the plant breathe better and absorb more light.
  3. Prune any dead or dying leaves: Use a pair of clean, sharp scissors to prune away any leaves that are brown or wilting. This helps the plant focus its energy on new growth.

It’s important that you are gentle while cleaning; you don’t want to damage the plant in the process. Also, avoid using any cleaning products or harsh chemicals, as these can damage the plant.

Marble Queen Pothos FAQs


Common Problems with your Marble Queen Pothos

Here are some common issues that you might run into. It’s important to diagnose any issues early to give your plant the best chance of bouncing back.

Fiddle and Thorn is a participant in the Amazon Services LLC Associates Program, an affiliate advertising program designed to provide a means for sites to earn advertising fees by advertising and linking to Amazon.com

Take our houseplant survey!

Quickly respond to our 30 second houseplant survey and get 75% off our Complete Houseplant Care eBook!

Take the Survey

No thanks…

The Ultimate Maidenhair Fern Care Guide

Last Updated: October 16, 2023

Maidenhair Fern

Maidenhair Fern

Introduction to Maidenhair Ferns

Maidenhair Ferns are an elegant variety of Ferns that are highly admired for their delicate, feathery fronds. Originating from a diverse group of species, Maidenhair Ferns can be found in various regions across the globe, including tropical, subtropical, and temperate areas.

Known for their visual appeal, they also hold significant historical and cultural value. In Greek mythology, these ferns were associated with the hair of Venus, the goddess of love. Their scientific name ‘adiantum’ is a term derived from Greek, translating to ‘unwetted’, which refers to the fern’s ability to repel water.

It’s important to know though that Maidenhair Ferns are not the easiest plants to care for. They require specific conditions to thrive, including high humidity, regular watering, and indirect light. If something is even a little off, you’ll notice issues across the leaves, stems and root system pretty quickly with these ones…

Maidenhair Fern Varieties: Differences and Similarities

The Maidenhair Fern, scientifically known as Adiantum, is a genus comprising of over 200 species of ferns. However, a few varieties are especially popular due to their unique characteristics, visual appeal, and adaptability to indoor environments.

Adiantum raddianum

The Adiantum raddianum, commonly known as the Delta Maidenhair Fern, is one of the most prevalent varieties. It boasts delicate, feathery fronds and small, triangular leaflets. This variant is loved for its graceful and airy appearance.

Adiantum capillus-veneris

Also known as the Venus Maidenhair Fern, Adiantum capillus-veneris features slender, black stems that support fan-shaped leaflets. Its lacy, frilly fronds are a striking contrast against the sturdy, wire-like stems.

Adiantum aleuticum

The Adiantum aleuticum or Aleutian Maidenhair Fern displays a vibrant green color and a unique frond structure that sets it apart from other varieties. Instead of the usual triangular leaflets, this variant has crescent or fan-shaped pinnae perched on a dark, wiry stem.

Adiantum pedatum

The Northern Maidenhair Fern, Adiantum pedatum, has a distinctively different look. Its fronds are divided into finger-like projections, each carrying several tiny leaflets. The result is a beautiful, bushy fern with a more upright growth habit than its counterparts.

Lighting requirements for your Maidenhair Fern

Like many ferns, the Maidenhair is a forest dweller. In its natural habitat, it enjoys soft, diffused light filtering through the trees. Therefore, when growing this Fern indoors, it’s important to mimic these conditions for optimal growth.

Indirect Light

While this fern loves bright light, direct sunlight can be extremely detrimental and should be completely avoided. The thin, delicate fronds of the Maidenhair Fern are highly susceptible to scorching and it can happen pretty quickly too if exposed to too much sunlight.

Low Light

Maidenhair Ferns can also tolerate some low light conditions. This makes them a versatile choice for rooms with less natural sunlight. However, growth may be slower in these conditions, and the fern’s lush green color may not be as vibrant so that’s worth considering when choosing the right placement.

Artificial Light

If your home doesn’t offer ideal lighting, there is another option! Maidenhair Ferns can also do well under fluorescent lighting. A few hours under a grow light each day can provide your fern with the light it needs to thrive.

Watering your Maidenhair Fern: Tips and Tricks

Proper watering is a crucial aspect of Maidenhair Fern care, as these plants thrive best in consistently moist soil conditions. However, they are also quite susceptible to overwatering so striking the right balance can be a bit challenging.

For the best results, consider the following tips and tricks:

  • Avoid letting the soil dry out: Maidenhair Ferns require a constant supply of moisture. Their thin, delicate fronds are susceptible to drying out if the soil becomes too dry. As a general rule, water the plant as soon as the top inch of soil feels dry to the touch.
  • Do not overwater: While the Maidenhair Fern likes constant moisture, it does not tolerate waterlogged soil well. Overwatering can lead to root rot, which is a common cause of plant death. Check the moisture level of the soil regularly to ensure the fern is not sitting in water.
  • Use tepid, not cold water: Maidenhair Ferns prefer tepid water. Cold water can shock the plant’s roots and may lead to leaf drop. Always allow tap water to come to room temperature before watering.
  • Water from the bottom up: Maidenhair Ferns benefit from bottom watering. This approach helps to ensure that the roots receive sufficient water without the risk of wetting the leaves, which can lead to problems such as leaf spot. Bottom-up watering also helps with the stability of the plant as it encourages the roots to grow downwards.

Humidity: What Maidenhair Ferns Need

This species, native to tropical and subtropical regions, is adapted to the consistently high humidity levels of these areas. Therefore, maintaining a humid environment will help you to avoid common issues such as dry brown leaves and stems.

Generally, Maidenhair Ferns prefer a humidity level of at least 60%. They can tolerate lower humidity levels down to 50%, but their growth may be hindered. On the other hand, very high humidity levels (above 80%) can lead to the development of fungal diseases.

Here are some of our favourite easy ways to increase the humidity:

  • Using a Humidifier: A humidifier can help maintain the required humidity level, especially in dry indoor environments (and you don’t need to do anything apart from turning it on). Remember to clean the humidifier regularly to prevent the buildup of bacteria and fungi.
  • Grouping Plants: Placing your Maidenhair Fern near other plants can increase the humidity around it, as plants release moisture into the air around them.
  • Misting: Regularly misting your Maidenhair Fern with water can also increase the humidity. Use room temperature or lukewarm water to avoid shocking the plant. However, avoid excessive misting as it can lead to fungal growth on the leaves.
  • Water Tray: Placing a tray filled with water near your fern can increase humidity as the water evaporates. Place pebbles in the tray to increase the surface area for evaporation, and place the plant on the pebbles to prevent waterlogging.

Fertilizing Maidenhair Ferns: What, When and How

What to Use

When selecting a suitable fertilizer for Maidenhair Ferns, it is advisable to use a balanced, water-soluble formula. Look for a product that has an equal ratio of Nitrogen (N), Phosphorous (P), and Potassium (K), often labeled as 20-20-20 or 10-10-10.

These three primary nutrients play a vital role in the growth and health of the plant. Nitrogen promotes lush, green foliage, Phosphorous aids in root development and boosts flowering, and Potassium enhances the overall vigor and health of the plant.

When to Fertilize

Fertilizing should be done only during the growing season, which for Maidenhair Ferns is typically from late spring to very early autumn. During this time, fertilize about every 3-4 weeks.

Fertilizing during the plant’s dormant period may lead to an accumulation of unnecessary salts in the soil, which could potentially harm the plant’s delicate root system.

How to Fertilize

Before applying fertilizer, ensure that the plant’s soil is damp. This can be achieved by watering a little bit a day before fertilizing. Dilute your chosen fertilizer with water, following the instructions on the product label.

Apply the diluted fertilizer to the soil, making sure not to splash any on the fern’s delicate fronds, as this can lead to leaf burn. After application, water the plant thoroughly to ensure that the nutrients are evenly distributed within the soil.

Pruning Maidenhair Ferns: How to Keep Them Healthy

Pruning is not just an aesthetic choice as many think it is; it also contributes significantly to the plant’s overall well-being. The following sections will provide a detailed guide on how to properly prune your Maidenhair Fern.

When to Prune Maidenhair Fern

It is generally recommended to mainly prune Maidenhair Ferns during their active growth phase, which typically falls in the spring and summer months. During this period, the plant is more resilient and can recover more readily from the stress of pruning.

However, if the Fern displays signs of disease or infestation, immediate pruning may be required to remove dead, dying, brown or yellow leaves, regardless of the season.

Tools Needed for Pruning

Always use sharp, clean scissors or pruning shears. The sharpness ensures a clean cut, reducing the chances of damage to the plant, while cleanliness prevents the spread of disease.

Steps to Prune Maidenhair Fern

  1. Examine the plant: Before you start pruning, it’s crucial to thoroughly examine the plant. Look for dead or yellowing fronds, as these are the ones you’ll want to remove.
  2. Start with dead fronds: Begin the pruning process by removing dead fronds. This helps to redirect the plant’s energy towards healthy growth. Alwats cut the fronds at the base, close to the soil.
  3. Prune yellowing fronds: Yellowing fronds indicate that they are unhealthy, but not quite dead. These should be pruned next, using the same method as for dead fronds.
  4. Thin out healthy fronds: If your Fern is quite dense, some thinning may be necessary. Remove some of the healthy fronds to allow for better air circulation and light penetration. It can be daunting to cut healthy parts of your plant but it’s worth it as it can promote healthier growth overall.

Maidenhair Fern Growth Rate

The growth rate of the Maidenhair Fern is generally considered to be moderate, though it will be impacted by several environmental factors as well as your care routine. To ensure optimal growth, it’s essential to provide this delicate fern with an environment that closely mimics its native habitat.

In perfect conditions, a healthy Maidenhair Fern can reach a height of 1-2 feet and a similar spread within a couple of years.

Slower Growth Rate

A slower growth rate could be due to adverse conditions or inadequate care. For example, a Fern placed in a location with too little light, low humidity, or cooler temperatures may struggle to grow. Additionally, underwatering or overwatering, along with poor soil quality or lack of fertilization, can all contribute to slowed growth and dead leaves that you’ll have to remove.

Maidenhair Fern Toxicity

Maidenhair Fern Toxicity to Humans

Fortunately, the Maidenhair Fern is classified as non-toxic to humans. There are no known harmful compounds present in any part of the plant that could potentially lead to adverse health effects if ingested or touched.

However, it is always advisable to err on the side of caution. If a large quantity of the plant is ingested, it could induce mild gastrointestinal discomfort, although instances of this are rare.

Maidenhair Fern Toxicity to Pets

Both the American Society for the Prevention of Cruelty to Animals (ASPCA) and the Pet Poison Helpline list the Maidenhair Fern as non-toxic to dogs and cats. This luckily means that pet owners can grow this plant without fretting over potential toxicity issues.

Even so, certain animals might be allergic to the plant, leading to symptoms such as skin irritation or digestive upset if they consume it so it’s always recommended to exercise caution.

Maidenhair Fern FAQs


Common Problems with your Maidenhair Fern

Here are some common issues that you might run into. It’s important to know what the early warning signs are so that you can diagnose and treat any issues early to give your plant the best chance of bouncing back.

Fiddle and Thorn is a participant in the Amazon Services LLC Associates Program, an affiliate advertising program designed to provide a means for sites to earn advertising fees by advertising and linking to Amazon.com

Take our houseplant survey!

Quickly respond to our 30 second houseplant survey and get 75% off our Complete Houseplant Care eBook!

Take the Survey

No thanks…

10 Low Light Cat-Safe Houseplants

Last Updated: November 5, 2023

Low Light Cat Safe Houseplants

Cat with houseplants

Picking the right houseplants for your home can be daunting. There are so many things to consider in terms of what the plant needs, but also other factors like their toxicity to pets.

Finding a low-light plant that’s also totally safe for your cat to be around isn’t as difficult as you might think. There are quite a few low-light tolerant non-toxic houseplants and below we will give you the rundown of our favorite 10.

Understanding Low Light Conditions

Low light doesn’t mean no light. It’s less about the intensity of the light and more about the duration and consistency of the light.

Naturally, low light conditions will be areas in your home that are far from windows, or rooms that get minimal daylight. Remember, while these plants are tolerant of low light conditions, they still need some light to photosynthesise and thrive.

The great thing about these low-light houseplants that we’ve listed below is that they can adapt and start to flourish even in less-ideal light conditions.

Whether you’re a seasoned plant parent or a budding green thumb, these pet-friendly, low light houseplants are an excellent addition to your indoor garden.

Top 10 Low Light Houseplants that are Cat Safe

1. Spider Plant

Spier Plants thrive in a range of lighting conditions, from partial to full shade. Their long, slender, arching leaves can jazz up any living space and they are absolutely safe for your cats and kittens.

  • Light Requirement: Low to medium light. They appreciate a bit of indirect sunlight though.
  • Watering: Aim for consistently moist, but never waterlogged soil. They are pretty drought-tolerant and will start to look quite droopy if they need more water.
  • Additional Care: Spider Plants are non-toxic and perfectly safe for cats.

Another benefit is that a Spider Plant will help improve your home’s air quality too as NASA rates them as top air purifiers, removing toxins like xylene and formaldehyde from your home.

2. Ponytail Palm

The Ponytail Palm is a perfect choice for both low light conditions and those of us with curious cats. You can trust it to not just be safe, but also to purify the air and add a unique touch to your home with its intriguing shape and cascading ‘hair’.

Your Ponytail Palm will appreciate a well-draining pot and soil as it prefers staying on the drier side.

  • Light: Although adaptable to low light, prefers bright indirect light.
  • Water: Water sparingly, allowing the top inch of soil to dry out between waterings.
  • Extra Care: Loves well-draining soil and pots with drainage holes.

3. Calathea Orbifolia

The Calathea Orbifolia is a tropical plant most famous for its large, broad leaves with silver bands that are eye-catching even in low light.

Not only will this plant thrive under minimal lighting, but it’s entirely safe for your cats too.

One main thing to remember though is just like other Calathea varieties, this one loves a humid environment.

  1. Watering: Cat owners, remember to water this plant only when the top inch of the soil has dried out as overwatering can cause root rot.
  2. Light: Although the Calathea Orbifolia tolerates low light, a bit of indirect bright light will make it happier. Avoid direct sunlight, it can dry out the leaves and cause brown and yellow patches.
  3. Humidity: As mentioned earlier, maintain a high humidity environment for this plant. Misting the leaves or using a pebble tray filled with water can help with this.

4. Nerve Plant

The Nerve Plant, or Fittonia, is loved for its mosaic pattern of red, pink, or white veins crisscrossing rich green leaves. It gets its name from these distinctive, nerve-like patterns. Although the name might sound a bit dangerous, Nerve Plants are totally safe and non-toxic for cats.

While it prefers low light, it won’t do well in utter darkness. It also has a reputation for being a tad fussy and likes its environment just right. Too much water, heat, light or cold can distress this delicate plant, causing its leaves to droop.

But don’t worry, the drooping is an early sign of stress and gives you plenty of time to diagnose and solve the issue.

5. Kentia Palm

If you’re looking for a touch of elegance, then the Kentia Palm could be the perfect low-light hosueplant for you.

Also known as the Kentia Howea or the Sentry plant, this easygoing tropical houseplant not only thrives in low light conditions, but it’s also entirely safe for your cats.

One of the main reasons you should consider adding a Kentia Palm to your indoor jungle is its resilience. It can withstand less-than-ideal conditions, including poorer light, a bit of neglect, or dry air.

While it prefers bright, indirect light, it can also survive quite comfortably in lower light conditions. The only thing that will change in low light is that it may grow a bit slower.

Size: Typically, a Kentia Palm will grow between 5-10 feet indoors. So, if you’re after a larger plant, this is a great choice.

Care: Despite its tropical origins, the Kentia Palm has low water requirements. Watering once every one or two weeks is usually plenty. Just ensure the top inch of the soil is dry before watering again.

Toxcity: The Kentia Palm Poison Control classifies as non-toxic to both cats and dogs.

6. Cast Iron Plant

It’s also known as Aspidistra Elatior, and its resilience to adverse conditions makes it one of the favoured house plants for low light conditions. And best of all, it’s also totally cat safe.

It’s name stems directly from its hardy nature. This plant can withstand not just low light, but also drafty areas, dry conditions, and a general lack of constant attention or care.

So if you’re someone who tends to forget about your plants every now and then, this could be the perfect match for you and your cat.

Plant Care:

  • Light: Low light tolerant, but can also withstand brighter conditions.
  • Water: They prefer well-drained soil. Water thoroughly and allow the soil to dry out between watering sessions.
  • Added Care: Dust the leaves periodically to help the plant perform photosynthesis efficiently. No need for frequent fertilising, once in spring should be quite sufficient.

7. Bromeliads

A tropical favourite, bromeliads are brilliant at brightening up any corners without much light. These evergreen perennials are extremely versatile and are a vivid pop of colour in darker rooms.

Bromeliads are also safe and non-toxic for cats, so you don’t need to worry about having them around your home.

Here are some tips to keep your bromeliad plant healthy:

  1. Watering: Despite the tropical association, Bromeliads do not need frequent watering. It’s best to wait until the potting medium is dry. Overwatering can invite root rot which quickly leads to a whole range of problems.
  2. Humidity: They enjoy humid conditions. Mist the leaves occasionally, especially during dry weather or if you keep your home’s temperature higher.
  3. Feeding: Feed with a good quality bromeliad or tillandsia (air plant) fertiliser during the growing season.

8. Maidenhair Fern

Let’s now move on to the charming Maidenhair Fern (Adiantum), which is one of our favorite houseplants. Although it demands a bit more attention and can be quite fussy about its care, Maidenhair Ferns are safe for cats!

This plant is known for its delicate, small leaves and wiry stems, adding a soft texture to your interiors. Suitable for low-light conditions, it makes a perfect addition to any darker corners of your home.

One thing to keep in mind with this particular plant is that it appreciates a very humid environment. If your home tends to be on the dry side, you could consider placing the pot on a tray filled with pebbles and a small amount of water, creating a mini-humidifier effect.

As this Fern has very small delicate leaves, dry air can be really damaging and you’ll soon see yellow and brown areas across your Fern.

But don’t let that scare you off! With atouch of extra care, your Maidenhair Fern can thrive and flourish.

9. Chinese Money Plant

Also known as Pilea peperomioides, the Chinese Money Plant has a rich folklore associated with it. Famed for attracting wealth, hence the nickname, this plant is a popular choice and it’s also safe for cats.

Their vibrant, coin-shaped leaves stand out in a crowd and they are very adaptable to a range of environments, including lower light levels. The main thing that just changes with less light is growth can be slower and you may see less pups grow.

Care requirements for this plant are relatively straightforward. Depending on how low the light is, you might need to rotate the plant occasionally to ensure it gets even exposure. You’ll see it try to reach towards the sunlight if it’s not getting enough.

Additionally, these plants prefer a well-draining potting mix. Overly damp soil can lead to root rot, a common issue among indoor plants.

You can easily propagate Chinese Money Plants by cutting a leaf and immersing it in water. Once roots start emerging, plant it in soil, and you’ll soon have another Pilea to gift or grow.

Remember to give the plant a good shower every once in a while. Dust can accumulate on the leaf’s surface, hindering its light absorption (which affects photosynthesis).

10. Rattlesnake Plant

You might not expect the Rattlesnake to be non-toxic to cats due to it’s name, but it is! And on top of this, it can also adapt well to lower light areas.

The tops of the leaves are an appealing green colour, dotted with darker green spots – a feature that resembles the scales of a rattlesnake (hence the name). On the flip side of the leaves is a beautiful purplish-red hue, creating a bold contrast.

Latin Name: Calathea lancifolia

Light Requirement: Low to medium

Water Requirement: Moderate

Soil Type: Well-draining

Care Tips for Houseplants in Low Light

Thriving in low light conditions doesn’t mean your houseplants won’t appreciate some extra love and care. Here are a few tips:

Adapt to Low Light: Keep in mind, not all low light is created equal. Gradually introduce your plants to low light areas to help them adjust.

Avoid Overwatering: Plants in low light tend to use less water, as their rate of photosynthesis is slower. Make sure to avoid over watering; a good rule of thumb is to wait until the top inch of soil is dry before watering again.

Rotate Your Plants: Allow all parts of your plant to get exposure to limited light source by rotating it periodically. This promotes balanced growth.

Prune Regularly: Regular trimming helps the plant focus its energy on new growth. Removing yellow, browning, or damaged leaves can keep the plant healthy.

Choose the Right Container: Use a pot with sufficient drainage to prevent water from sitting at the bottom, which can cause root rot.

Fertilise Sparingly: In low light, houseplants will grow slower, meaning they don’t require as much fertiliser. Overfertilising can lead to build up of salts that can harm your plant – it’s often safer to under-fertilise than overdo it.

Fiddle and Thorn is a participant in the Amazon Services LLC Associates Program, an affiliate advertising program designed to provide a means for sites to earn advertising fees by advertising and linking to Amazon.com

Take our houseplant survey!

Quickly respond to our 30 second houseplant survey and get 75% off our Complete Houseplant Care eBook!

Take the Survey

No thanks…