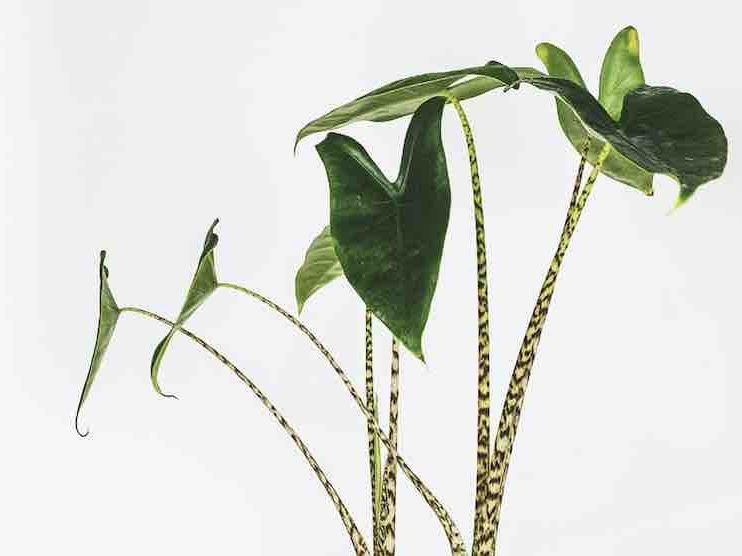
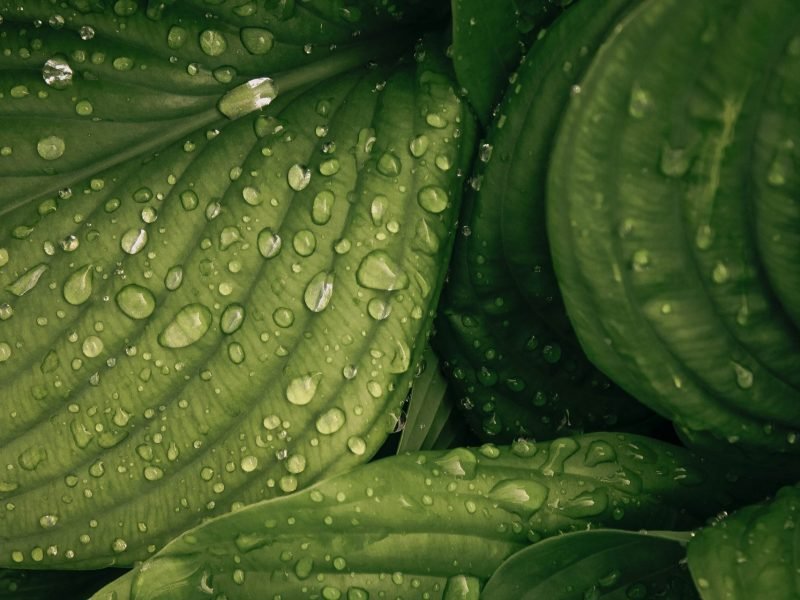
If you notice that your Arrowhead is starting to develop brown leaves or brown leaf tips then it can be quite worrying. However, there are only a couple of things that cause this which makes it one of the simpler problems to fix. Below we will go through the main reasons why Arrowhead plants develop brown leaves.
Dry air can cause brown Arrowhead leaves
A good tip to remember when caring for houseplants more generally is that brown leaf tips are often caused by a lack of humidity in the air. Although you cannot reverse the brown tips that are already on your Arrowhead plant, there are a few things you can do to increase the humidity level and stop any more from developing.
Mist your plant
Use a spray bottle to mist the leaves on your Arrowhead a few times a week. This will dramatically increase the humidity around your plant. It’s also a great way to keep the leaves clean and remove dust that builds up on the leaves. Arrowhead plants are quite susceptible to dust as their leaves are quite flat and large. Therefore, you need to ensure they stay clean so it doesn’t prevent sunlight from hitting the leaves.
Shower your Arrowhead
By giving your plant a shower you can instantly increase the humidity. However, this is quite a short term solution so best paired with another one of our methods for long term effect. Put your plant in the bath or sink and wash down the leaves with lukewarm water. It’s also a great way to get rid of any pests that might be lurking around on your plant.
Use a pebble tray
This one requires a little bit of DIY. Fill up a tray with small pebbles and add water so it reaches about halfway up the tray. Place your Dragon Tree on top and throughout the day the water will evaporate around the plant. You need to make sure that the roots of your plant are not touching the water (which is why we say to fill up the tray halfway). If the roots are sitting in the water then it will very quickly lead to root rot and a whole range more problems!
Use a humidifier
Humidifiers are a real game changer when it comes to tackling brown leaf tips. They just do what it says on the box – increase the humidity in the room. You can get really affordable ones from Amazon (this is the one we use which is great) but if you are willing to spend a bit more they come with fancy setting such as scheduling and auto turn on/off. Your Arrowhead plant and other houseplants will LOVE it!
Not enough water can also cause brown leaves
Underwatering is also a common cause of brown Arrowhead leaves. Although they won’t die on you instantly if they have to go a little longer without water, consistent underwatering will dry out the plant and the leaves causing them to turn brown.
You want to be 100% confident that there is an issue with watering before you change anything about your routine. If you switch to giving your plant too much water when it didn’t need it, this can cause a whole range of further issues. Always check the soil moisture before altering your watering routine. If the soil is really dry and powdery when you take your Arrowhead out of its pot then this is probably the issue.
You want to slowly reintroduce watering by giving your plant a bit of water once a day for a week and your plant should slowly begin to recover. Underwatering causes less damage to the root system than overwatering so your plant should begin to bounce back after a few weeks. Keep an eye on how moist the soil is so you don’t go the other way and overwater accidentally.
Should I trim away the brown leaves on my Arrowhead plant?
We always recommend trimming the brown leaves off the plant if the dried patches are all over the leaf. If it is just the tips that are brown then they can stay on. Once the leaves have turned brown there is no going back so it is better to trim them away so your Arrowhead can focus on producing new, healthy and green growth. You don’t want your plant wasting vital energy on trying to save the dead or dying leaves. Plus aesthetically your plant will look better and healthier if you cut away the brown parts.
So those are the main two reasons why Arrowhead plants develop brown leaves. If you want to find out more about caring for your plant, or solving other common problems, visit our Arrowhead Plant Care Guide.
Our comprehensive (and rather good looking) eBook that will teach you everything you need to know to successfully care for, and maintain your houseplants!
Fiddle and Thorn is a participant in the Amazon Services LLC Associates Program, an affiliate advertising program designed to provide a means for sites to earn advertising fees by advertising and linking to Amazon.com
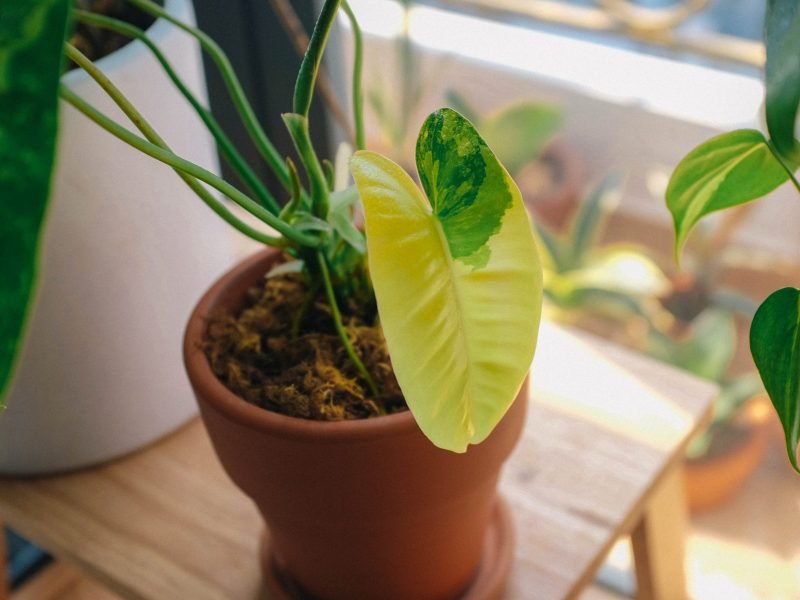
Why are my Arrowhead Plant’s leaves turning yellow?
January 5, 2021
Last Updated: April 1, 2022
There are quite a few reasons why your Arrowhead plant may be turning yellow so it’s important you eliminate them one by one. The most common reasons are to do with watering but it is worth looking at other factors such as humidity, light and nutrient levels before changing anything in your care routine.
Underwatering
If your Arrowhead’s leaves are yellow, dry and crispy it may be because you have not given it enough water for a while. Over time, consistent underwatering will mean your plant begins to dry out, turn yellow and become very limp.
It is important to get to know each of your houseplants so you get a feel when they are ready for watering. There are a few really easy ways to do this. First check the moisture at the top of the soil, if it is still damp then it won’t need watering for another few days. The second method is lifting up your Arrowhead before and after watering you so you start to gauge how heavy the soil is when it is in need of water. Make sure to pick it up by the pot rather than the leaves or stems as you don’t want to damage the plant.
If you think that underwatering is the cause of your Arrowhead’s yellow leaves then it is important that you reintroduce watering slowly. You may think that the best thing to do is drown your plant in water but this will actually shock your plant and cause even more harm. Instead, you want to water it little but often for a few days to make sure the soil gets a good soaking.
Overwatering
Another cause of yellow leaves on an Arrowhead plant is overwatering. If the yellow leaves are falling off the plant, and are not dry or crispy then this is most likely the cause.
Arrowheads don’t like sitting in pools of water for too long and it can cause their roots to rot. This will mean the plant is unstable and unable to get nutrients from the soil and the long stems cannot hold up the leaves leaving the plant floppy.
If you think your Arrowhead is waterlogged then check the moisture of the soil immediately and adjust watering accordingly. We also recommend replacing the potting soil straight away (rather than waiting for it to naturally dry out) so that the roots can begin to recover.
Top tip: waterlogged soil can give off a damp, musty smell so get up close to your plants every once in a while to check!
Dry air
Arrowheads like slightly humid environments and can struggle in homes with dry air. This can be especially damaging in winter months when we often have the heating on for a lot of the day. If the yellow leaves on your Arrowhead starting off with brown or yellow spotting on the leaf, then this may be the cause.
To increase the humidity for your Arrowhead we recommend misting the leaves, putting together a pebble tray or investing in a humidifier.
Nutrient Deficiency
Another reason your Arrowhead plant may be developing yellow leaves is a lack of nutrients. This can happen if you haven’t switched out the potting soil in over a year or you don’t fertilise during the growth months.
We recommend using a diluted water-soluble fertiliser during spring and summer to make sure your plant is getting all the nutrients it needs.
Sunburn
The correct light level is a really important element to monitor when taking care of your Arrowhead plant. If your plant is receiving too much bright direct sunlight each day you may start to notice yellow patches forming on the leaves. This is where the leaves are becoming sunburnt, something which is unfortunately irreversible.
If your Arrowhead is receiving too much light then make sure to move it to a slightly shadier spot in your home immediately. You may be able to move it closer to the window in winter when the sun isn’t as strong so keep an eye on lighting changes throughout the year. If you prefer you can carefully trim away the burnt patches on the leaves so your Arrowhead looks healthier and can focus on producing new healthy growth.
Natural Ageing
If you have gone through all of the above but none of it really fits what is going on with your Arrowhead then it may simply be natural ageing. Over time it is totally normal for your Arrowhead to drop some of its oldest leaves as it focuses on new bigger growth. These old leaves will first turn yellow before falling off the plant.
If the rate of yellowing is quite slow (1 or 2 every few months) then it probably is nothing to worry about and is simply part of the natural shedding process. Do keep an eye on how often they are turning yellow though as if the rate speeds up then it is worth checking the plant over again for the problems we outlined above.
Luckily, if you have caught the problem early and there aren’t too many yellow leaves on your Arrowhead then correcting the issue should solve it and you should start to see new luscious green growth pretty soon! Many people ask us whether or not they should trim off the yellow leaves and we always say yes! Not only will it make your plant look healthier but it stops it wasting energy trying to save a dead leaf. There is no going back from dry crispy or sunburnt leaves so it is better to just get rid.
You can find out more about caring for your plant in our Arrowhead guide. Or if you want to learn everything there is to know about houseplant care then our downloadable ebook is the one for you!!
Our comprehensive (and rather good looking) eBook that will teach you everything you need to know to successfully care for, and maintain your houseplants!
Fiddle and Thorn is a participant in the Amazon Services LLC Associates Program, an affiliate advertising program designed to provide a means for sites to earn advertising fees by advertising and linking to Amazon.com
Aside from watering and the occasional repotting and pruning, there is one other super important thing to add to your houseplant care list; cleaning the leaves!
It can be easy to forget that you need to clean your houseplant’s leaves but it’s a really important part of caring for your plants properly.
Why should I be cleaning my houseplants’ leaves?
Dusting and wiping the leaves on your houseplants’ leaves is super important and has a whole load of benefits. Firstly, dust and grime that slowly build up on your plant will prevent them from breathing properly and cleansing the air in your home. Regularly dusting the leaves of your plant will also mean they can soak in as much sunlight as possible.
If you’ve ever thought that the leaves on your plants look a little dull, then this is most likely due to the dust on the leaves. Giving the leaves a wipe down will do wonders and make them shine more than leaf shine ever could.
And lastly, cleaning your houseplants regularly can get rid of pests that you might not even know are hiding on your plant. It also gives you a good chance to check in on your plants to spot any potential issues early before they take over your plant and the issue becomes difficult to fix.
How often should I be cleaning my houseplants?
There is no one-fits-all rule when it comes to cleaning the leaves on your houseplants. You’ll have to just keep an eye on them and wipe them down when they look quite dull and dirty. We use the rule of once a month as a minimum and adjust this as needed for each individual plant. You might also want to clean the leaves more after any DIY or building work that’s left them a little dustier than usual.
Method 1: Wiping down the leaves
The easiest method of cleaning houseplants is to carefully wipe the leaves down using a clean cloth. Apply gentle pressure so you don’t damage the leaves. For delicate houseplants or those with fuzzy leaves, you are better off using a paintbrush or pipe cleaner to dust the leaves down and remove the dust.
If the leaves are just dusty, then a damp cloth or paintbrush should be enough to clean them. However, if there is some grime on the leaves then you may need to use a drop or two of dish soap.
Top tip: Always use lukewarm water
When cleaning your houseplants, we always recommend using lukewarm water. Avoid using really hot or cold water as this can damage the leaves.
Method 2: Shower your houseplants
The other method of cleaning your houseplants is giving them a shower every now and again. This can help to remove dust, dirt and pests from your houseplants and is good to do a few times per year.
Pop your houseplants in the sink or shower (depending on size) and wash down with lukewarm water. Keep the water pressure fairly low for plants with long stem and delicate leaves as this might damage the plant. Leave your plant in the shower for a little while so any excess can run out of the pot. This will prevent the soil from waterlogging.
Don’t use a feather duster (unless you reeeeallly have to)
Feather dusters push the dust around, rather than collect it like a cloth. This is usually fine when dusting your furniture and knick-knacks but when it comes to plants, stay away. This is because there may be pests on your plant that you don’t know about and using a feather duster will simply spread these all around the room, potentially falling on your other houseplants.
Don’t use leaf shine
There are several products that claim to turn your houseplants shiny. Whilst some plants can tolerate leaf shine, some really don’t bode well with it and it can cause the leaves to fade or turn brown. Leaf shine won’t achieve anything that can’t be done with a good dusting or showering so we recommend staying away from chemicals as much as possible.
Chemicals such as leaf shine can also block the pores in the leaves of your plants if you accidentally use too much, which don’t allow them to breathe and cleanse the air.
Top tip: plants with variegation or leaf patterns such as Calathea plants are especially sensitive to leaf shine so it’s a big no-no for these plants!
So that’s our introductory guide to cleaning your houseplants. It might take a while to get used to introducing that in your regular plant care routine but it’ll be a habit in no time. We always use the time to check in with each plant, look over their leaves and the undersides to spot any signs of pests or any brown spots that might indicate something is wrong in the care or environment.
Fiddle and Thorn is a participant in the Amazon Services LLC Associates Program, an affiliate advertising program designed to provide a means for sites to earn advertising fees by advertising and linking to Amazon.com
What is a Node on a Houseplant? And why are they important
March 14, 2023
Last Updated: March 14, 2023
In a lot of plant care and propagation guides, nodes play a pretty prominent role. But what exactly is a node on a plant? Why are nodes important? And how do I even identify them? Well, luckily these are all questions that we will be covering in this article.
What is a node on a houseplant?
Before we get into it, it’s pretty important to note that the nodes we are talking about are the ones on houseplants and not in the computer science context. On houseplants, nodes are points on a plant’s stem where a leaf or a branch grows out from. Nodes are vital to your plant’s growth and development because this is where the meristematic tissue is found. This tissue aids the growth of new cells (which form leaves, branches and the roots of your plant).
The function of nodes on a houseplant
Nodes are responsible for plant growth and are needed to form new leaves and stems. Because of this, when you propagate your plant, you will need the cutting to contain at least one node. Without it, there will be no new growth as this is where the new roots and the new stems will form from.
For most plants, we tend to recommend including at least two or three nodes in the cutting rather than just one. This helps with overall root growth and increases your chances of a successful propagation.
There are a few exceptions to this as some plants do allow you to propagate them using just a single leaf. This is because some plants have adventitious buds which means that new growth can grow from individual leaves.
But it’s not just for propagation where nodes are important to consider. When pruning your plant, cutting just above the node will encourage new growth to develop from that uppermost node. With a lot of houseplants, you’ll find that cutting in one place actually leads to two new stems or branches forming from the node. This can be a great way to increase the bushyness of your plant and gives you more control when shaping it.
How to identify nodes on a houseplant
Bumps in the stem
Most of the time you will find that the section of stem that contains the node is slightly larger than the rest. If you run your finger along the stem, you can usually feel a pattern of nodes. There may also be some scarring on the plant’s stem where the nodes are.
Aerial roots
Some plants will actually grow aerial roots from their nodes. Monstera plants are the best example of this as they can grow aerial roots that will actually reach the soil.
Aerial roots are a little bit different to the normal root system of a plant. When in their native environment, they will often attach themselves to a tree or another plant as a way to support themselves. Aerial roots also help them absorb moisture and nutrients from the air.
Stem joints
Another way of locating nodes across your houseplants is by looking for stem joints. This is where leaves or other stems are coming off a stem.
At the base of the plant
There are also a lot of plants that only have nodes at the base, such as Spider Plants. In order to propagate a Spider Plant, you’ll need to propagate one of the babies or divide the base of the plant in two. Calathea plants are also like this meaning the only way to propagate them is through division!
Hopefully, this overview of nodes and their function on houseplants has been useful for you. Nodes are really important to take into account when you are propagating and pruning your plants.
Without them, you won’t have much success multiplying your plants! Do note though that you will find nodes in different places on all houseplant types so make sure to know the location for each of your plants so that when it comes to propagating or pruning, you know what to do!
Fiddle and Thorn is a participant in the Amazon Services LLC Associates Program, an affiliate advertising program designed to provide a means for sites to earn advertising fees by advertising and linking to Amazon.com
What Causes Brown Leaves on Anthurium Clarinervium plants
November 13, 2021
Last Updated: June 21, 2022
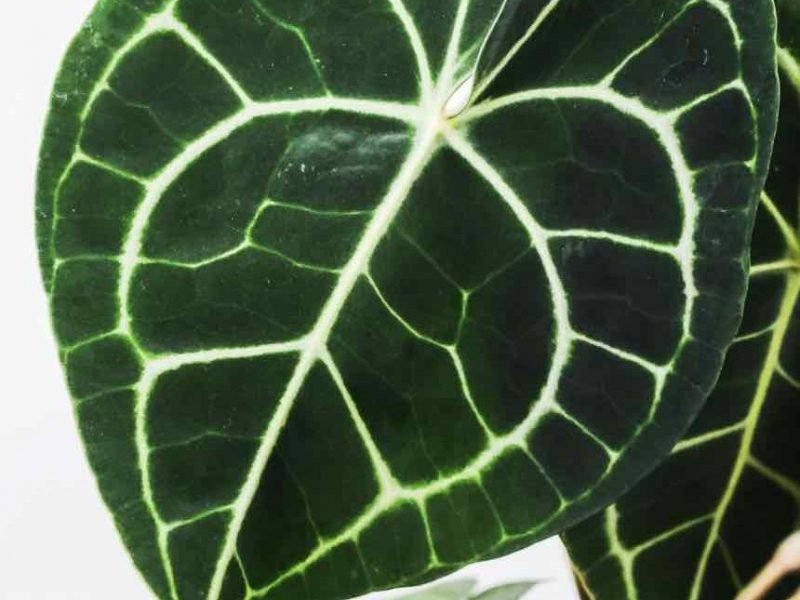
Adored for their striking heart-shaped white-veined leaves, the Anthurium Clarinervium is a must-have for every plant lover. It can be pretty frustrating when their incredible foliage starts to turn brown so we have put together a detailed guide to help you diagnose the issue, solve whatever is wrong and prevent it from happening again.
Lack of humidity can cause brown leaf tips
Dry air might be the cause of your Anthurium Clarinerviums’s brown leaves if the tips and edges are the first to go brown. Although the current brown tips are irreversible, there are quite a few simple ways you can increase the humidity to stop any more from developing on your plant.
Misting the leaves
This is the first port of call when it comes to increasing the humidity for your Anthurium Clarinervium and preventing brown leaves. Mist the leaves usinga spray bottle 3-4 times a week. Not only will this increase the humidity but it will also get rid of any dust that has formed on the leaves so it’s a win-win. We recommend misting your Anthurium Clarinervium in the mornings as it allows enough time for the water droplets to evaporate before it gets cold during the night. Cold damp leaves are more susceptible to root rot so you want to be careful not to cause any other issues whilst trying to fix the brown leaves.
Put your Anthurium Clarinervium in the shower
Washing down your plant you can instantly increase the humidity and prevent more brown leaves. Put your plant in the bath or sink and wash down the leaves. Use lukewarm water at low pressure so you don’t damage, shock or burn your Anthurium Clarinervium.
Make a pebble tray
This method requires a little bit of DIY but it’s worth it in the end and is a good preventative measure for brown leaves on Anthurium Clarinerviums. Fill a tray with small stones and add water so it reaches about halfway up the tray. Place your Anthurium Clarinerviums on top and throughout the day the water will evaporate around the plant. You need to make sure that the roots of your plant are not touching the water (which is why it’s important to only fill up the tray halfway). If the roots are sitting in the water then it will very quickly lead to root rot and a whole host of other more serious issues, not just brown leaves.
Invest in a humidifier
Theseportable and affordable gadgets are a real game-changer when it comes to increasing the humidity for your plants and your Anthurium Clarinerviums (and your other humidity loving houseplants) will love you for it.
If the leaves on your Anthurium Clarinerviums have turned light brown, dry and crispy, then you may not be watering your plant enough. Although Anthurium Clarinerviumss like their soil to dry out between waterings, they won’t be able to go weeks and weeks without any water. Consistent underwatering will cause them to develop brown leaves.
Before you go and drown your Anthurium Clarinervium in water to prevent more brown leaves and make up for a lack of water, you need to make sure that this is actually the issue. Carefully take your Anthurium Clarinerviums out of the pot to inspect the soil. If it is very dry and powdery, and the roots are shrivelled, then your Anthurium Clarinervium will need more water.
Slowly reintroduce water to your plant over the course of a week as a sudden change in environment can shock your Anthurium Clarinerviums and cause more problems than a few brown leaves.
Check for temperature extremes
Your Anthurium Clarinerviums could be in an area where it is suffering from temperature shock without you feeling it and this might be causing the brown leaves. This often occurs if your Anthurium Clarinervium is too close to a heating/AC vent or a radiator. Whilst the overall temperature in your home might be ideal for cacti growth, be wary of drafty windows, doors and vents that might be affecting your Anthurium Clarinerviums.
Make sure to open your windows to make sure that the air in your home is circulating properly. This reduces the risk of hotspots forming in the room where your Anthurium Clarinerviums and will help to prevent brown leaves. You can always pick upa digital thermometer to check the spot your Anthurium Clarinerviums is sat for peace of mind.
Should I trim away the brown leaves on my Anthurium Clarinervium?
Now that you’ve hopefully diagnosed the issue with your Anthurium Clarinervium you might be wondering what to do about the brown leaves that are already there. Unfortunately, once a leaf has turned brown, there is no reversing that. This is why we often recommend removing the leaves that have turned a solid brown colour.
If only the edges of the leaves have turned brown, then it can be a good idea to leave these as they aren’t all dead and can still be valuable to your Anthurium Clarinervium. However, any leaves that are fully brown and have crisped up should be removed. This will stop your plant from wasting energy trying to revive them. Instead, it allows your Anthurium Clarinervium to focus all of its energy on new healthy growth.
When removing the leaves, make sure to trim them off using sharp tools. Never rip or pull the leaves off by hand as this can damage the stems and other parts of the plant that might be otherwise healthy.
How do I stop my Anthurium Clarinervium from turning brown?
The key to preventing your Anthurium Clarinervium from developing brown leaves is to make sure that it is growing in the ideal environment. You need to make sure that environmental factors such as sunlight, warmth and humidity are right for your plant, as well as balance watering so that your Anthurium Clarinervium is getting what it needs.
Care requirements will be different for each plant so we recommend looking at our care guide for a more comprehensive overview.
Can brown leaves turn green again?
Unfortunately, once the leaves on your Anthurium Clarinervium have turned brown, there is no reversing this as that part of the leaf has died.
These are the most common reasons why Anthurium Clarinervium plants start to develop brown leaves. We recommend going through each one whilst inspecting your plant, your care routine and your Anthurium Clarinervium’s environment closely to see which one fits. After making any adjustments, keep a close eye on your plant to see if things are starting to get better or if any other problems are starting to arise.
Fiddle and Thorn is a participant in the Amazon Services LLC Associates Program, an affiliate advertising program designed to provide a means for sites to earn advertising fees by advertising and linking to Amazon.com
How to Care for Your Watermelon Peperomia: A Complete Guide
August 16, 2023
Last Updated: October 16, 2023
Watermelon Peperomia
Introduction to Watermelon Peperomia
The Watermelon Peperomia, also known by its Latin name of Peperomia argyreia, has shot up in popularity over the last few years! Loved for its unique, watermelon-like patterned leaves, these plants can adapt well to a range of indoor environments.
One of the appealing features of the Watermelon Peperomia is its compact size. The plant tends to grow up to a foot in height, making it the perfect addition to your desktop, table or windowsill.
Characteristics of the Watermelon Peperomia Plant
Appearance
Its common name – Watermelon Peperomia – stems from the striking resemblance of its leaf pattern to the rind of a watermelon. The ovate leaves with silver stripes against a dark green background indeed mimic the appearance of a ripe watermelon.
Size and Growth
The Watermelon Peperomia is a compact plant, usually growing no taller than 12 inches. In terms of width, the plant generally does not exceed 8 inches. This makes it a perfect choice for those looking for a space-efficient plant.
Blooming
While the Watermelon Peperomia is primarily loved for its patterned leaves, it does produce flowers. Its blooms are small, green and grow on tall, slender stalks. They are not as visually exciting as the leaves and it’s totally up to you whether you keep them on the plant or remove them.
Light Requirements for Watermelon Peperomia
Firstly, Watermelon Peperomia prefers bright but indirect light, the indirect is the most important thing. This can be achieved by placing your plant near a window that gets plenty of natural light, but not directly in the sunlight. Direct rays hitting the leaves can lead to scorching of the leaves, causing them to turn yellow or brown. This is especially a problem in summer when the sun is a lot stronger.
In seasons with less natural light, such as winter, you may need to supplement with artificial light to keep your plant healthy or move your plant a little closer to the window. Fluorescent lights or grow lights can be a good solution in such situations.
Low light: Changes in light intensity can affect the color and pattern of the Watermelon Peperomia’s leaves. If the light is too dim, the leaf patterns may fade and you may find new growth to be smaller and more leggy.
Watering your Watermelon Peperomia: When, How and How Much
When to Water your Watermelon Peperomia
We are very against having a set schedule to water your plants and instead recommend that you only water your plant when it actually needs it. This can change from week to week and throughout the seasons quite dramatically.
A common sign that your plant needs watering is when the top 1-2 inches of the soil is completely dry (if you are watering from the top down). You can use a variety of methods to test soil moisture, including the finger/chopstick method, the lifting method or using a moisture meter.
How to Water your Watermelon Peperomia
When it comes to watering, this plant prefers the ‘soak and dry’ method to ensure that the potting mix has time to dry out, rather than staying moist for long periods of time. Here’s how to do it:
Soak: Water the plant thoroughly, ensuring every part of the soil gets wet.
Drain: Allow any excess water to drain out. Never leave your plant sitting in water as this can lead to root rot!
Dry: Wait until the top 1-2 inches of the soil are dry before watering again. This usually takes about a week, but can vary depending on conditions such as light and humidity.
How Much Water to Use
There’s no one-size-fits-all answer to this as it depends on several factors including the size of your plant and its pot, the time of year, and the humidity of your home. Generally, a thorough soaking of the soil until water comes out of the drainage holes is a good rule of thumb. Remember, it’s always better to under-water than over-water when it comes to the Watermelon Peperomia.
Ideal Temperature and Humidity Levels
Temperature: Watermelon Peperomia plants prefer warmer environments, much like their natural tropical habitat. Ideal temperatures range from 65 to 80 degrees Fahrenheit (18-27 degrees Celsius). However, they can tolerate lower temperatures down to 60 degrees Fahrenheit (15 degrees Celsius) without harm.
Avoid placing your plant in areas where it may be exposed to extreme temperature fluctuations, such as near heaters or air conditioning units. Using a digital thermometer can really help here to spot changes before it causes harm to your plant.
Humidity: These plants also thrive in humid conditions. Ideally, the humidity level should be between 40% and 60%. To increase humidity, consider placing your plant in a tray filled with pebbles and a bit of water. You can also group it with other plants, as this naturally increases humidity through transpiration. A humidifier is another great option for a more consistent higher humidity level.
Choosing the Right Soil and Pot
Your Watermelon Peperomia requires well-draining soil, a blend that prevents water from stagnating around the roots. A premium potting mix combined with either perlite or sand can do the trick. The ratio should be around 2:1, two parts potting soil to one part perlite or sand.
Potting soil: Rich in organic matter, it provides the necessary nutrients for your plant.
Perlite or sand: These elements enhance the soil’s drainage capacity.
When it comes to the right pot, it needs to have drainage holes at the bottom. This feature allows excess water to escape out of the bottom of the pot, preventing any potential root rot. A ceramic or terracotta pot is beneficial because these materials are porous, allowing the roots to breathe.
When it comes to size, a slightly snug pot is best for Watermelon Peperomia. This plant grows predominantly in the vertical direction with little horizontal spread, so it does not need a wide pot. However, you should repot your plant every two years or so to give it more space as it grows (more on repotting below).
Repotting a Watermelon Peperomia
When to Repot
Identifying the right time to repot your Watermelon Peperomia is essential. If the plant has outgrown its current pot or the soil has become depleted of nutrients, it’s time for repotting. Pay close attention to signs such as roots peeking out of the drainage holes or a sudden cessation in growth. These are clear indicators that your plant is ready for a new home. Generally, repotting should be done every 2-3 years but sooner if your plant is showing signs of being rootbound.
Choosing the Right Pot
The pot you choose for your Watermelon Peperomia should be only slightly larger than the current one. A pot that is too big can lead to overwatering issues, as the soil will remain wet for a longer time. It can also lead to stability issues, but this is more of a concern in taller houseplants.
Steps to Repot
Remove the plant: Gently take the Watermelon Peperomia out of its current pot, being mindful not to damage the roots. Don’t tug at the leaves to remove the plant as they have very thin stems which can be damaged easily.
Prepare the new pot: Place a layer of fresh potting mix at the bottom of the new pot. This should be a well-draining mix to prevent waterlogging.
Transplant: Place the plant in the center of the new pot and fill around it with more potting mix. Ensure that it is at the same depth as it was in the old pot.
Water: After repotting, water your plant thoroughly to settle the soil.
Fertilizing your Watermelon Peperomia
When to Fertilize
The best time to fertilize your Watermelon Peperomia is during its active growing phase, which is generally during spring and summer. During this period, you should fertilize your plant once a month. In the dormant winter months, there’s no need to fertilize as your plant won’t be producing much or any new growth.
Type of Fertilizer
Watermelon Peperomia thrives with a balanced liquid fertilizer. A good choice would be a 20-20-20 mix, meaning it contains equal parts of Nitrogen (N), Phosphorus (P) and Potassium (K). Be sure to dilute the fertilizer slightly more than recommended to avoid overfertilizing.
How to Fertilize
Dilute the liquid fertilizer with water according to the instructions on the package (and dilute even a little more than recommended).
Before you fertilize, water your plant thoroughly. This helps to prevent the roots from getting burnt by the fertilizer.
Apply the diluted fertilizer to the soil, making sure it’s evenly distributed.
Pruning a Watermelon Peperomia
The Watermelon Peperomia doesn’t require much pruning. However, it’s necessary to remove yellow or damaged leaves to keep the plant healthy. When you notice any discolored or wilted leaves, cut them off at the stem using a sharp, sanitized pair of scissors. This helps in maintaining the aesthetic appearance of the plant as well as its overall health. You can remove dead or dying leaves at any point in the year!
Watermelon Peperomia Toxicity
Watermelon Peperomia is a non-toxic plant. This means it’s safe to have around curious pets and playful toddlers. However, it’s still important to ensure that your pets or little ones are not ingesting any part of the plant, as it can lead to mild digestive discomfort.
Let’s delve a bit into the details:
While non-toxic, the plant is not meant for consumption. It doesn’t provide any nutritional benefits to cats, dogs, or humans.
Ingesting parts of the plant can result in mild gastrointestinal upset, such as vomiting or diarrhea. This is not due to the plant being poisonous, but because it’s simply not part of a regular diet for pets or humans.
Chewing or biting into this plant can cause irritation to the lips, mouth, and tongue due to the plant’s natural plant chemicals.
Watermelon Peperomia Flowers
These plants produce small, non-showy flowers on tall, narrow spikes that look a little like rat tails. However, they’re not particularly known for their blooms as they aren’t really anything special.
When Does Watermelon Peperomia Flower?
Watermelon Peperomia can flower at any time of the year, but they’re more likely to bloom in the spring and summer months. It’s during this period that the plant’s conditions are most suitable for flowering. However, remember that your plant may not flower every year or at all and that’s perfectly fine.
Should You Remove Watermelon Peperomia Flowers?
There’s no need to remove the flowers unless they start to die or brown. The plant uses a lot of energy to produce these flowers, so removing them can help to divert energy to growing new healthy leaves. If the flowers are taking away from the overall appearance of your plant or if they’re wilting, then you may also choose to remove them.
Do Watermelon Peperomia Flowers Smell?
No, Watermelon Peperomia flowers do not have a noticeable scent.
Cleaning your Plant
Your Watermelon Peperomia will appreciate occasional cleaning to keep its foliage looking fresh and vibrant. Cleaning your plant not only enhances its aesthetic appeal but also keeps pests at bay and improves photosynthesis. Here’s a simple guide on how you can maintain your plant’s cleanliness:
1. Regular Dusting
Just like any other houseplant, your Watermelon Peperomia can accumulate dust on its leaves. Dust can restrict light penetration, affecting the plant’s photosynthesis process. Dust your plant’s leaves gently with a soft, dry cloth or a soft bristle paintbrush to remove any dust build-up.
2. Washing
For a more thorough cleaning, consider washing your plant. This can be achieved by lightly spraying the plant with a water bottle, or gently rinsing under a tap with lukewarm water. Remember to let the plant dry naturally to avoid water spots.
It’s important that you don’t wash your plant with extremely cold or hot water as this can shock or burn the plant.
3. Checking for Pests
While cleaning your plant, it’s also an excellent opportunity to check for pests. Inspect the underside of the leaves for any signs of insects. If you find any, a simple solution of mild soapy water can help get rid of them. Remember, early intervention is key in preventing a full-blown infestation.
Note: Always be gentle when cleaning your Watermelon Peperomia. Its leaves are delicate as they have very thin stems and can easily be damaged by harsh cleaning.
Watermelon Peperomia FAQs
Are Watermelon Peperomia plants easy to care for?
Watermelon Peperomia plants are relatively easy to care for. Whilst they aren’t complete low-maintenance plants, they don’t die at the smallest change in environment and can adapt quite well to a range of environments. As long as you are consistent with your watering habits, you shouldn’t have too many issues keeping these plants thriving.
How much water does my Watermelon Peperomia need?
You need to create a good balance between not allowing the potting mix to dry out for extended periods of time, but avoiding waterlogged soil. Watermelon Peperomia plants are sensitive to root rot but they can also become quite limp if not watered regularly. Using a moisture meter will really help you create a good watering routine.
Can Watermelon Peperomia tolerate full sun?
Watermelon Peperomia plants are quite versatile when it comes to light conditions but will do best in medium to bright, indirect light. Try to avoid direct sunlight as this can scorch the leaves.
Whilst the Watermelon Peperomia can tolerate low light levels, you will start to see the new leaves have less variegation and be a darker green color.
Are Watermelon Peperomia toxic?
You’ll be pleased to know that Watermelon Peperomia plants are non-toxic and completely safe for pets and humans.
Common Problems with your Watermelon Peperomia
Why are my Watermelon Peperomia’s leaves curling?
It can be a little tricky to know exactly why the leaves on your Watermelon Peperomia curl so we recommend going through the following and eliminating them one by one to find the cause: overwatering, low temperatures, low humidity, heat stress.
Why is my Watermelon Peperomia losing leaves?
If you notice your Watermelon Peperomia losing leaves then it may be due to a drop in temperature or overwatering. We recommend you check the soil’s moisture first and replace if waterlogged. If watering isn’t the issue then try moving your Watermelon Peperomia to a warmer spot in your home (but away from direct light).
Why does my Watermelon Peperomia have yellow leaves?
The occasional yellow leaf on a Watermelon Peperomia is totally fine as this is simply natural aging. However, if the rate of yellowing is quite high then it’s a sign something isn’t quite right.
The two most common causes of yellow leaves on a Watermelon Peperomia are overwatering or too much direct light. Monitor the spot your plant is in to see how much light it receives and check the soil moisture level to confirm which is the cause.
Why are the leaves on my Watermelon Peperomia losing their pattern?
Lighting issues can cause your Watermelon Peperomia to lose variegation on their leaves. If not receiving enough light, then the leaves will turn more solid green. If your plant is receiving too much light then the whole leaf will look faded.
Fiddle and Thorn is a participant in the Amazon Services LLC Associates Program, an affiliate advertising program designed to provide a means for sites to earn advertising fees by advertising and linking to Amazon.com
One of the most important parts about taking care of your houseplants is making sure you are watering correctly. Too much, too little or even watering in the wrong way can harm your plant, so it is worth getting it right. We hope our watering guide will help you understand your houseplants better and know what to look out for when it comes to watering them.
Knowing when to water
Every houseplant type is different and has its own unique watering needs. Some need bi-weekly watering, others will survive months without a drop. When buying a new houseplant, it should include a label with a rough indication of watering requirements. If you are unsure on how often to water your plant, check out our Plant Index page where you can find more information on each specific plant type.
Environment and seasonal changes
Once you have figured out the rough watering requirement of your houseplant, it’s important to also take into consideration how your watering must change dependant on environment and season.
If your plant is in a bright and heat-intensive room in your home, you will need to water it more often than if light and temperature levels are medium to low. This is due to higher levels of photosynthesis in brighter spots which will require more water.
It is also vital that you change your watering schedule throughout the year depending on the season. During winter, your plant will be receiving less sunlight as the days get shorter. The temperature will also be lower both during the day and at night. This is when overwatering can become a very easy mistake to make so it is important to significantly reduce watering over those colder darker months.
Get up close with your plant
One of the easiest ways to tell if your houseplant needs water is to see whether the top few inches of the soil are still damp. If so, wait a few days before giving it any water.
We also recommend lifting up your plants (any that aren’t too big of course) and getting a feel for what they are like weight-wise before and after watering. Over time, you will become really attune to you how your plant feels when it wants some more water. Make sure to lift up your plants carefully from the strongest stems or from the pot itself and never from the leaves.
Your plants are telling you things
Several houseplants will also give you a really clear indication if they need more water. For example, Peace Lilies get very droopy leaves when thirsty and spider plants become quite light in colour. These aren’t major issues if not consistently underwatered and they will reverse almost immediately after watering.
Time of day
We only really have one rule when it comes to what time of day to water your plants; not in the evening. This is because overnight, your plant will be in a slightly cooler environment with no natural sunlight meaning that any excess water will not evaporate until the morning. This will lead to an increased risk of root rot. We recommend watering in the morning as it gives the plant enough time to soak up all the water needed before nighttime. It also gives you the time to empty out the saucer of any excess water so it is not sitting in it all night.
How to water
Watering from the top
One method for watering your houseplants is from the top down. This is usually the method used if you have a planter rather than a saucer, or if your plant pot does not have any drainage holes.
Although this watering method does have it’s advantages, such as soaking the entire plant through, there are some important things to watch out for when watering from the top. You want to avoid any of the leaves or stems becoming damp as this can lead to bacterial disease and rot. Instead, water as close to the soil as possible.
Water the whole plant. One common mistake to make when watering is to pour it all in one spot. However, this will lead to the roots growing towards the moisture, making the plant unstable and the growth uneven. Instead, you want to pour water all around the top of the plant evenly to promote healthy growth.
We would always recommend watering in a variety of ways as top watering can flush out the nutrients, drown the roots and sometimes even not get enough water to the roots. So switching up how you water each plant can be really beneficial for its long-term health.
Watering from the bottom
This method is often used if you have a saucer and a plant pot with drainage holes. It can also be used for smaller plants in a planter which you can pick up and water from the bottom.
Watering from a saucer can be especially beneficial for tall plants as it encourages their roots to grow downwards, thus increasing the stability of your plant.
We recommend removing any excess water from the saucer half an hour after watering. This will ensure that the roots have had enough time to soak up the required amount of water and prevents your plant from sitting in water for too long. For many plants, this can quite quickly cause root rot which will damage the overall health of your plant.
Immersion
If you notice your houseplants are getting quite dry, or you have been away for a while, the immersion technique can be really beneficial. This is done by filling up a large container, or the bathtub and placing your plant in there, submerging the pot fully. Leave your plant in the water for a few minutes before removing.
We recommend only doing this one plant at a time and switching out the water between them to decrease the risk of spreading diseases or pests between your plants.
Type of water
Some houseplant types can be a little fussy to the water that you use, especially if you live in a hard water area. We always recommend using natural water (either collected rainwater or distilled/ filtered water). This reduces the possibility of your plants negatively reacting to the high levels of fluoride in tap water.
Most of the time using tap water will be absolutely fine, but if your plant is showing signs of water sensitivity, or you can’t figure out why your plant might be looking a little sad, it may be best to try switching up the water used. An easy technique is to leave a tray of tap water out overnight so that the chemicals can evaporate off.
Preventing root rot
Apart from being cautious with watering and checking the moisture in the soil of your houseplants regularly, there are a few other tips that we have that will help to avoid root rot.
Choose the right pot
When you bring your new beloved houseplant home, they will often come in a plastic pot. These are great for nurseries and plant shops as they are cheap, lightweight and durable. However, they are not ideal for your houseplants as they hold all the moisture in. This means that if you accidentally overwater, and there is a slight blockage of the drainage holes, your plant will be sitting in all of that moisture. Instead, you want to opt for terracotta pots as they are permeable meaning that some of the water can evaporate through the sides of the pot. Clay and terracotta pots are a little more expensive and breakable, but their benefits are huge (and they look great too!).
As we mentioned before, drainage holes are a must-have for any pot. They allow you to water from the bottom up and mean that any excess water can stay far away from your plant’s delicate roots.
Choosing the right soil
Another technique we use to avoid root rot is to add a little perlite to the potting soil. This increases the drainage as it makes it a lot easier for the water to flow through and out of the drainage holes at the bottom. You can also opt for adding a few small pebbles or stones at the bottom of your pots to avoid the drainage holes getting blocked by soil.
Signs you are overwatering
There are a few signs to look out for that could be an indication your plant has been overwatered. Of course, this does vary with each houseplant type, so it is worth heading over to our individual plant guides to find out the signs for your specific plants.
Leaves become wilted and limp
Leaves start to fall off throughout the plant
Leaves become dark brown/black
An unpleasant damp smell coming from the soil
What to do if you overwater
Replace the soil
If you notice that your plant is suffering due to overwatering, check the soil straight away. If it is still waterlogged, replace the entire soil straight away. Remove as much of the soil from the root system as possible without damaging it any further.
Cut away the dead leaves and roots
Once you have taken away the waterlogged soil, carefully cut off any damaged roots. You want to do the same with the leaves as you don’t want the plant wasting energy trying to keep them alive. Cutting off the dead brown leaves will encourage new healthy growth.
Adjust your watering schedule
Once you have replaced the soil and removed the dead parts of the plant, you want to be really careful reintroducing water. Make sure your plant has drainage holes and a saucer or planter to collect the excess water. Cut down on the amount of water in comparison to how much it was getting before and keep an eye on light or temperature changes throughout the year that will impact how much water it needs.
Signs you are underwatering
Similarly with overwatering, these signs will be slightly different for each houseplant but are good to know more generally so you can spot any early warning signs.
Leaves become limp and droopy
The oldest, often lowest leaves start to fall off
Leave edges become dry, crispy and brown
What do do if you underwater your plant
Luckily underwatering is a little easier to deal with than overwatering. We recommend two things; first of all giving your houseplant a quick bath using the immersion watering method we mentioned above. This will allow your plant to slowly soak up the water needed without sitting it a bowl of water for too long.
The most important thing with underwatering is that you do not overcompensate. You don’t want to shock the plant, or worse – go the other way and overwater. So you need to slowly reintroduce watering with a little and often approach. A small amount of water every day for a week or so to ensure the root system is sufficiently watered.
Equipment that will help you with watering
Whilst you could go forever watering out of a plastic bottle or spare container that you find on the side, there are quite a few tools and products that will really help you water your plants correctly and make your life a lot easier!
Watering cans
Are you really a plant parent if you aren’t obsessed with finding the right watering can? It is definitely worth investing in one that works for you and your plants, and that fits well into your home. If you have smaller, more delicate plants, it is definitely better to get a watering can with a thinner spout so you can be more precise with your watering.
Water probes
Say goodbye to uncertainty around watering and hello to the peace of mind knowing your houseplants will never be overwatered again. If there is one houseplant gadget that you will allow yourself to get, make it a moisture probe. They are really affordable nifty probes that will measure the amount of moisture in the soil. You will then know exactly when it is time to water your plant.
Watering whilst on holiday
Give them a thorough soaking
If you are only going away for a few days, we recommend giving them a good soak through before you leave, letting them soak up the maximum amount of water. This should help your plants survive for a good few days without any extra attention. Note that this will work best for plants not in direct sunlight or really hot rooms as they often will require more regular watering.
Self-watering pots
There are a couple of DIY tips and tricks that you can use to create a self-watering system yourself (plastic bottle or wet string techniques) but we don’t often recommend them as they are not as reliable as self-watering pots. These pots will gradually release water to your plants over time, making sure that they are not overwatered, or bone dry.
Ask a friend or neighbour
If you have someone who lives close to you that you trust with your plants, then this is always the best option. We always recommend leaving detailed instructions so that they know which plants to water when. Try and pick a friend that you know also has plants – that way you can trust they know what they are doing!
Fiddle and Thorn is a participant in the Amazon Services LLC Associates Program, an affiliate advertising program designed to provide a means for sites to earn advertising fees by advertising and linking to Amazon.com
Eggshells for Houseplants: Why and How to Use Them
November 1, 2023
Last Updated: November 1, 2023
Composting Eggshells
Ever wondered how you can give your houseplants that much-needed boost? Have you given thought to eggshells? Yes, you heard right, eggshells.
Eggshells can actually be a great nutrient boost for your houseplants if used in the right way. Below we will go through everything you need to know in terms of why, how and when to use them for your houseplants.
Eggshells are rich in a mineral that plants love – calcium. This nutrient plays an instrumental role in cell wall structure and also aids in cell formation and growth.
Without sufficient calcium, the plants can experience stunted growth or withered tips and edges.
Other Minerals Found in Eggshells
Apart from calcium, eggshells also house other essential minerals for plant growth: phosphorus, potassium, and magnesium.
When incorporated into soil, these minerals can help improve the overall plant growth and vigor.
Phosphorus: It’s a key player in the process of photosynthesis, helps with cell division, and plays a role in plant growth. It can encourage blooming and root growth as well.
Potassium: Aiding in photosynthesis and protein synthesis, potassium is critical for plant growth. It also strengthens the plants, increasing their resistance to diseases and pests.
Magnesium: This mineral is a part of chlorophyll and crucial for photosynthesis. A lack of magnesium can lead to plant discoloration, also known as chlorosis.
How Eggshells Improve Soil Drainage
Eggshells are primarily composed of calcium carbonate, also found in lime, which is commonly used to condition soil.
Essentially, the coarse-ground eggshells create extra space in between the soil particles. This presents an opportunity for water to circulate more freely and ultimately drain better.
In essence, you’re significantly reducing the chances of waterlogging, which can easily cause root rot in your houseplants which is one of the biggest killers of houseplants around.
Eggshells as a Natural Pest Deterrent
Eggshells are a fantastic natural pest deterrent for houseplants, and they work in two main ways.
Firstly, they deter pests due to their sharp edges which pests absolutely hate!
Secondly, calcium being a crucial nutrient in eggshells, most pests find it too tough to digest. Both these reasons result in a pest-free, healthier plant without you having to rely on harsh chemicals.
How to Prepare Eggshells for Houseplants
Cleaning Your Eggshells
First, rinse the eggshells under warm water to remove any leftover egg. Look out for any residual egg yolk or egg white because these could potentially attract pests.
It’s best to be thorough and make sure the eggshells are sparkling clean.
Drying Your Eggshells
Next, you’ll want to thoroughly dry them. This can be done in two ways: air drying or oven drying. Air drying means leaving your eggshells out on a paper towel or tray, typically for about 24 hours but popping them in the oven is a little quicker.
Simply preheat the oven to a relatively low temperature, about 200 degrees Fahrenheit, then place the eggshells in a single layer on a baking sheet. After 10 minutes, your eggshells should be dry.
Crushing Your Eggshells
Once your eggshells are dry, crushing them is the final step. The finer you can get your eggshells, the better.
This increases the surface area and maximizes the potential for your plants to absorb the nutrients within.
Use a blender, coffee grinder, or even just your hands to crush the eggshells into a fine powder.
Adding Eggshells to your Houseplants Soil
Now that you’ve successfully prepared your eggshells, it’s time to integrate them into your houseplants’ soil.
Incorporating Eggshells into the Soil
Fortunately, adding eggshells to your plant soil is a straightforward task. You can start by sprinkling the crushed eggshells around your plants.
However, just scattering the shells on the soil’s surface often is not enough to get the full benefit. You’ll need to blend them into the top layer of your soil thoroughly, ensuring even distribution. This integration allows the nutrients to seep into the roots more effectively.
Composting with Eggshells
Alternatively, you can add your crushed eggshells to a compost pile or bin, enriching the compost with all the nutrients eggshells offer. Later, when you use this compost for your houseplants, it provides a balanced, nutrient-rich ecosystem encouraging healthy growth.
Creating an Eggshell Potting Mix
You could also make an eggshell potting mix! Mix the crushed eggshells with other organic materials like peat moss or compost. This combination increases the soil’s nutrient content and aeration, which significantly improves plant health.
Dos and Don’ts of Using Eggshells in Houseplant Soil
Do: Rinse and Dry Your Eggshells
We always recommend giving your eggshells a proper rinse to remove any egg residue. Post-rinsing, ensure you dry them out completely as the drying process helps to prevent mold formation, which will thank you later.
Do: Watch Out for Over-Fertilization
Even with the great nutrients present in eggshells, over-application can be harmful. It can bring about a condition known as ‘nutrient burn’ in the root system.
Don’t: Neglect Composting
If you’re into composting, don’t forget to add eggshells! They can balance your compost heap’s pH levels and enrich it with essential minerals, making your compost a well-rounded fertilizer for your houseplants.
Common Mistakes to Avoid When Using Eggshells
Not Crushing Eggshells Small Enough
Common mistake number one: not crushing your eggshells small enough.
You may feel it’s okay to simply crumble them by hand and call it done. However, large chunks of eggshell decompose at a slower pace, becoming effective too late for your plants’ nutritional needs. It’s essential that you crush your eggshells into a powdery texture to speed up the decomposition process.
The only benefit of having larger eggshell pieces is to be more of a deterrent to pests. But if it’s nutrients you’re after, crush then into a powder.
Overusing Eggshells
Another mistake made by many is overusing eggshells as moderation is key. Too much can lead to an excess of calcium, causing deficiencies of other essential nutrients in the soil.
Always ensure you’re giving your plants a balanced diet, not purely eggshell-derived nutrients.
Skipping the Washing Step
Unwashed eggshells can host harmful bacteria, such as salmonella, which are not something you want in your precious plant soil.
So, always make sure to rinse and dry your eggshells properly before using them in your soil mix.
Improper Storage of Crushed Eggshells
Storage is just as important as preparation. If your finely crushed eggshells are improperly stored before being added to your houseplants, they could develop mold or attract pests.
It’s best to store your eggshell powder in an airtight container, placed in a dry and cool environment for optimal preservation.
Alternative Ways to Utilize Eggshells for Houseplants
When it comes to harnessing the potential of eggshells for your houseplants, there are more ways than simply incorporating crushed shells into your soil. Here are some of our favorites:
Eggshell Plant Tea
It’s a nutritious mixture intended for your plants! To make this liquid, you add the crushed eggshells to boiling water and let it steep overnight.
After straining out the eggshells in the morning, you have a calcium-rich “tea” that’s ready to irrigate your plants!
Seed-Starting Pots
Why not use your eggshells as little pots for starting seeds? Admittedly, the process requires a bit more preparation as the eggshells need to be cleaned and have a hole punctured at the bottom to allow for drainage, but it’s worth it.
Once you’ve germinated the seed and it’s begun to grow, the entire plant (eggshell pot and all) can be planted in soil.
Eggshell Mulch
By crushing the eggshells into tiny pieces, you can turn it into a type of mulch that you spread on top of your soil. This method is excellent for preventing moisture loss and deterring pests. Additionally, as the eggshell mulch slowly decomposes, it contributes its calcium content to the soil.
Frequently Asked Questions about Using Eggshells in Plant Soil
Are eggshells beneficial for all types of houseplants?
Yes, most houseplants benefit from eggshell use. The calcium carbonate in eggshells helps to nourish the plant’s cells.
However, you should ensure that the soil pH does not get too high, especially for acid-loving plants like azaleas and rhododendrons, for which eggshells may not be the best choice.
How many eggshells are required for each plant?
This depends on the size of the plant and its specific nutritional needs. Generally, a light sprinkling of crushed eggshells around the base of your plant every 2-3 months is suffecient.
For vegetable garden beds, six crushed eggshells per square foot is an often-recommended ratio.
What are the signs of over-fertilization from eggshells?
Signs of over-fertilization include yellowing or brown-tipped leaves, slowed growth, or wilted plants even with sufficient watering.
If you detect any of these signs after adding eggshells, try reducing the amount you use, or remove the top layer of soil and replace it with fresh, eggshell-free compost.
If you are also adding a liquid fertilizer, it may be that you are over-fertilizing by adding too much of this, rather than the eggshells being the issue. Make sure to read the label on the fertilizer bottle and use that as a maximum guide.
Often we will fertilize less than the recommended strenght just to be on the safe side.
Can eggshells replace commercial fertilizers?
While eggshells can definitely contribute a wealth of nutrients to your plant’s soil, they may not cover the complete spectrum of nutrients needed by a plant, as commercial fertilizers do.
So, while you can boost your plant’s health with eggshells, a balanced diet might still require additional fertilizers.
What about raw eggshells versus cooked ones for houseplants?
Both raw and cooked eggshells can be utilized, as long as they are cleaned and dried thoroughly before grinding to prevent any potential health risks.
However, if you’re using eggshells from boiled eggs, ensure no salt or additives came into contact with the shell, as these could potentially harm your plants.
What is a good method for storing crushed eggshells?
A clean, dry glass jar or plastic container with a tight-fitting lid is a good choice for storing your crushed eggshells. Be sure to store these containers in a dry, cool place to keep them fresh until you’re ready to use them.
Fiddle and Thorn is a participant in the Amazon Services LLC Associates Program, an affiliate advertising program designed to provide a means for sites to earn advertising fees by advertising and linking to Amazon.com
Using Coffee Ground for Houseplant Care? Here’s everything you need to know
March 5, 2023
Last Updated: March 5, 2023
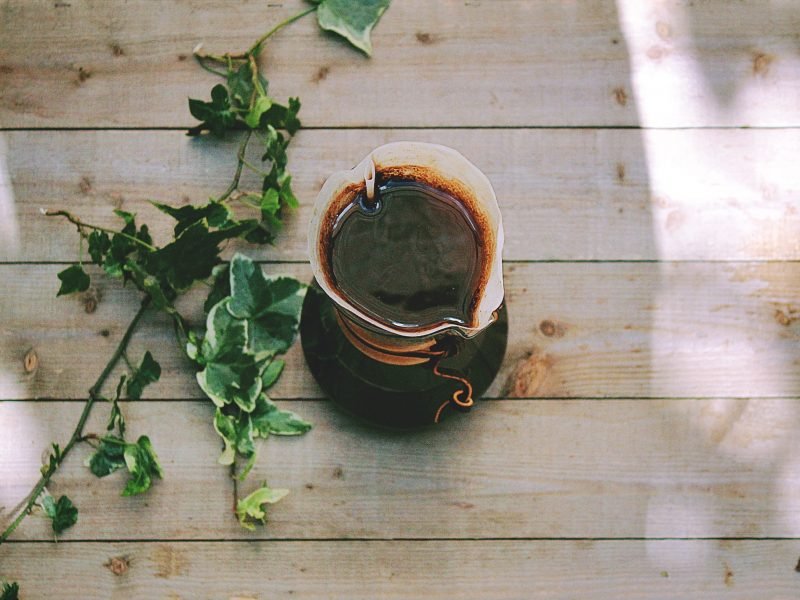
There’s a lot of talk in the houseplant world about natural remedies and pest repellents that you should be using. One that crops up a lot is using coffee grounds in and on your houseplant’s soil. You might be surprised to learn that coffee grounds can be a really beneficial tool when looking after your houseplants and is a great way to turn kitchen waste into something useful.
If you’re a coffee drinker you’ll likely be aware of what coffee grounds are but just so that we’re all on the same page, coffee grounds are what you’re left with after ground coffee beans have been extracted with water.
In this article we will be going through the different benefits coffee grounds can have for your houseplants, how to use them and all of the tips we have a long the way.
The benefits of using coffee grounds for your houseplants
It can be a great soil supplement
Coffee grounds contain an abundance of nutrients and micronutrients including potassium, calcium and magnesium. This is why it’s so beneficial to your houseplants as a way to turn waste into nutrients for your plants.
These nutrients will aid your houseplants in their development, helping them to grow bigger and stronger new leaves, stems and flowers. Without the right amount or balance of nutrients, your plant can slow down the rate of new growth as well as develop a range of issues including brown and yellow leaves.
So if you’re looking for a cheap and easy way to boost the nutrients in your houseplant’s soil, coffee grounds can be a great way to do this!
Coffee grounds can be a pest deterrent
There are mixed views on using coffee grounds as a pest deterrent as they can actually attract more pests to your plants. This is why we strongly recommend not adding a large amount of coffee grounds to the top of the pot and instead mixing it in.
When used in the right way it can be good at deterring pests from your plant which can help to stop issues such as brown and yellow spots and over time can prevent pests from killing your plant!
How to use coffee grounds for houseplants
Mixing coffee grounds into your houseplants’ soil
When you are repotting your soil anyway, it can be a really great time to add in some coffee grounds. They are a relatively slow release fertilizer which can provide nutrients to your houseplant for up to around 6 months.
How much coffee grounds you add depends on the size of the plant (and therefore the size of the pot) but we recommend for an average-sized plant around 5 heaped tablespoons.
It is also a good idea to test it out by adding only a very small amount to see how your plant reacts. You can then slowly increase the amount if it seems to be working well for that plant.
Top dressing the soil with coffee grounds
Another way of adding coffee grounds to your houseplants’ soil is by adding it as a top layer on the soil. Whilst this is a quicker and mess-free way of doing it, it’s actually less beneficial than mixing it into the soil. This is because coffee grounds are great at retaining moisture so this can create a moist layer which is the ideal spot for fungus gnats to thrive in.
Make compost with your coffee grounds
Another great way to utilize the coffee grounds for your houseplants is by making compost. Add all of your coffee grounds to a compost pile and wait for it to be ready. The benefit of composting your grounds is that it emulates the natural process of nutrition that your houseplants would use when growing in their native environment.
Another benefit of using composted coffee grounds is that the nutrient level will be more balanced from other things you have added to the compost pile. This creates a much better fertilizer for your plants compared to just using coffee grounds.
Pros of using coffee grounds as a fertilizer for your plants
It’s cheap (well, basically free)
The great thing about using your old coffee grounds is that it’s a free way of fertilizing your plants. If you’re a regular coffee drinker then this would have simply gone into the bin and by using it as a fertilizer, it means you’re getting even more value out of your coffee beans.
If you don’t regularly drink coffee, then another alternative could be asking coffee shops for their left over coffee grounds. Most of the time they are happy to give them away to you for free.
It’s environmentally friendly
Using coffee grounds in your houseplants’ soil is also a really great environmentally friendly option. You are preventing the coffee grounds from going into landfill and reducing your overall waste output.
Alongside, this you’re not buying commercially made fertilizers which can often be a lot more damaging to the environment.
Cons of using coffee grounds as a fertilizer for your plants
It retains a lot of moisture
Whilst this can be a benefit for plants that like to have moist soil, it’s often a disadvantage of adding coffee grounds into the soil for a few reasons.
Firstly, moisture can create a nice home for pests to thrive which is obviously an issue for your plant’s overall health. Fungus gnats in particular will love a moist spot but it can also be appealing to mealybugs too.
But it’s not just pests that make coffee grounds’ moisture retention an issue as root rot needs to be considered too. When coffee grounds are added to the potting mix, it means it often takes a little longer for it to fully dry out. This can cause stress to the root system and also make overwatering a lot easier and more damaging to do.
Can result in fungal growth
If you’re adding a top layer of coffee grounds to the soil then this can also be the ideal place for fungal growth to develop. This is because that layer of grounds will likely stay quite moist. You may start to notice in winter that fungus may start to appear on top of the soil as it thrives in cold, damp environments.
This can be a real issue with top dressing and is one of the reasons we recommend mixing the coffee grounds into the soil if you do choose to add them to your plants’ potting mix.
It’s not suitable for all plants
Be careful when adding coffee grounds to the soil of your houseplants because it’s not suitable for all plants. You should avoid adding it to plants that are less than 1 year old as well as seedlings and fresh cuttings.
We hope that our guide to using coffee grounds in the soil of your houseplants has been useful. Whilst there are several benefits in doing so, we don’t always recommend it as a method because there are quite a few downsides too. Yes, coffee grounds are a great natural fertilizer but in our opinion, we have had a lot of success using other methods of fertilization in comparison to coffee grounds.
If you do choose to add it to the soil, we highly recommend mixing it in rather than adding one layer at the top. This can go a long way to mitigating some of the issues with using it and allows you to reap the benefits instead.
As with any changes, it’s important that you monitor your plant’s health closely in the weeks following the addition of the coffee grounds to ensure you spot any issues early. If there are problems, replace the soil with fresh potting mix immediately.
Fiddle and Thorn is a participant in the Amazon Services LLC Associates Program, an affiliate advertising program designed to provide a means for sites to earn advertising fees by advertising and linking to Amazon.com
Using Coco Coir for Houseplants: Why and How to Use It
November 1, 2023
Last Updated: November 1, 2023
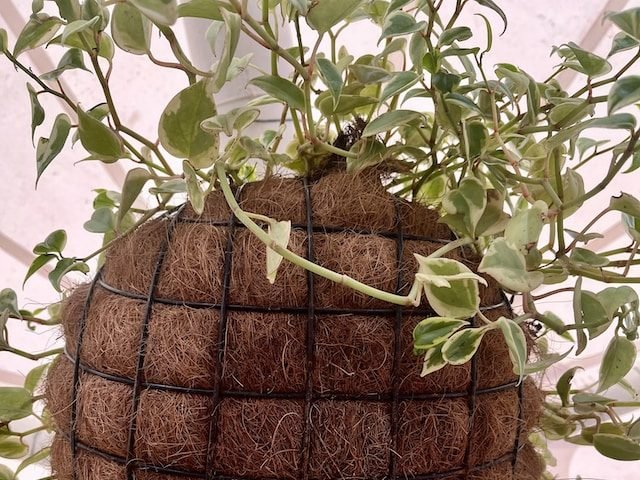
Coco Coir used with a Pothos
Ever found yourself contemplating the best growing medium for your beloved houseplants? Maybe you’ve heard of Coco Coir but aren’t quite sure what it is or how to utilize it correctly?
In this guide we will go through what Coco Coir is, the benefits of using as well as best practices to ensure your houseplants thrive.
Coco Coir, also known as coco peat, is a resourceful byproduct of the coconut industry, which previously saw little value.
The coarse, fibrous material obtained from the husks of coconuts has become a big hit among gardeners, especially those growing houseplants.
Why is there so much fuss about coco coir? The reasons are clear, it’s eco-friendly, sustainable, and biodegradable.
Coco Coir not only has high water retention capacity but also favors aeration, making it perfect for houseplants that dislike being too waterlogged or too dry.
Understanding the Different Types of Coco Coir
Coco coir comes in several forms, and each type serves a different purpose.
1. Coco Coir Pith or Coco Peat
Coco peat, also known as coco pith, is the fine dust or ‘peat’ that is produced during the extraction process of coco fiber. It has a unique structure that acts like a sponge, making it capable of holding up to 10 times its weight in water.
Therefore, it’s perfect for thirsty houseplants, or for gardeners who might forget to water now and then.
2. Coco Coir Fiber
Moving on to coco fiber, this type includes long strands of fiber that are extracted from the outer shell of a coconut.
This form of coco coir is useful in potting mixes due to its ability to provide structure, improve aeration, and resist compaction.
For those of you with houseplants that need lots of space, coco fiber can be the perfect component to integrate into your plant’s growing medium.
3. Coco Coir Chips
Finally, let’s talk about coco chips. These are small chunks of coconut husk that facilitate greater air flow within the soil mix while also helping retain water effectively.
They can be used to improve the texture and structure of homemade potting mixes, providing a balance between moisture retention and air spaces.
Benefits of Using Coco Coir for Houseplants
Absorbent Yet Drainage-Friendly
Coco Coir can retain up to ten times its weight in water. This makes it excellent at keeping your plants hydrated.
But it’s not just about water retention. Coco Coir also brilliantly balances this by providing excellent drainage, preventing waterlogged roots—a common concern when growing houseplants.
Eco-Friendly and Sustainable
It’s a byproduct of the coconut industry—an industry that was, for a long time, wasting this valuable resource.
Warding Off Pests
It’s naturally resistant to bacterial and fungal growth, warding off those pesky pests.
Easy to Handle and Store
Coco Coir is fairly lightweight, easy to work with, and takes up minimal storage space, especially when bought in compressed form.
How to Choose the Right Coco Coir for Your Houseplants
Different plants have varying needs regarding moisture retention, air, and texture. Thus, the choice of coco coir depends on the plant species you’re looking after.
Understanding Your Plants’ Needs
Are your plants drought-tolerant types like succulents, which prefer a quick-draining and aerated medium? Or, do they belong to tropical species that appreciate moisture retention like Spider plants?
Or, perhaps, are they larger types that necessitate substantial support like Monsteras?
Once you’ve got a clear idea of what your plants need, you can then move on to select the suitable type of coco coir.
Moisture-loving Plants: Coco Pith
If you have moisture-loving houseplants, like Fittonia or Peace Lily, Coco Coir Pith or Coco Peat would be a good choice.
This type of coco coir is excellent in retaining moisture and nutrients but still offers sufficient drainage so the roots don’t become water-logged.
It’s important to note that it’s not the best for plants that need high aeration like Cacti or Succulents.
Drought-Tolerant Plants: Coco Chips
Wanting something for drought-loving species like Cacti or Succulents? Then Coco Coir Chips would be your best bet.
These chips create spaces within the soil, allowing for great aeration and rapid drainage, so roots don’t soak and rot. Plus, they also add some weight to your pots, which is perfect if your plants are top-heavy.
Larger, Robust Plants: Coco Fiber
For larger and stronger houseplants like Philodendron or Monstera, Coco Coir Fiber should do the trick. It offers incredible aeration and good moisture retention and its sturdy structure can provide the necessary support these big plants need.
Mixing Coco Coir with Other Growing Mediums
Perlite
Perlite is a fantastic choice to add to your coco coir mix. It’s a volcanic glass that has been heated to extreme temperatures, causing it to expand and produce a lightweight and porous material.
Adding perlite to coco coir can enhance drainage while also improving aeration, promoting healthier root development and preventing root rot.
Vermiculite
Just like perlite, vermiculite is a natural mineral expanded under high heat to produce a lightweight material. However, while perlite increases drainage, vermiculite helps to retain moisture.
This makes it an excellent addition for those using coco coir for moisture-loving houseplants.
Sand
If you’re growing plants that appreciate a well-draining soil, consider adding sand to your coco coir mix.
Coarse, sharp sand can improve drainage and air circulation, making it a good choice for succulents and other drought-tolerant plants.
Compost
Compost is another valued addition to a coco coir mix. It not only enriches the medium with essential nutrients, but it also introduces beneficial soil organisms that promote plant health.
As coco coir is naturally nutrient-free, incorporating compost will definitely benefit your houseplants.
Managing pH and Nutrient Levels in Coco Coir
Coco coir, while amazing in providing the needed aeration and water retention for your plants, lacks the necessary nutrients. On top of this, Coco coir has a naturally low pH that needs to be adjusted to specific levels that best cater to your plants’ needs.
Adjusting pH Levels
The pH level in coco coir typically ranges from 5.5 to 6.5, slightly acidic in nature. However, most indoor plants thrive in a slightly more neutral pH range of 6.0 to 7.0.
Although it may not seem like a significant difference, this small adjustment can be the difference between thriving and wilting.
To adjust the pH levels, use a pH meter to test your coco coir. If it’s too acidic, you can gradually increase the pH by adding lime. If it’s too alkaline, you can add sulfur to lower the pH level.
Note: do this gradually to avoid shocking your plants.
Supplementing Nutrients
Although Coco Coir is a fantastic growing medium due to its excellent water retention, drainage, and aeration, it doesn’t come packed with nutrients. Hence, in order to provide your plants with the right nutrition, you will need to supplement them.
This is where a balanced plant fertilizer enters the picture. An ideal fertilizer for coco coir should include Nitrogen (N), Phosphorous (P), Potassium (K), and trace elements such as Calcium and Magnesium.
Be cautious not to overdo it; follow the instructions on your chosen fertilizer and adjust based on your plant’s responses.
Recalibrating During Reuse
Can you reuse coco coir? Absolutely yes! However, used coco coir would need to be recalibrated in terms of pH and nutrient levels.
It may have residual nutrients from its prior use, or the pH level may have been altered. Therefore, before reusing coco coir, it’s wise to recalibrate by adjusting pH and nutrient levels again.
Tips and Tricks for Maximizing Coco Coir’s Potential
Coco coir offers a plethora of advantages as a growing medium for your houseplants, but how can you ensure you’re harnessing its full potential? This section will walk you through some savvy tips and tricks to get the most out of your coco coir.
Regularly Rinse Coco Coir
You should thoroughly rinse your coco coir before using it because it can sometimes contain high salt levels, which may affect your plants’ growth. Rinsing it helps remove excess salts.
Once you rinse the coir, ensure to drain it properly before use, maintaining its moisture-retaining property without oversaturating your plants.
Pre-soak Before Use
Coco coir is known for its superb water-retaining ability, but remember, it can take a while to absorb water at first.
So, how can you maximize its water retention and thereby ensure your plants stay hydrated? It’s simple—always pre-soak your coco coir.
Submerge it in water and allow it to absorb as much as it can before using it. This can take anywhere from 15 minutes to a few hours.
Check Its pH Regularly
Coco Coir is usually neutral or slightly acidic, but like any growing medium, pH levels can fluctuate over time. So it’s important to regularly check the pH level of your coco coir.
You might want to invest in a pH test kit to monitor the pH changes and make necessary adjustments when required.
Store the Unused Coir Properly
Coco coir has a fantastic shelf life —it doesn’t decompose quickly, which means you can store it for extended periods. However, it’s crucial to store it properly to ensure its longevity.
Keep unused coco coir in a cool, dry place away from direct sunlight. And of course, store it in a place inaccessible to pests to keep it pest-free.
FAQs
Can Coco Coir be used straight from the bag?
Yes and no. While some coco coir is ready-to-use out of the bag, it’s often beneficial to first rinse and soak the coco coir to remove excess salts and to ensure proper hydration.
Do Ineed to add fertilizers to my coco coir?
While Coco Coir itself doesn’t have much in the way of nutrients, it’s an excellent medium for absorbing and retaining them.
That means you’ll want to supplement regularly with a high-quality, complete fertilizer that includes all the macro and micronutrients your plants need.
How often should Iwater my plants when using coco coir?
This all depends on the type of coco coir you’re using and the watering requirements of your plants. Keep an eye on your plants, and when you see the coco coir starting to dry out, water your plants again.
Always remember, over-watering can be just as harmful to your plants as under-watering.
Can I reuse Coco Coir?
Yes, one of the great benefits of coco coir is its potential for reuse. Before reusing, however, make sure you flush the coir thoroughly to remove any salt build-up and replenish nutrients that may have been lost during previous use.
How should Istore unused coco coir?
For Coco Coir not in use, ensure it remains dry and clean in a cool and dark environment. Well stored, it should last indefinitely. But do remember to give it a good soak before using it again.
Fiddle and Thorn is a participant in the Amazon Services LLC Associates Program, an affiliate advertising program designed to provide a means for sites to earn advertising fees by advertising and linking to Amazon.com