Parlour Palm Care

Last Updated: May 2, 2022

Parlour-Palm

Basic Parlour Palm Care

Parlour Palms are a great way to bring some of the tropics into your home as they adapt well to a variety of conditions. However, there are a few things to keep in mind to keep your Parlour Palm thriving. Firstly, you want to find a spot that doesn’t get much direct sunlight as in summer the intense sun can burn the leaves. You can get away with some direct light during winter though so it might be a case of adapting the positioning of your Palm depending on the seasons. When watering your Parlour Palm, make sure the soil has time to dry out fully to prevent root rot. Below you will find our complete Parlour Palm care guide with all the information you need to properly care for your Palm as well as how to spot and treat common problems you might encounter.

Detailed Parlour Palm Care

Keep them away from direct light

Parlour Palms love anything from medium to bright, indirect light. You want to keep them away from intense direct light or this will damage the leaves.

Let the soil dry out between waterings

It’s super important that you let the soil dry out before watering your Parlour Palm otherwise you risk waterlogging the soil which can cause root rot. Water every week during summer and less during the colder darker winter months.

A little humidity boost can go a long way

Parlour Palms can adjust to the normal humidity level in your home. However, misting once a week or popping them in the shower every once in a while will help to keep them happy and fend off any drier leaves.

They love warmer temperatures

Parlour Palms are used to tropical temperatures so you want to keep them away from any cold drafts in your home.

Parlour Palms don’t need much feed

You want to make sure you are only fertilising your Parlour Palm once or twice during spring and summer and not at all during winter.

Parlour Palms are non toxic

Another reason to love the Parlour Palm is that they are completely safe for pets and humans!

Parlour Palms are great air purifiers

We recommend Parlour Palms for bedrooms and offices as they are great at purifying toxins out of the air.

Parlour Palm Care FAQs

Common Problems with Parlour Palms

If you want to find out more about how to best care for your Peace Lily then visit our Plant Guide or download our How to Care for your Houseplants ebook.


Complete Houseplant Care eBook

Our comprehensive (and rather good looking) eBook that will teach you everything you need to know to successfully care for, and maintain your houseplants!

Buy on

Fiddle and Thorn is a participant in the Amazon Services LLC Associates Program, an affiliate advertising program designed to provide a means for sites to earn advertising fees by advertising and linking to Amazon.com

Take our houseplant survey!

Quickly respond to our 30 second houseplant survey and get 75% off our Complete Houseplant Care eBook!

Take the Survey

No thanks…

Why is my Ponytail Palm dying? Causes and Solutions

Last Updated: April 1, 2022

 Ponytail Palm Although Ponytail Palms can be quite forgiving when it comes to their care and environment, this doesn’t mean they are immune to all issues. If your Ponytail Palm is showing signs that it might be dying, then it’s vital you act quickly to correctly diagnose the issue and make the needed changes. Below we will be going through each of the potential reasons why your Ponytail Palm is dying, alongside tips on how to make the right diagnosis, treat the issue and also prevent it from happening again in future.

Lack of sunlight can cause a dying Ponytail Palm

If your Ponytail Palm has been growing in darker areas of your home, then you probably need to adjust the light levels to revive it. Leggy or stunted growth is a classic sign of a lack of sunlight and you might even find your Palm growing towards the sunlight. It’s important that you monitor the light levels around your home and how they change throughout the day. Your Ponytail Palm might be getting the right amount of light in the morning, but much too much in the evening for example. The light level will also dramatically change throughout the year, so if you’ve found a great spot for your Ponytail Palm in summer, it may mean it’s not getting enough light in winter and might start dying as a result. To monitor the light level, and to be sure your Ponytail Palm is getting the right amount, use a light meter. If you have established that your Ponytail Palm is dying due to lack of sunlight, you’ll want to move it to an area in your home that gets more sunlight. However, be careful not to move it to direct sunlight as this will cause a whole range of other issues for your Ponytail Palm. However, if there isn’t a better spot in your home to help revive your dying Ponytail Palm, then it’s not all lost. We recommend purchasing a LED light to encourage new healthy growth. They are also great for your other houseplants if they don’t get as much light during winter or can be used when growing seeds/cuttings so are a great investment for every plant parent.

A dying Ponytail Palm can also indicate overwatering

Overwatering is one of the most common causes of problems across all houseplant types. This is why we usually start with it as the first port of call when looking for a problem. Ponytail Palms don’t like sitting in puddles of water for long periods of time and as they are a type of succulent plant, they need their potting mix to dry out between waterings. If this doesn’t happen it can cause damage to the root system and mean your Ponytail Palm will lose leaves, and become droopy and soft. To figure out if overwatering is the reason your Ponytail Palm is dying, check the moisture levels in the potting mix immediately. You can do this either by using a moisture meter, the chopstick method or by removing your plant from its pot. If the soil is quite waterlogged and clumpy then replace it with fresh dry mix which will allow the plant to start to recover. If you do remove your Ponytail Palm from its pot then you also want to look out for black or dark brown mushy roots and trim these off. To prevent your Ponytail Palm from dying due to overwatering in the long term, you want to cut back on how frequently you are watering it. Make sure that the potting mix has fully dried out before watering again.

Cold temperatures can also cause a dying Ponytail Palm

Another potential factor that may be causing your Ponytail Palm to begin dying is extreme temperatures, in particular cold air and consistent drafts. As they are tropical plants, Ponytail Palms need warm environments to really thrive and can get quite shocked and damaged by drafts coming in from outside or air conditioning vents. Whilst you might never feel the cold air coming through cracks in doors and windows, if your plant is right next to a small stream of cold air it can really harm your plant during winter, causing it to freeze and start dying. Whilst this issue won’t kill your Palm from one day to the next, over time it will start to cause issues. Make sure that you draft-proof any windows or doors that are close to your Ponytail Palm (as well as any heat-loving tropical plants) and trim off any dry or damaged leaves.

You may be over-fertilizing your Ponytail Palm

This is a really easy thing to do with Ponytail Palms because you might think it’s fine to use the standard houseplant fertiliser diluted into the water, or added to the potting mix in pellets or sticks. However, Ponytail Palms really don’t need much fertiliser and an excess might be why it’s dying. The reason that overfertilization is so harmful to a Ponytail Palm is that the excess forms around the roots, starving them of needed oxygen, nutrients and moisture from the soil.   To solve the issue, flush out the soil or remove the fertilizer sticks. If you have used pellets then it’s best to replace the entire potting mix with fresh mix to allow your dying Ponytail Palm to begin the recovery process. Moving forward, hold back fertilizing for about a year and then continue very lightly if you choose to. Ponytail Palms really don’t need much fertilizer and will thrive without it.

Pest infestation might be what’s behind your dying Ponytail Palm

Although it’s rare for indoor-only plants to develop a pest infestation, it’s definitely worth checking over as the impact can be devastating. Over time pests can suck on the leaves of your plant, suffocating them which slowly kills your Ponytail Palm. To diagnose the issue, look out for pests or signs of their existence on your plant. These include yellow or brown spots across the leaves, holes in the leaves, white powder or webbing and, of course, actual insects on the leaves. If you spot a pest infestation on your dying Ponytail Palm the first thing you need to do is isolate your plant from any others in the room. Make sure it is at least 1 metre away from any other plants as pests can spread if the leaves are close. Then you want to wash down your plant and treat it with an insecticidal spray. If you have caught the issue relatively early then you should be able to curb the infestation and revive your dying Ponytail Palm. However, if the issue progresses for some time, you might need to say goodbye to your plant to minimize the risk of pests spreading across your entire urban jungle. Those are the most common reasons why a Ponytail Palm might be dying. The key to solving the issue quickly is catching the problem as early as possible. This is why we always recommend that plant parents conduct regular checkups on their houseplants to look for any early warning signs. Doing this gives you the best chance of spotting the issue before it has progressed too far. Then, once you’ve made the necessary adjustments to either your care routine or your Ponytail Palm’s environment, monitor your plant daily to ensure it’s no longer showing new signs of it dying. To learn more about how to keep your plant thriving, check out our Ponytail Palm care guide.

Fiddle and Thorn is a participant in the Amazon Services LLC Associates Program, an affiliate advertising program designed to provide a means for sites to earn advertising fees by advertising and linking to Amazon.com

Take our houseplant survey!

Quickly respond to our 30 second houseplant survey and get 75% off our Complete Houseplant Care eBook!

Take the Survey

No thanks…

Why is my Pothos Plant turning brown? Causes and Solutions

Last Updated: April 1, 2022

Pothos Plant
Pothos plants have incredible foliage and are pretty easy to care for so their popularity has soared in recent years. Dorning every bookshelf from New York to Sydney, these incredible hanging plants are definitely one of our favourite houseplant types. However, it can happen that the gorgeous leaves start to turn brown if something isn’t quite right which is pretty worrying for us plant parents. In this post, we will be covering the different causes of brown Pothos leaves, as well as how to fix the issue and prevent any more brown leaves from occurring.

Lack of humidity

If your Pothos has brown dry leaf tips rather than the leaves fully turning brown, then a lack of humidity is the most probable cause. Pothos plants will struggle in homes with quite dry air, especially in winter where heating and a lack of ventilation can leave the air in your home a lot dryer than in summer. But don’t worry, if dry air is the cause of the brown leaf tips then there are some really easy and cheap solutions that will prevent the problem from getting any worse.

Mist your plant every few days

This is one of the easiest ways to increase the humidity for your Pothos and solve the issue of brown leaf tips. Mist the leaves of your Pothos several times per week with a spray bottle. It’s best to mist your Pothos earlier in the day so the water droplets will evaporate off the plant before temperatures fall at night. If the leaves of your Pothos are still wet when in cold temperatures, it can cause the leaves to rot which can kill your plant and cause more than just brown leaf tips.

Give your Pothos a shower

Another easy method to prevent brown leaf tips on your Pothos is showering your plant. Regularly washing your plant down with water also gets rid of dust and potential pests that might be on your Pothos so we recommend doing it every few months even if there aren’t any brown leaves. Make sure to shower your Pothos with temperate water so you don’t shock or burn your plant.

Placement in your home

Depending on the light levels and amount of space you have in your bathroom or kitchen, it can be a good idea to move your Pothos in there. The humidity level in these rooms is often higher than in other areas of your home because of the steam released when showering and cooking. Just don’t put your plant too close to the cooker or the intense heat will burn the leaves and cause more brown patches on the leaves.

Use a humidifier

If you find yourself forgetting to mist or bathe your plant, then the humidifier is the best option. They can be really affordable and will raise the humidity without you really needing to do very much. We couldn’t recommend them more!! If you want to know more about how to raise the humidity for your Pothos then check out our humidity guide.

Overwatering

Consistent overwatering is another reason why your Pothos has developed brown leaves. Pothos plants don’t like sitting in puddles of water for long periods of time but will forgive you if you overwater once or twice. If the problem persists then it will start to rot the root system which cuts off your plant from nutrients and oxygen. This then prevents your Pothos from photosynthesising properly and the leaves will turn brown. To figure out if overwatering is the reason your Pothos is turning dropping leaves (as you don’t want to hold off watering your Pothos if this isn’t the cause of the brown leaves), check the moisture levels in the soil immediately. If the soil is quite waterlogged and clumpy then replace it with fresh dry mix. Trim away any leaves and roots that have turned brown and soft, rotten roots as you don’t want your Pothos wasting precious energy on these. To prevent any more brown leaves from occurring, adjust your watering schedule moving forward, so you aren’t watering your Pothos as much or as often as you were before.

Underwatering

Another cause of brown Pothos leaves is consistent underwatering. If this is the case, the leaves will be a lighter brown than when overwatered and will feel quite dry and crispy. To check that underwatering is the cause of the brown leaves on your Pothos plant, take your plant out of its pot to inspect the root system and potting mix or use a moisture meter. If your Pothos is suffering from a lack of water, slowly reintroduce water to your plant rather than drowning it. You don’t want to shock your Pothos as this can cause several other issues. Water them once a day for a week and this should help your Pothos get back to their normal self.

Too much fertiliser

Although slightly less common, overfertilization can also cause brown Pothos leaf tips. Pothos plants really don’t need much fertiliser and you can even skip it altogether if you’d prefer. At most, you want to be fertilising a couple of times throughout the growth period of spring and summer and not at all during the cold dark months of autumn and winter. If you’re fertilising more than this, or not diluting your water-soluble fertiliser enough, then it could be the cause of the brown leaves on your Pothos. If you have been using fertiliser dissolved in the water, then it’s an easy fix as you just stop adding it in. However, it’s a little more effort to remove if it’s mixed in the potting mix. Dig out any spikes that you have added in and replace the potting mix entirely if you have sprinkled fertiliser pellets. Hold off fertilising for several months to give your Pothos time to recover. Those are the most common reasons why your Pothos has developed brown leaves or brown leaf tips. We recommend going through each cause one by one and inspecting your Pothos at the same time. If you have caught the problem early and there are just a few brown leaves on your Pothos, then you should have no problem bringing your plant back to full health. They are quite resilient plants so don’t give up on your Pothos!

Fiddle and Thorn is a participant in the Amazon Services LLC Associates Program, an affiliate advertising program designed to provide a means for sites to earn advertising fees by advertising and linking to Amazon.com

Take our houseplant survey!

Quickly respond to our 30 second houseplant survey and get 75% off our Complete Houseplant Care eBook!

Take the Survey

No thanks…

Why does my Ponytail Palm have brown leaves?

Last Updated: April 1, 2022

String of Pearls Loved for being low maintenance plants that bring a bit of the tropics indoors, the Ponytail Palm is a great for both novice and experienced plant parents. It is often forgotten though that they are succulents so they aren’t adaptable to every environment and if things aren’t right, these Palms can start to develop brown leaves. Below, we will go through each of the main reasons why Ponytail Palms develop brown leaves and leaf tips. We will also cover how to treat the issue and stop it from causing any more brown foliage.

Underwatering can cause brown leaf tips on Ponytail Palms

Ponytail Palms can be forgiving for the odd time where you forget to water, but if they don’t receive any moisture for several weeks then they will start to develop brown leaves. With Ponytail Palms, this will most commonly start from the tips of the leaves and work its way throughout the leaf as the issue progresses. Before you start pouring loads of water over your plant, you need to make sure that this is really the cause of the brown leaves on your Ponytail Palm. The best thing to do is check the moisture levels in the soil by removing the plant from its pot. If the soil is dry and feels quite sandy to touch, and the roots look a little crispy and shrivelled, then underwatering is likely the cause. It’s important that you treat the issue of overwatering properly as otherwise, you may cause more problems than just the brown leaves you started with.
  1. Give your Ponytail Palm a soak. Fill up a container with fresh temperate water and place your Ponytail Palm in there for about 10-15 minutes. Make sure the water is temperature as really hot or cold water can halm your Palm. This bathing method allows the water to soak into the potting mix but your Palm will only take up as much as it needs. Often when watering really dry soil, it flows right through and out the bottom of the pot which doesn’t help solve the issue so bathing helps soak the potting mix.
  2. Slowly reintroduce watering. Sudden changes in the environment can be quite stressful for plants and if the potting mix goes from really dry to super soggy quickly, it can cause your plant to go into shock (this is why we recommend only soaking for a short time). For the next week or so, slowly reintroduce watering by giving your Ponytail Palm a little every day before returning to a more normal schedule.
  3. Adjust your watering schedule. If you had simply forgotten to water your Ponytail Palm and that’s why the brown leaves appeared, the fix is easy – just make sure to remember how often to water your Palm. However, if you did stick to a watering schedule, it suggests that it wasn’t enough. You want to make sure that you are either watering more frequently than you did previously or that you give your Ponytail Palm a little bit more water each time you do and this will help to avoid more brown leaves.
Make sure you are keeping an eye on when the potting mix is dry so you know when it’s time to water your Ponytail Palm. Using a moisture meter is a great way to avoid any more brown leaves caused by a lack of water in future – they are every plant parents best-kept secret.

Brown leaves can be caused by low light

Ponytail Palms are one of the only houseplants that really like bright sunshine! Whilst they can adapt to lower light levels, you may experience some issues such as leggy or stagnant growth and a few brown leaves. This is simply because your Ponytail Palm isn’t getting enough light to photosynthesise properly. If this is happening to your Ponytail Palm, make sure to move it to a spot that is getting enough sunlight. If this is occurring during winter, or there is no brighter place for your Palm to go, then supplementing light through LED grow bulbs is the best way to go.

Too much fertiliser could also be the problem

Another cause of brown Ponytail Palm leaves is too much fertiliser/ plant food. We recommend fertilising your Ponytail Palm with a water-soluble feed, making sure that you dilute it more than it says on the bottle. Each plant is unique and there are so many factors that determine how much feed your plant needs so there can never be one amount that suits all plants. Ponytail Palms don’t need regular feeding, once or twice a year (during the growth months) is all your Palm needs. You also shouldn’t be feeding your Palm at all during autumn and winter. If you are fertilising more than this, or not diluting the feed enough, this can cause fertiliser burn which shows up as brown leaf tips or edges. To solve the issue, flush out the soil of all fertiliser and hold off using any feed with your Ponytail Palm for an entire year. The great thing about Ponytail Palms is that you don’t really have to feed them at all and you will still be rewarded with luscious new leaves. Those are the three main reasons why Ponytail Palms develop brown leaves or brown leaf tips. As they are quite forgiving plants, by the time it has caused brown leaves it does tend to mean that the issue has been going on for a while which can make solving the issue a little tricker. However, as long as you act as soon as you spot the issue then you should still have a good chance at getting your Ponytail Palm back to full health and preventing any more brown leaves. To learn more about how to properly care for your plant, check out our Ponytail Palm care guide.

Fiddle and Thorn is a participant in the Amazon Services LLC Associates Program, an affiliate advertising program designed to provide a means for sites to earn advertising fees by advertising and linking to Amazon.com

Take our houseplant survey!

Quickly respond to our 30 second houseplant survey and get 75% off our Complete Houseplant Care eBook!

Take the Survey

No thanks…

String of Pearls Care

Last Updated: April 1, 2022

String of Pearls

Basic String of Pearls Care

There are two important things to note when caring for a String of Pearls and that is that they like bright levels of sunshine (but keep them away from intense direct light and hotspots in summer) and secondly that they really need their soil to fully dry out between waterings. As they are cascading plants, String of Pearls plants have quite delicate roots so are quite sensitive when it comes to soggy soil and root rot.

Below you will find all the information you need to properly care for a String of Pearls including detailed care requirements, FAQs and how to diagnose and treat common issues that might pop up along the way.

Detailed String of Pearls Care

String of Pearls love sunshine

They can’t get enough of the sunshine so find a bright spot in your home for your String of Pearls. Do keep it away from too much direct sunlight though as it can cause them to burn.

Be sparing on the water

String of Pearls plants are succulents, meaning they don’t require much water. They prefer their soil to be dry and overwatering can very quickly lead to root rot.

String of Pearls plants need space

These hanging succulents will need space to grow so make sure there is enough room for it to sprawl downwards.

Don’t worry about fertilising your String of Pearls

String of Pearls don’t need to be fertilised often, if at all. Overfertilisation can actually cause real harm to your plant quite quickly so we recommend leaving it out completely.

Propagating your String of Pearls is easy

All you need to do to propagate a String of Pearls is snip off some of the pearls and place half of the cutting in water. Change out the water every few days and you should start to see some new roots growing after a few weeks. You can also propagate your String of Pearls by burying the pearls in soil and watering regularly.

String of Pearls plants are toxic to your pets

Keep your dogs, cats and children away from your String of Pearls plant as ingestion of the plant can cause skin irritation and stomach ache.

Never mist your String of Pearls

As with watering, too much misting of your String of Pearls plant can quite quickly lead to root rot. String of Pearls plants don’t like rooms with high humidity so we recommend keeping them away from bathrooms or kitchens.

String of Pearls plants like warmer temperatures

Although it isn’t a dealbreaker when caring for a String of Pearls plant, try to keep them in a warm room as they thrive in slightly higher temperatures. Keep your plant away from drafty windows and doors as the cool air from outside will shock the plant.

String of Pearls Care FAQs

Common Issues for String of Pearls

It can sometimes be tricky to grow your String of Pearls indoors, so it is important that you keep an eye out for any warning signs that might indicate your plant is unhappy. Signs of stress include shrivelling leaves, thinning stems and a loss of leaves.

Fiddle and Thorn is a participant in the Amazon Services LLC Associates Program, an affiliate advertising program designed to provide a means for sites to earn advertising fees by advertising and linking to Amazon.com

Take our houseplant survey!

Quickly respond to our 30 second houseplant survey and get 75% off our Complete Houseplant Care eBook!

Take the Survey

No thanks…

Calathea Musaica ‘Network’ Care Guide

Last Updated: April 1, 2022

Calathea Musaica

Basic Calathea Musaica Care

Calathea Musaica plants get their ‘Network’ nickname from the intricate detailing on the leaves which makes this plant unique! They are also slightly easier to care for than other Calathea types so a great choice for every plant parent!

Light

Bright Indirect Light

I love the sunshine but too much direct light will damage my leaves.

Water

Water Moderately

I don’t like my soil to be too dry or too soggy. Little and often is what I’m after.

Humidity

High Humidity

I thrive in humid environments so please mist my leaves every so often.

Soil

Potting Soil

I need soil specifically for indoor plants as it retains the right amount of water.

They can deal with a range of light levels

Whilst bright, indirect light is ideal for your Calathea Musaica, they can tolerate quite a range of light conditions compared to other Calathea types. Just avoid intense direct light during summer as this can damage the leaves.

Keep the potting mix slightly damp

Calathea Musaica plants like to have some consistent moisture in the soil so it’s all about finding the right balance when watering. They are somewhat forgiving if you water too much or too little but over time this can cause real issues for the plant.

Avoid temperature extremes

Calathea Musaica like average room temperature to thrive and can struggle in really cool or warm environments. Keep them well away from heaters, drafts or AC vents.

They will benefit from a humidifier

Calathea Musaica plants love a slightly humid environment as they are native to the tropics. We recommend buying a humidifier to keep a nice stable humidity level around your plant. Other great ways to give it a boost is misting, pebble trays and showering.

Only fertilise during the growth period

It’s important that you hold off fertilising your Calathea Musaica during autumn and winter as your plant will be dormant. During the warmer, sunnier months of spring and summer feed your Calathea Musaica every 1-2 months to support growth.

Propagate a Calathea Musaica Network through division

The most successful way of propagating a Calathea Musaica is through division of the mother plant. Divide up the plant so each section has a good amount of the overall root system. This will increase your chances of a successful propagation.

Repot your new sections into fresh well-draining potting mix and resume normal Calathea Musaica care.

Learn more in our Calathea propagation guide.

Calathea Musaica Network plants are non-toxic

Another thing we love about the Calathea Musaica Network is that it is non-toxic and pet friendly. So you don’t need to worry about having one of these in your home around your beloved furry friends!


Calathea Musaica ‘Network’ FAQs

Quick and simple answers to the most common questions we see about the Calathea Musaica ‘Network’.


Common Problems with your Calathea Musaica ‘Network’

Here are some common issues that you might run into. It’s important to diagnose any issues early to give your plant the best chance of bouncing back.


Fiddle and Thorn is a participant in the Amazon Services LLC Associates Program, an affiliate advertising program designed to provide a means for sites to earn advertising fees by advertising and linking to Amazon.com

Take our houseplant survey!

Quickly respond to our 30 second houseplant survey and get 75% off our Complete Houseplant Care eBook!

Take the Survey

No thanks…

Types of Peperomia Plants: 29 Common and Rare Varieties (With Pictures)

Last Updated: April 1, 2022

With over 1,500 known varieties, Peperomias are some of the most popular houseplants around. Known and loved for their unique foliage, each and every type of Peperomia is quite different, from thick to delicate leaves, trailing to climbing and that’s not even mentioning the range of colours and leaf textures. Because of this, there is a Peperomia variety for everyone!

The other great thing about Peperomia plants is that they are relatively compact, which means they are great for every home. In this article, we’ll explore 29 of our favourite Peperomia varieties, from common to rare types and everything in between. This will also be complete with pictures, context to each type and specific care requirements so that you can find the right plant for you.

Whether you’re a seasoned plant enthusiast or just starting out, there’s sure to be a Peperomia variety on this list that catches your eye!

Common Peperomia Varieties

These types of Peperomia plants have risen sharply in popularity over the past few years but luckily there is availability to match the demand. This means it isn’t that difficult or costly to get your hands on them and you’ll commonly find these across plant shops, nurseries and even supermarkets across the world.

houseofplants.co.uk

Peperomia Obtusifolia

Peperomia Obtusifolia (Common name: Baby Rubber Plant)

Peperomia Obtusifolia is an incredible bushy variety, with dark green oval-shaped leaves. The leaves grow in a rosette pattern and can look a little like a Rubber Plant (hence the common name). The Peperomia Obtusifolia is a slow-growing houseplant that will only reach heights of around 12 inches, making them a great window sill plant or a choice for smaller rooms.

Occasionally, Peperomia Obtusifolias can produce small long white flowers but these aren’t really anything special.

The benefits of a Peperomia Obtusifolia are that they are pretty adaptable to a range of environments, making them relatively easy to care for. Because all Peperomia types are pet friendly, you also don’t need to worry about having this one around your furry friends.

Peperomia Caperata

Peperomia Caperata (Common name: Emerald Ripple)

This Peperomia variety has captured the hearts of so many plant parents over the past few years and has luckily become quite widely available. The intense leaves have a quilted, deeply-creased texture that creates a rippled effect which you’ll also see on some similar types of Peperomia below.

Emerald Ripple Peperomias have a bushy growing habit but won’t ever grow that large (maximum 10 inches in height) so it is a great choice if you don’t have much space but still want something striking.

Peperomia Caperata might look intense, but they are relatively relaxed about their care requirements, making them a great addition to any home.

Check out our Peperomia Caperata care guide to learn more!

Watermelon Peperomia

Peperomia Argyreia (Common name: Watermelon Peperomia)

The Watermelon Peperomia has shot up in popularity over the last 2 to 3 years and what was once quite a tricky plant to find, is now easily available globally. They get their common name from their leaves’ distinctive resemblance to a watermelon.

In our experience, Peperomia Argyreia can sometimes be a little fussy about its environment and you may encounter some curling leaves or a loss of leaves if things aren’t right. However, in return for ideal conditions, the Watermelon Peperomia will reward you with relatively fast growth.

The other thing that we love about the Peperomia Argyreia is how easily you can propagate it. Whether through division, stem cuttings or even just using a single leaf, they are some of the easiest plants we have ever propagated.

Check out our Watermelon Peperomia care guide to learn more about this variety.

www.houseofkojo.com

String of Turtles plant on a stool

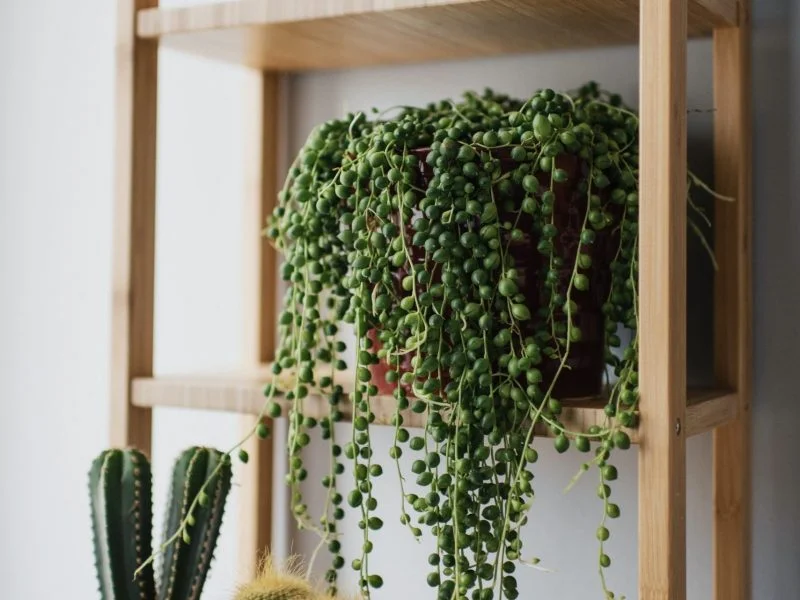
Peperomia Prostrata (Common name: String of Turtles)

Peperomia Prostrata, commonly known as String of Turtles, is quite different from a lot of Peperomia varieties as it is a trailing plant with very small, delicate leaves. It gets its name from its round succulent leaves with white or silver markings that resemble turtle backs.

The Peperomia Prostrata is one of our top choices for hanging baskets or to trail down shelving units as they have a delicate but minimalist aesthetic.

Native to South America, the String of Turtles prefers warm, slightly humid conditions so you’ll need to keep a close eye on the conditions to ensure the delicate leaves and vines don’t dry out.

Peperomia Hope plant in a small terracotta pot

Peperomia Tetraphylla (Common name: Peperomia Hope)

Peperomia Hope plants have thick coin-shaped leaves with faint lines and waves throughout. The interesting thing about how a Peperomia Tetraphylla is that they develop clusters of leaves, with three or four growing in one spot, rather than evenly distributed along the vine.

Peperomia Tetraphylla is a small plant, typically reaching only 6 to 8 inches in height and spread, making it a great choice for small spaces or as part of a larger plant arrangement.

When it comes to their care requirements, Peperomia Tetraphylla needs bright but indirect sunlight and always needs their potting mix to dry out between waterings. Peperomia Hope plants can occasionally develop white flowers but they are quite insignificant so don’t get your hopes up!

Learn more about caring for this plant and keeping it happy and healthy in our Peperomia Hope care guide.

@kukkaputiikki on Instagram

Trailing Jade Plant

Peperomia Rotundifolia (Common name: Trailing Jade)

Peperomia Rotundifolia is a beautiful trailing Peperomia variety with delicate, round leaves that grow along long, thin stems. The leaves are a lot smaller than a lot of other Peperomia types and it won’t actually often grow beyond about 15 inches in length so a nice option for a more compact trailing plant. They are also quite slow growers so don’t expect there to be new leaves popping out every week.

Native to Central and South America, the Trailing Jade Peperomia prefers a nice warm and humid environment but is otherwise fairly easy to care for. They can tolerate some medium and low-level light but will grow slower under those conditions which is the trade-off. They are a great option for offices too as they can adapt quite well to fluorescent lighting.

plantophiles.com

Red Ripple Peperomia

Peperomia Rubella (Common name: Red Ripple Peperomia)

With arguably some of the most beautiful leaves, the Peperomia Rubella is a variety named for its distinctive red-tinged leaves. Although the top of the foliage is dark green, the undersides are a striking red and paired with a velvety texture, this is a plant to impress!

The Peperomia Rubella is also quite a small plant and will tend to grow to about 8 inches in height and spread. They can be beautiful cascading plants as after growing a few inches, the stems will become heavy and hang down, exposing a lot more of the red sides of the leaves.

One bonus about the Peperomia Rubella is that it actually quite likes being a little bit root bound so you don’t need to worry about repotting too often which is great!

Raindrop Peperomia Plant

Peperomia Polybotrya (Common name: Raindrop Peperomia)

The Raindrop Peperomia is really having its moment at the minute as they are taking over plant shops around the world (and we are loving it!). With its incredible large glossy leaves, it gets its common name from the raindrop shape of the leaves.

Often mistaken for a Pilea plant, the Peperomia Polybotrya is a little bit easier to care for than Pileas so can be a nice option if you’re looking for something less fussy.

Peperomia Polybotrya are slow growers but their incredible raindrop-shaped leaves make it all worth it when a new one pops out. When it comes to their maximum size, you’ll often see about 12-15 inches in height.

Find out more about caring for this plant in our Raindrop Plant care guide.

Less Common Peperomia Varieties

These are slightly less common types of Peperomia plants, which means you might not always be able to get your hands on them locally to you. However, they are available to buy online and won’t be too expensive either which is a bonus!

@dinidjoemiko on Instagram

Red Edge Peperomia

Peperomia Clusiifolia (Common name: Red Edge Peperomia)

Their common name gives away pretty much what the Peperomia Clusiifolia is as their leaves have a very vibrant red edge which is very unique. They look quite like the Baby Rubber Plant variation but the splash of colour sets it strongly apart.

The rest of the foliage is a deep, glossy green and has a succulent and waxy texture and appearance.

As with a lot of Peperomia varieties, the Red Edge Peperomia is a slow grower and will also stay quite small with a maximum height and spread of around 15 inches making them a great windowsill plant. So if you’re looking for a low-maintenance plant that will thrive in a variety of indoor environments, this one is a great choice!

String of Coins plant on a stool

Peperomia Pepperspot (Common name: String of Coins)

This variety is often mistaken for the Ruby Cascade Peperomia as they do look quite similar. However, the Peperomia Pepperspot is technically a different variety. With very delicate leaves and stems, the Peperomia Pepperspot’s vines become very intertwined with each other, giving quite a messy look.

Peperomia Pepperspots are in classic Peperomia style, very slow growers and never really become very long. You might (with the right care and environment) see vines up to about 15 inches long but most will be shorter.

In its native environment of the Amazon, the Peperomia Pepperspot grows under the canopy which means that in your home, it’s very important it doesn’t receive any intense direct light. This can very quickly burn and dry out the leaves and vines.

Check out our Peperomia Pepperspot care guide to learn more!

@suculentaspro on Instagram

Prayer Pepper plant

Peperomia Dolabriformis (Common name: Prayer Pepper)

The Prayer Pepper Peperomia stands out from a lot of the precious varieties purely because of its leaf shape. They have very small elongated leaves that resemble hands in prayer (hence the name). The foliage is a deep, glossy green and has a slightly succulent texture.

The most loved things about the Peperomia Dolabriformis are the compact size and ease of care. The two factors mean this plant is a great choice for any home, in any room and pretty much any spot which is rare. So if you’re looking for something to bring a bit of interesting greenery into your home, but that doesn’t take up too much of your space, then go for a Peperomia Dolabriformis!

wearebonefide.co.uk

Happy Bean Plant

Peperomia Ferreyrae (Common name: Happy Bean)

Similarly to the Prayer Pepper variety, the Peperomia Ferreyrae also has long elongated leaves which makes them stand out in the Peperomia family which is filled with round-leaf plants.

You can probably tell from the appearance of the leaves, but the Peperomia Ferreyrae is a semi-succulent which means it has quite low watering requirements compared with other varieties in the Peperomia family. This also impacts the soil required as you’ll want to choose a cacti/succulent mix for this to ensure it has good drainage qualities.

The Happy Bean is a slow-growing plant that also won’t grow too big or bushy. You’ll often see stems reach about 12-15 inches in length.

@jillyjelly1 on Instagram

Parallel Peperomia plant on a plant stand

Peperomia Puteolata / Tetragona (Common name: Parallel Peperomia)

The striking leaves on a Parallel Peperomia have a large resemblance with the Watermelon Peperomia but instead of being round, are more elongated in shape. Native to South America, the slight trailing habit of the Parallel Peperomia meant that in its native environment, it can spread quite quickly.

Although the individual leaves aren’t that large (only around an inch or two), the individual stems can grow very long for a Peperomia, reaching upwards of 18 inches.

In terms of flowering, the Parallel Peperomia can sometimes produce small white flowers on long spikes, but similar to a lot of other Peperomia varieties these are insignificant and not that pretty.

feelslike-home.co.uk

Peperomia Graveolens in a terracotta pot

Peperomia Graveolens (Common name: Ruby Glow)

The Peperomia Graveolens is also a semi-succulent and has thick plump leaves. But the thing that is most attractive about this variety is the reddish-pink undersides of the leaves. So if you’re looking to add a splash of colour to the room, but don’t want anything super difficult to care for, these are a great choice.

The Ruby Glow Peperomia is a very small plant, reaching heights of only about 4 inches. But what they lack in size, they definitely make up for in incredible leaves.

@sj_plantsplants on Instagram

Teardrop Peperomia plant

Peperomia Orba (Common name: Teardrop Peperomia)

What attracts people to the Peperomia Orba is its bright lime green leaves which aren’t so common across the rest of the Peperomia varieties. You’ll often also see a touch of variegation across the foliage when grown in the right conditions.

Another thing that plant parents love about the Peperomia Orba is its ability to tolerate lower light levels. Although you may see slower growth, it can be tricky to find plants that can adapt to a lower level of sunlight so these are a great addition to every home.

You may be a little disappointed about the flowers that grow on Peperomia Orbas though as they are very small and easily overlooked. Because of this, it’s the incredibly bright leaves that are the attractive element of this variety.

positivebloom.com

Beetle Peperomia plant

Peperomia Angulata (Common Name: Beetle Peperomia)

Native to South America, the Peperomia Angulata (also known as the Beetle Peperomia due to its beetle striped leaves) is an incredible trailing plant that can grow up to about 15 inches in length. Although they are relatively slow growing when indoors, in their native environment they are known to be quick spreaders!

As with so many peperomia varieties, the Beetle Peperomia will sometimes grow small long white flowers but these are very insignificant so not something you should be hoping for really!

You’ll be pleased to know that they are relatively easy to care for and similar to succulents, they are able to store quite a bit of water so don’t need regular watering.

Red Ripple Peperomia

Peperomia Carperata Rosso (Red Ripple Peperomia)

The Peperomia Carperata Rosso is actually one of our favourite types of Peperomia because the vibrancy of the leaf undersides isn’t something you get regularly in houseplants! But it’s not just the undersides of the leaves that are the attractive part of the Red Ripple Peperomia as the deep-ridge texture on the top creates a strong ripple effect which we absolutely love.

Another great thing about the Peperomia Carperata Rosso is that they are so easy to propagate as you can even do it from a single leaf. This means you can easily increase the size and bushiness of your mother plant, or create infinite gifts for friends and family.

@thepurplepothos on Instagram

Peperomia ‘Ruby Cascade’

Peperomia ‘Ruby Cascade’

Another one of our favourite Peperomia plant types that we are only slowly starting to become a little bit more widespread, is the Peperomia ‘Ruby Cascade’. Loved for their small, delicate leaves, the main attraction point of the Ruby Cascade is the red/pink undersides of the leaves.

We also love the fact that they are so easily propagated. Just trim off the ends of the vine, and pop them in some water and they will quickly grow new roots, ready to either be potted back into the mother plant or to form a new plant entirely.

Although it is a slow-growing plant, with the right care and environment you will see each of the vines descend several feet when grown as a hanging plant!

Rare Peperomia Varieties

These types of Peperomia are a lot less common and trickier to get your hands on. They can sometimes be a little pricier than the less rare varieties. However, Peperomia as a plant family is quite affordable in general so you won’t see any price tags of hundreds or thousands of dollars like you would with some other rare houseplants.

@tsvetnyesni on Instagram

Peperomia Glabella plant

Peperomia Glabella (Common name: Smooth Peperomia)

The Peperomia Glabella is a slightly less popular variety of Peperomia and in our opinion, it doesn’t get enough credit. The way in which their stems cascade out of the pot makes for an incredible hanging plant and looks great trailing down shelves or in a hanging basket.

Native to South and Central America, the Peperomia Glabella is a super easy houseplant to care for as the only thing that needs a little extra attention is humidity. As long as you’re misting your plant every few days and giving it a nice comfortable environment, this will help avoid a lot of common problems.

www.duchyofcornwallnursery.co.uk

Peperomia Columella plant in a hanging basket

Peperomia Columella

The Peperomia Columella is as unique as they come when it comes to Peperomia varieties. Native to Peru, the Peperomia Columella has very small succulent leaves along central ascending stems. For the first few inches, these stems will grow vertically. However, as they become longer and heavier they can start to curve downwards.

During summer, you’ll often see long white flowers appear across your Peperomia Columella but these aren’t really anything special, unfortunately.

When it comes to care, like most succulent types, the Peperomia Columella is easy to care for as long as it’s getting ample light and is not overwatered.

@growwith_jess on Instagram

Piccolo Banda Peperomia plant

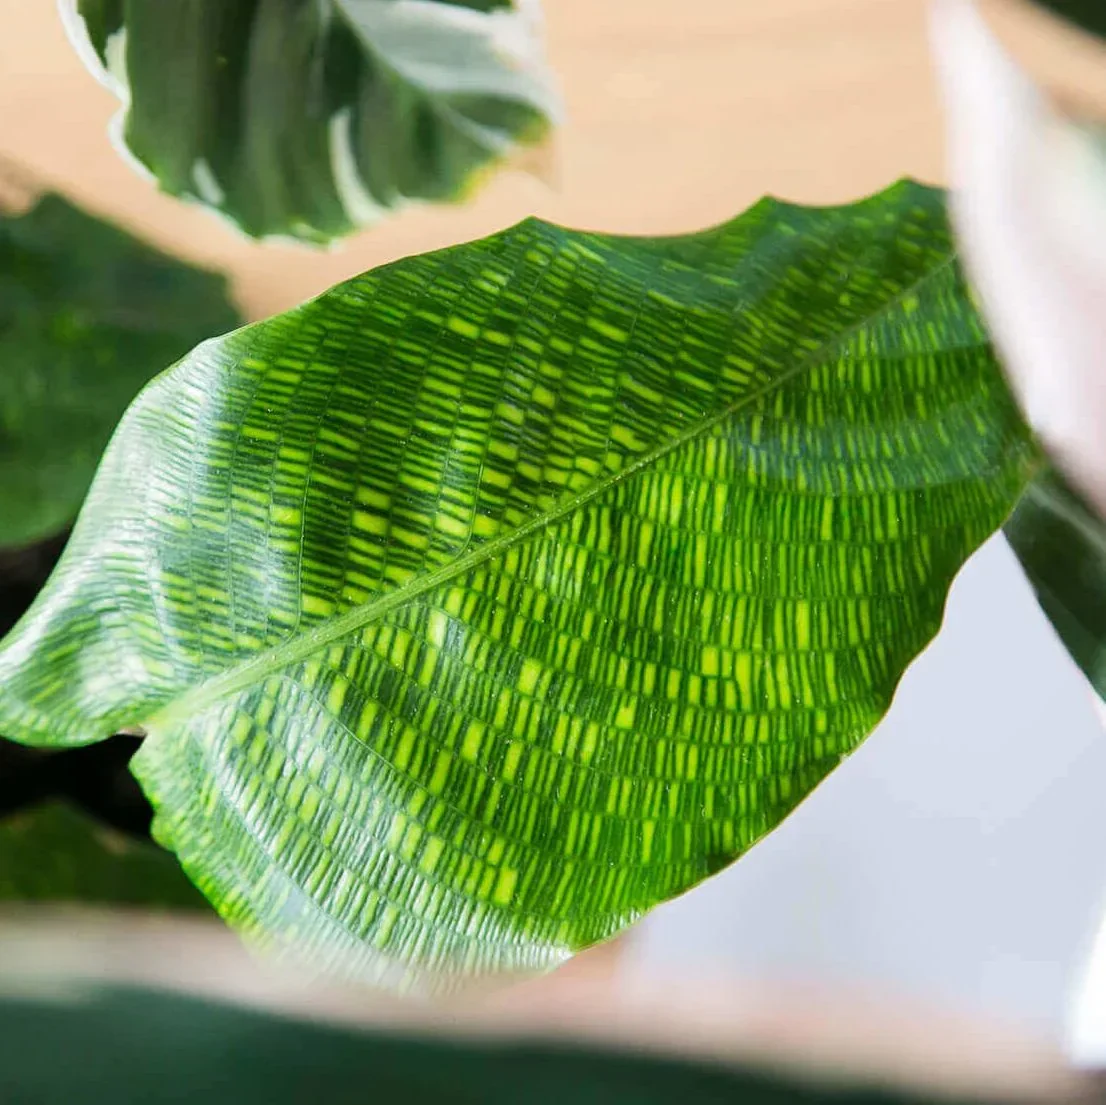
Peperomia Albovittata (Common name: Piccolo Banda Peperomia)

The Peperomia Albovittata is often mistaken for a Watermelon Peperomia and while they do look similar, the Albovittata has a more rippled and veiny texture, whereas Watermelon Peperomias have very smooth leaves. The other difference is that the Peperomia Albovittata has striking dark red veins running through the leaves but both also bring vibrancy through their red stems.

When it comes to caring for your Peperomia Albovittata, you want somewhere with ample bright but indirect light to avoid burning these incredible leaves. And avoiding cold drafts from outside or air conditioning units is crucial with these plants.

As with most Peperomia varieties, the Piccolo Banda can be easily propagated through both stem and leaf cuttings.

@paz_plantlife on Instagram

Peperomia Verschaffeltii plant

Peperomia Verschaffeltii (Common name: Mini Watermelon)

This is another variety that often gets mistaken as a Watermelon Peperomia as they are very similar in appearance. The main difference between the two is that the Peperomia Verschaffeltii has more teardrop shaped, elongated leaves rather than completely round ones. However, the markings and colours are the same with both having silver and green stripes across the leaves.

The Peperomia Verschaffeltii also produces some flowers during summer but these are quite bland and most of the time we just trim them off when they appear. Their flowers have the nickname rat tail as they are thin, long and not very pretty.

Ivy Peperomia plant

Peperomia Griseoargentea (Common name: Ivy Peperomia)

Native to the jungles of South America, the Peperomia Griseoargentea is another variety with deep ridges and ripples. Their leaves are mostly quite dark green with a hint of silver and like many other types of Peperomia, they have the famous red stems.

The Peperomia Griseoargentea is another great choice if you’re looking for a compact plant that’s anything but boring. They might only grow to about 15 inches in height, but they definitely will draw attention with their incredible foliage. It’s important to remember that these plants are naturally very slow growers, so don’t make the mistake of over-fertilizing to try to promote growth as this can cause more damage than good.

www.thejunglecollective.com.au

Peperomia Rugosa ‘Aussie Gold’ plant

Peperomia Rugosa ‘Aussie Gold’

This variety has no trouble standing out from the rest with its gold and red leaves! Although they might look very different, their care requirements and growth habits are very typical of a Peperomia variety.

Don’t expect new gold leaves to be shooting out every week as they are slow growers but their striking leaves really make up for that fact.

When it comes to the care and environment, as long as your Peperomia Rugosa ‘Aussie Gold’ is receiving a bright but indirect light, moderate watering and is somewhere with enough warmth, then they’ll be happy.

@niclarsworldplants on Instagram

Peperomia Incana plant

Peperomia Incana (Common name: Felted Pepperface)

The Peperomia Incana gets its common name from the little hairs on their leaves, which is quite unique to this variety. Because of this, they are also sometimes known as felted peperomia, fuzzy pigface or Amazon fuzz.

As with some other varieties, the Peperomia Incana has semi-succulent qualities which means it’s able to store water in its leaves. This water acts as a reserve that it can use when in need but it does mean that overwatering is a very common and serious issue with the Felted Peperomia. Make sure that the potting mix has fully dried out before watering again and this will avoid root and leaf rot.

And if you want to create a bushier plant, or gift these furry leaves to a friend, the Peperomia Incana is easily propagated through stem or leaf cuttings!

@pots4plants_by_cath on Instagram

Peperomia Elongata plant

Peperomia Elongata

This type really stands out for its elongated leaves which are quite big relative to most other types of peperomia. But just because it’s a quite different, doesn’t mean that the same care requirements don’t apply. You want to find somewhere without direct sunlight but with enough bright light and make sure that the potting mix dries out between watering.

When it comes to the growth rate, the Peperomia Elongata is (like most other types of Peperomia) a very slow grower. This can be a benefit though if you’re looking for a plant for a specific spot and don’t want it to outgrow or overtake the room.

@plant_mode on Instagram

Peperomia Metallica Plant

Peperomia Metallica

The name tells you everything you need to know about this type of Peperomia. With dark red leaves, the Peperomia Metallica can be spotted easily by the silver stripe that runs down the middle of every leaf. They also have deep red leaf undersides which are quite common in Peperomia types and adds a nice splash of colour.

Peperomia Metallica might look intense, but they are a dream to care for. As long as the basics of enough light (but not direct), enough water (but time in between waterings) and a warm environment are there, you shouldn’t have too many problems.

giromagicactusandsucculents.com

Taco Plant

Peperomia Axillaris (Common name: Taco Plant)

Native to the jungles of Ecuador and Peru, the Peperomia Axillaris has some succulent qualities but is not actually a succulent, despite really looking like one! What it does have though is the ability to store water in its leaves, just like a succulent. This is why they look quite plump and squishy. This allows the Peperomia Axillaris to go for longer periods without water.

As with nearly all other types of Peperomia, the Peperomia Axillaris is a slow grower an remains very small. Usually, each part of the plant will grow to a maximum of 12-15 inches. This makes them a great windowsill or desk plant.

pflanzenbestimmung.info

Peperomia Marmorata plant

Peperomia Marmorata (Common name: Silver Heart)

Native to Brazil, the Peperomia Marmorata is also known as the Silver Heart plant due to the colour and shape of its leaves. The Peperomia Marmorata stays quite a short but bushy plant, reaching heights of only about 12 inches.

You want to provide a nice warm and humid environment for your Silver Heart Peperomia to properly thrive. This will also prevent dry leaf tips and edges as well as curling leaves which can be a common but difficult problem for most Peperomia varieties.

The Peperomia Marmorata can store some water in its leaves, which makes it quite drought-tolerant and low-maintenance.

Those were 29 of our favourite Peperomia varieties. If we were to list them all this would be a very long post as there are over 1,000 different types of Peperomia plants. Most of those aren’t commercially available though and can only be found in their native environment so we’ve made sure that the types we’ve mentioned are available to buy and can thrive indoors with the right care and environmental considerations.

For most varieties, they need a good level of bright but indirect light so you want to avoid any direct sunlight during summer. During winter, you can often get away with having your Peperomia as a windowsill plant as the sun is a lot weaker.

The other thing to note with pretty much all of the Peperomia varieties we listed above is that they stay very compact and are slow growers. So don’t expect the plant to fill a much larger pot or space in your home anytime soon.

Fiddle and Thorn is a participant in the Amazon Services LLC Associates Program, an affiliate advertising program designed to provide a means for sites to earn advertising fees by advertising and linking to Amazon.com

Take our houseplant survey!

Quickly respond to our 30 second houseplant survey and get 75% off our Complete Houseplant Care eBook!

Take the Survey

No thanks…


Why is my Air Plant dying? Causes and Solutions?

Last Updated: February 7, 2022

 Air Plant dying Air Plants are different from nearly every other type of houseplant because they don’t need soil to survive (hence the name). But this can make caring for them and treating issues complicated because we can’t always just do what we know. There are quite a few reasons why your Air Plant might be dying so we have condensed all the important information into the post below so you can figure out what is killing your plant.

Your Air Plant might be dying due to watering issues

We have grouped over and underwatering together into this section because they are two sides of the same coin when it comes to these plants. Watering them is a very different routine than your normal soil potted plants. You need to soak them in a bath for about 20-30 minutes every week or so. You can also mist them occasionally if they are looking a little dry. However, too much or too little bathing will mean that your Air Plant will die. Either from the leaves rotting if there is too much moisture, or the leaves shrivelling up and drying out if they are not bathed or misted enough. It can be a tricky balance as each individual plant type is slightly different. If your Air Plant has flat leaves then it is perfectly hydrated. You only need to be concerned when the leaves start to curl inwards as this indicates that your Air Plant might be dying.

Chemical sensitivity might be harming your Air Plant

If you live in a hard water area then tap water is not always the best thing to use on Air Plants. The water contains chemicals such as fluoride that over time will impact your plant’s health and might be why it’s dying. There are two ways to avoid this problem that are free and don’t involve getting a whole purification system installed in your home. Firstly, you can leave a watering can full of tap water standing for over 24 hours. Over that time most of the chemicals with evaporate or sink to the bottom of the watering can. Then the only thing left to do is remember not to pour away the last few inches of water. The other method is to collect rainwater as it is a lot better to use that the treated water out of your tap.

Leaf burn can lead to a dying Air Plant

Another problem that may be causing your Air Plant to die is too much direct sunlight. They don’t mind the sun but if they are placed close to a window during summer, the intense sunlight can scorch the leaves. This is unfortunately irreversible so we recommend trimming away any burnt leaves to help revive your dying Air Plant. To avoid this problem move your plant a little further away from the windows during the summer so it gets less of that intense light directly falling onto its leaves.

Not enough sunlight can cause your Air Plant to die

Although direct light can cause leaf burn, not enough sunlight can also be really damaging to your plant and might be why it’s starting to die. They are not low light plants so will really struggle in shady corners or rooms with not much natural light. If you think that your Air Plant isn’t getting enough sunlight then move it to a brighter spot in the home and monitor how it reacts. It may mean that it needs more bathing and misting as a result of more light.

A dying Air Plant can indicate temperature extremes

Much like light and water, it is a real balancing act to get the right temperature for your Air Plant. They will struggle in both really cold temperatures and hot environments. The best thing to do is monitor the temperature with a thermometer to make sure the spot you have your plant is the right one. You want to make sure that the temperature doesn’t drop below 12°C (54°F) or rise above 30°C (86°F). Hotspots caused by radiators/cookers and draughts caused by cracks in windows or doors can also be really damaging to your plant. You might find that the overall temperature in the room is perfect, but are not detecting the hot spot or cold draft in the room which is causing your Air Plant to die.

Your Air Plant might be dying due to overfertilisation

This is a really easy thing to do with Air Plants because you might think it’s fine to use the standard houseplant fertiliser when you bathe your plant. Instead, there are some really great Air Plant specific fertilisers that are just the right strength for your plant. Remember that because your plant doesn’t grow in soil, the rules around fertiliser are a little different.

It may simply be natural ageing

Air Plants grow in cycles and produce offshoots and baby Air Plants. Unlike Spider Plants, for example, where the mother continues to thrive after growing babies, mother plants grow their pups until they are just as big as the main plant and will then die. This is just part of the natural cycle of many types of Air Plants. It’s not anything you did wrong or because of their environment. The best thing to do in this instance is to propagate the offshoots and nurture them until they themselves begin to produce their own plant babies! You will soon become really used to the natural cycle and how to spot the different stages. Those are the most common reasons why your Air Plant might be dying. There are quite a few variables and factors so it’s important to go through each one and investigate whether this is the main problem. Watering is always our first stop with plant problems as it is just so different from what we are used to with our other plants. If you want to find out more about how to care for your plant, or if you have any other more specific issues with it, then visit our Air Plant care guide.

Lucky Bamboo Care

Last Updated: August 10, 2022

Lucky Bamboo Care

Ponytail Palm Care

Last Updated: August 10, 2022

Ponytail Palm Care