Why does my Watermelon Peperomia have yellow leaves?

Last Updated: April 1, 2022

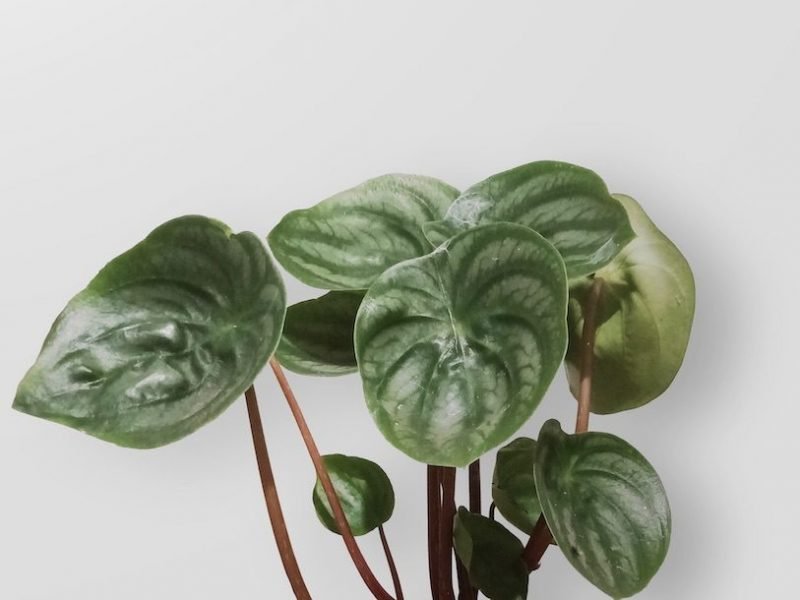
Watermelon Peperomia plants have incredible leaves and it’s always devastating to see that some of them are starting to turn yellow. But don’t fear, we have figured out exactly what can cause yellow Watermelon Peperomia leaves as well as what you need to do to fix the issue and prevent it from happening again. If you have caught the issue fairly early then you should have a good chance at getting your plant back to full health.

The most common cause of yellow Watermelon Peperomia leaves is overwatering

And the major consequence of this is root rot. Once the roots have started to rot in waterlogged soil, it will prevent the plant from getting the needed moisture and nutrients.

If you think that your Watermelon Peperomia is suffering from overwatering and root rot, the best thing to do is to take your plant out of its pot immediately and inspect the root system. Carefully trim away any rotten roots as this will encourage the new healthy roots to grow. If the potting mix is still soggy and waterlogged, replace it immediately. Don’t wait for it to naturally dry out as this risks causing more harm to your Watermelon Peperomia and cause more yellow leaves.

Over the next few weeks, you need to water your Watermelon Peperomia less than you were doing before so that it can start to recover. Using a moisture meter is a great way to know when it’s time for a water. You will also want to adjust your watering schedule depending on the seasons, to ensure that you are cutting down on watering over the colder, darker months of autumn and winter.

Top tip: to avoid the roots of your plant sitting in water for days, remove any excess water that has run out of the drainage holes into your saucer or planter.

Poor Drainage

Sometimes it may not be your watering schedule or overwatering that is causing your Watermelon Peperomia to develop yellow leaves, but the poor draining of the soil and pot. You can very easily increase the amount of drainage in your Watermelon Peperomia by mixing in a small amount of perlite, this will make it far easier for water to flow through and out of the drainage holes of your pots. Oh, that’s another thing, make sure your pot has drainage holes!!.

Another way to avoid water building up in the soil is to add a few small stones or pebbles to the bottom of your pots. This ensures that the drainage holes don’t get blocked by clumps of potting mix.

If you’re using plastic plant pots, then this next tip is for you. Plastic pots hold in every drop of moisture, which means if you accidentally overwater, or the drainage holes get blocked up, there’s nowhere for that water to go and it’ll likely damage your plant and cause yellow leaves (among other issues). Although clay and terracotta pots can be a little bit more expensive and are breakable, their upsides are much more than just the aesthetic. The clay they’re made of is permeable which means that some of the water in the potting mix can evaporate through the sides of the pot.

You tend to buy your plants in plastic pots from nurseries or plant shops as they are much more economical, but this doesn’t mean they are the best tithing for your plant. So sometimes it is worth investing a little more to make sure that the roots of your Watermelon Peperomia are not sitting in too much moisture.

Sunburn

Another cause of yellow leaves on Watermelon Peperomia plants is too much direct sunlight. Although they can tolerate the odd spot of direct light, indirect is what’s best for your Watermelon Peperomia. If the yellow leaves look quite scorched, then it may be because they have been burnt from the sun.

Unfortunately, once the leaves on your Watermelon Peperomia have been burnt by the sun there is no reversing that. Trim off the worst affected yellow leaves and move your plant to a shadier spot, away from any direct sunshine. You need to watch out a little more in summer when the sun is a lot stronger and is out for more of the day whereas in winter you can get away with placing most of your plants a little closer to the window to capitalise on the light if you choose to.

Pest Infestation

A slightly rarer cause of yellow leaves on your Watermelon Peperomia is a pest infestation. Pests suck on the plant’s leaves, exhausting them and causing them to turn yellow in most cases. Watermelon Peperomia plants are susceptible to scale insects, mealybugs and spider mites.

Whilst an infestation is more common when the plant is struggling due to the wrong environment or care, it can happen to a plant in good health too if you’re unlucky so it’s an important one to rule out if you spot yellow leaves.

Most pests are visible to the human eye so we can catch the problem by properly inspecting the leaves. Check the undersides of the leaves carefully as this is where the unwanted visitors like to hang out! If you spot pests lurking on your plant the first thing to do is isolate your Watermelon Peperomia from all of your other houseplants. Pests can easily jump across plants if the leaves are touching so you want to avoid the insects spreading to any of your other plants..

The next step is to then trim off all badly affected leaves to curb the growth of the infestation. Then give your plant a wash down in the sink or shower and treat with an insecticide or neem oil.

A pest infestation isn’t always a death sentence for your Watermelon Peperomia as long as you have caught the problem early. If you are struggling to stop the infestation after treating with an insecticide, then it may be best to say goodbye to your plant. As much as this isn’t ideal, it prevents the problem from spreading to your other beloved houseplants so is often better in the long run.

Natural Ageing

As your Watermelon Peperomia matures, it may occasionally lose a lower leaf as a natural sign of ageing. Before dropping the leaf, it can happen that it turns yellow first as it starts to die. This is nothing for you to worry about as long as the rate of yellowing is slow (slower than the rate of new healthy growth).

If you feel the rate of yellowing is increasing, double-check the environment around your Watermelon Peperomia as well as the potting mix as it could be a sign of one of the issues we’ve detailed above. There is no harm in giving the soil and roots a once over to check for signs of root rot and keep an eye on any changes in light or temperature that may be affecting its health.

So those are the most common reasons why your Watermelon Peperomia may be developing yellow leaves. Some problems are easier to diagnose than others, and some easier to fix. So it’s all about keeping a close eye on your plant, monitoring its environment and identifying any potential issues early. As long as the problem hasn’t spread to a large chunk of your Watermelon Peperomia, then you shouldn’t have too many issues solving the problem and preventing any more yellow leaves.

Fiddle and Thorn is a participant in the Amazon Services LLC Associates Program, an affiliate advertising program designed to provide a means for sites to earn advertising fees by advertising and linking to Amazon.com

Take our houseplant survey!

Quickly respond to our 30 second houseplant survey and get 75% off our Complete Houseplant Care eBook!

Take the Survey

No thanks…

Why does my Watermelon Peperomia have curling leaves?

Last Updated: September 20, 2022

Curling leaves is one of the most common issues with Watermelon Peperomia plants as there are quite a lot of issues that have that impact on your plant. However, if you’ve spotted curling leaves then you’ve come to the right place as in this article we will go through not only the factors that cause them but will guide you through how to treat and prevent the issue in the long term.

Underwatering can quickly cause curling leaves

A consistent lack of moisture in the potting mix is the most common reason why Watermelon Peperomia plants start curling up their leaves. You’ll be pleased to know though that curling leaves are often one of the earliest signs of trouble so hopefully you have caught the problem early.

Other signs of underwatering to look out for are dry brown leaves or spots, a drooping plant and very light-coloured potting mix which has come away from the sides of the pot.

The reason that underwatering causes curling leaves on a Watermelon Peperomia is because this is a mechanism that most plant types use to reduce the loss of moisture.

There are several reasons for drought stress that can cause your Watermelon Peperomia leaves to curl inwards:

Firstly, watering your Watermelon Peperomia too lightly causes the potting mix to dry out very quickly. Secondly, you might not be watering frequently enough and may need to increase it during heatwaves and hot months. The third factor is that your Watermelon Peperomia is growing in water-repellent soil. This can happen if you are using a peat-based potting mix as it can repel the water and dry out very quickly.

The best way to diagnose and confirm that underwatering is causing your Watermelon Peperomia to start curling is to remove it from its pot and inspect the soil and root system. If you notice that the roots have turned dry and crispy then this indicates underwatering.

How to fix the issue and prevent further curling leaves on your Watermelon Peperomia

  1. Give your Watermelon Peperomia a soak.

    This will ensure the root system takes up the water rather than it just running out of the drainage holes. We recommend soaking your plant for about 5-10 minutes at first so that your plant has enough time to take in some water but it doesn’t leave the whole soil waterlogged.

  2. Adjust your watering schedule.

    So that you are watering more generously and don’t let it dry out for extended periods of time.

  3. Monitor the environment around your plant.

    Check for any fluctuations that might mean your plant is drying out quicker (low humidity, higher temperatures and more intense sunlight).

Curling leaves can also suggest low humidity

Watermelon Peperomias like the humidity level to be a little above average and can struggle in homes with really dry air. This can be especially damaging in the winter months when we often have the heating on for several hours a day and ventilate a lot less. When this happens, plants start curling to reduce moisture loss through their leaves.

Humidity can be a difficult thing to properly diagnose because it’s less obvious than water and light levels so the best way to do this is to use a humidity monitor. You can often get humidity and temperature meters in the same device and that is every plant parent’s best friend! They can really help you spot any fluctuations before it’s impacting your plant’s health and mean you can find the perfect spot for each of your houseplants.

Once you have diagnosed the issue as being caused by dry air, it’s important you take a few steps to increase the humidity for your Watermelon Peperomia. Firstly, get into the habit of misting your plant every few days with a spray bottle and this should help prevent the plant from drying out. Then we also recommend investing in a humidifier to help keep a nice stable humidity level for your plant.

Heat stress can cause the leaves to curl up and crack

Another factor that can cause curling and cracked leaves on a Watermelon Peperomia is high temperatures. This links in with some of the other issues above as if your plant is exposed to a lot of warm air, it will dry up quickly and your plant will curl its leaves to save moisture. As the leaves can become very dry and brittle as a result, not only will they start to curl but you may start seeing cracks in the leaves.

Using a thermometer is the best way to spot any changes in temperature as it might be that your plant is too close to a window that gets the afternoon sun and is therefore sitting in a hotspot for half of the day. Cookers, heating vents and radiators can also cause your plant to be exposed to really high temperatures so look out for the proximity to those as well when finding the best spot for your plant.

Curling Watermelon Peperomia leaves can suggest low light

Another factor that can cause your plant to develop curling leaves is low light. This tends to impact new leaves and can lead to quite leggy sporadic and small growth as well so that should help you when diagnosing the issue.

This tends to be more common in winter as the sun is a lot weaker and out for less of the day so you might need to move your plant closer to the window during winter to solve the issue.

If there isn’t a better spot for your plant then you might need to buy an LED grow light to supplement light levels and stop the leaves on your Watermelon Peperomia from curling. They are a great investment for plant parents as they will help your plants get through the winter and are super useful for propagating seeds and cuttings.

Nutrient deficiency could also be to blame

If nothing else seems to be fitting what you are seeing on your Watermelon Peperomia, then a rarer and harder-to-diagnose cause of curling leaves is a nutrient deficiency. A great way to combat this is by changing out two-thirds of the potting mix each year or feeding with a well-baalnced water-soluble fertiliser a few times in spring and summer.

Those are the most common reasons why Watermelon Peperomia plants develop curling leaves. As there are a wide range of factors that can have this effect, we recommend going through each of them one by one whilst inspecting your plant, its potting mix and root system to figure out which best suits what’s happening with your Watermelon Peperomia. Then, once you have made any changes to solve the problem, keep a very close eye on your plant over the upcoming weeks to ensure that more leaves aren’t curling.

Check out our Watermelon Peperomia care guide to learn more about how to keep your plant thriving.

Fiddle and Thorn is a participant in the Amazon Services LLC Associates Program, an affiliate advertising program designed to provide a means for sites to earn advertising fees by advertising and linking to Amazon.com

Take our houseplant survey!

Quickly respond to our 30 second houseplant survey and get 75% off our Complete Houseplant Care eBook!

Take the Survey

No thanks…

Why does my Watermelon Peperomia have brown leaves?

Last Updated: April 7, 2023

Over the past few years, the Watermelon Peperomia has definitely become one of our favorite houseplants. Their incredible thick, round and silver striped leaves paired with those thin deep red stems make them one to remember!

However, they are a little bit of a fussy plant sometimes and a common problem that occurs is brown leaves. It’s always pretty devastating when you notice one of their luscious leaves has developed brown edges or patches but don’t fret any longer because we have put together this guide to help you diagnose the problem.

Below we will be going through each of the reasons why your Watermelon Peperomia has brown leaves, so you can not only figure out the problem but treat it and prevent it from happening again in future.

What causes Brown Leaves on Watermelon Peperomia Plants

The difficult thing when diagnosing brown foliage on a Watermelon Peperomia is that there are actually several different and completely separate factors that might be causing them. This means there isn’t a one fits all solution. Instead, there are specific signs that can help you make the right diagnoses as well as things you’ll need to do such as inspecting the soil that can help you figure it out.


Temperature fluctuations can cause brown leaves

Watermelon Peperomia plants don’t like rapid changes in temperature, so you should make sure you keep them out of areas of your home that might be exposed to cold drafts. This includes drafty doors or windows, but also AC vents as a constant flow of cool air will really harm your plant and cause them to develop brown leaves.

It’s also best to keep them away from heating vents, radiators and cookers as the hot dry air that is produced can quickly turn your Watermelon Peperomia’s leaves brown.

Whilst you may think that the temperature in your home is comfortable for you, there may be some hidden cold drafts near your plant or certain times of day when it gets particularly hot next to the window for example. This is why we strongly encourage that you invest in a digital thermometer if you don’t already have one. These can help you track the temperature and figure out if it’s causing the brown leaves.


Waterlogged soil can quickly cause brown leaves

Another one of the most common reasons why Watermelon Peperomia plants develop brown leaves is too much water. It can be pretty easy to accidentally give your plant too much water and its leaves can be quite sensitive to any damage caused to the root system. As they have such thin stems and heavy leaves, even the slightest bit of damage to the root system can turn the stems soft enough to not be able to sustain the healthy leaves attached.

Waterlogged soil cuts off air circulation in the potting mix which can quite quickly rot the root system and prevents your Watermelon Peperomia from taking in any oxygen and nutrients.

Before you change your watering routine, you need to be 100% sure that overwatering is the cause of the brown leaves on your Watermelon Peperomia. The first thing to do is to take your plant out of its pot which will allow you to closely inspect the potting mix and root system. You want to be super careful here as the stems are even more breakable if your Watermelon Peperomia is damaged.

If the potting mix feels soggy and clumpy, then this means your plant has been overwatered. If the roots are soft and mushy it suggests that this issue has been going on for a while and may be harder to revive your Watermelon Peperomia.

You should also be checking drainage at this point as well because if there are problems with drainage, then the impact of even a small bit of overwatering can be huge. You want to ensure that the pot has drainage holes and that they aren’t blocked by anything. This will allow any excess water to flow out into a saucer or planter rather than making the root system sit in a puddle of water.


Underwatering can also lead to brown foliage

Whilst your Watermelon Peperomia will often forgive you for forgetting to water it every so often, it won’t be able to survive for long periods of time without any water. Consistent underwatering will eventually lead to brown patches forming on the leaves.

These leaves will not only be light brown in colour, but they will be very dry to touch. An underwatered Watermelon Peperomia will also begin to lose the brown leaves as they dry out.

The best way to determine if your Watermelon Peperomia has been underwatered is to lift the plant up and see how light it feels, before also inspecting the potting mix. If your Watermelon Peperomia is underwatered, the potting mix will be dry and crumbly and the roots may look crispy (if the problem has been going on for a while).


Brown leaves can be nothing to worry about

There’s one more cause of brown leaves on Watermelon Peperomias which is actually not a problem at all; natural ageing. As your Watermelon Peperomia matures, it will want to spend most of its energy on the new growth.

This is so it can grow taller, bushier and produce larger leaves. For this to happen, it will sacrifice some of its oldest, lowest and smallest leaves. These leaves will turn brown and crispy before falling off your plant entirely.

This is absolutely nothing to worry about as long as the rate of browning is slow, then it’s just simply part of the natural ageing cycle of your plant.

You also want to make sure that the rate of new growth is higher than the number of leaves turning brown. If this ever switches or the rate of browning increases, you have an issue with the watering or environment that your Watermelon Peperomia is in.

How to Treat and Prevent Brown Leaves on a Watermelon Peperomia

How to fix an overwatered Watermelon Peperomia

It’s crucial that you replace any waterlogged potting mix straight away with fresh, high-quality soil. Don’t wait for the soil to dry out naturally as you risk causing even more damage to an already rotting root system. Then you want to trim off any soft, mushy or brown roots and leaves. Use clean, sharp scissors to remove any dying parts of your plant. This will prevent your Watermelon Peperomia from wasting valuable energy trying to keep dying roots and leaves alive.


Adjust your watering schedule moving forward

Take a look at how often you were watering your Watermelon Peperomia, and how much water you were giving it each time. Cut back on one of these factors to ensure you don’t overwater your Watermelon Peperomia again. You then need to find a balance between allowing the soil to dry out between waterings, but not for extended periods of time.

To aid you with this, we recommend buying a moisture meter. These are really affordable little devices that indicate how much moisture is in the potting mix. So gone are the days of guessing when to water. These will help you avoid underwatering (as well as overwatering and root rot) which should help prevent brown leaves on your Watermelon Peperomia in future.


Switch to a terracotta pot

A great way to prevent overwatering (and consequent brown leaves) is to swap any plastic pots for terracotta ones. Terracotta pots not only look great, but they are permeable which means some of the excess water is able to escape out of the sides.

If your Watermelon Peperomia is growing in a plastic pot, then it means the only way for the water to run out is through the drainage holes. Having a permeable pot, it just aids evaporation of excess water over time.


Monitor your plant’s environment

To prevent brown leaves from developing on your Watermelon Peperomia, the best thing to do is nip any problems in the bud before they cause an issue. Monitoring your plant’s environment is a crucial part of spotting issues early so buy a digital thermometer to place next to your plant if you don’t already have one.

These will allow you to spot cold drafts and hotspots and help you figure out if you need to relocate your Watermelon Peperomia throughout the year. These monitors also often tell you the humidity rate as well which is a great way to prevent dry leaf tips.

Removing the Brown Leaves on a Watermelon Peperomia

Now that you’ve hopefully diagnosed and treated the problem correctly, you may be wondering what to do with the leaves that have already turned brown. Unfortunately, once part or all of a leaf has turned brown, there is no reversing this. It is a permanent change as that part of the plant has died.

When it comes to pruning away the brown leaves, we do recommend removing any that are entirely or mostly brown. Not only will this look better aesthetically, but it will help your plant to focus its energy on new healthy growth, rather than wasting it trying to revive the dying areas.

If there are a few leaves that just have a few brown edges or spots here and there, then we recommend that you leave these on the plant as they are still beneficial to photosynthesis.

You also don’t want to remove too much of the plant as it will struggle to take in enough light without many leaves, which will hinder its growth.

Over the next few weeks, we recommend giving your plant a detailed once-over every few days to see if any new leaves are turning brown or if your preventative measures have taken effect already. Then once the issue has resolved itself, we recommend giving your Watermelon Peperomia (and all other houseplants) a check-up once a month to help you spot any warning signs early, before they’ve caused a lot of visible and irreversible damage on your plant.

To learn more about how to help your plant thrive, check out our Watermelon Peperomia care guide.

Fiddle and Thorn is a participant in the Amazon Services LLC Associates Program, an affiliate advertising program designed to provide a means for sites to earn advertising fees by advertising and linking to Amazon.com

Take our houseplant survey!

Quickly respond to our 30 second houseplant survey and get 75% off our Complete Houseplant Care eBook!

Take the Survey

No thanks…

Why does my Spider Plant have yellow leaves? Causes and Solutions

Last Updated: June 8, 2022

Spider Plants are great for beginner plant parents or those that just want an easy plant to bring a little something extra to their space. But that doesn’t mean that they won’t come without their range of issues.

Yellow leaves are quite a common problem to have with Spider Plants and it indicates that something isn’t quite right with either the care of their environment. Below we go through all the main reasons why Spider Plants develop yellow leaves as well as how to fix and prevent the issue.

Underwatering can cause yellow Spider Plant leaves

Spider Plants are quite tolerant when it comes to watering but a consistent lack of it will cause yellow leaves. The leaves will also go quite dry and crispy and start to fall off the plant. To check whether a lack of water is the issue, carefully take your plant out of its pot to check the moisture in the soil. If the soil is quite powdery then you can assume underwatering is the cause of the yellow leaves.

You want to slowly reintroduce watering to your Spider Plant over the course of a week. Avoid drowning it in water as it won’t like going from one extreme to another. So water it a little each day for a week and your plant should bounce back to full health.

Overwatering can also cause yellow leaves

This is a slightly rarer cause with Spider Plants but is still worth mentioning. Spider Plants are definitely more tolerant of the occasional overwater compared to lots of other houseplants so this won’t happen unless there is consistent overwatering and the potting mix never gets a chance to dry out at all.

Consistent overwatering will cause the roots to rot and the plant won’t be able to take up any of the needed nutrients, which means it will develop yellow leaves. The first way to tell if the soil is waterlogged is by smelling it. If the potting mix smells quite damp and musty then there is a good chance it has been waterlogged for a while.

Take your plant out of the pot to check and replace the potting mix if it’s waterlogged. You don’t want to wait for it to naturally dry out as this can cause more damage to the root system.

Cut away any of the rotten roots to encourage new growth. You want to be very careful with how much you water your Spider Plant going forward as you want to avoid this problem reoccurring.

Healthy Spider Plant

Healthy Spider Plant

Yellow patches can be caused by sunburn

Another cause of yellow leaves on Spider Plants is too much direct sunlight. They thrive in bright but indirect light. If the leaves look quite scorched and patchy then sunburn might be the cause. Too much direct light can also make your Spider Plant go quite light in colour as it is bleached from the sun so those are the two main things to look out for.

Unfortunately, once the leaves have been burnt by the sun there is no reversing that. Trim off the worst affected leaves and move to a slightly shadier spot in your home. You need to watch out a little more in summer when the sun is a lot stronger and is out for more of the day.

Temperature extremes can lead to yellow leaves on a Spider Plant

Another factor that can harm your Spider Plant is really high or low temperatures. It can happen that your Spider Plant is in an area that gets hotspots or cold drafts and this can cause the yellow leaves. If your plant is too close to a window that gets a lot of direct sunlight or is too close to a radiator or heating vent then the hot air can dry out the plant. To avoid this, ventilate the room well and keep all plants at least 1 metre away from radiators, heaters or cookers.

Cold air can also be harmful to your plant and can also cause yellowing of the leaves. Make sure there are no drafts coming through the windows or doors that your Spider Plant (or any other houseplant) is near. You may also want to invest in a digital thermometer to keep track of how the temperature changes throughout the seasons and make sure your spider plant is in its ideal range.

Overfertilisation can also cause some yellowing

Spider Plants don’t need to be fertilised that often, or even at all!

We recommend feeding them a few times over the growth period of spring and summer and not at all during winter. This is because growth will slow down dramatically when it’s colder and darker. If you are fertilising your Spider Plant more often than this then it may be the cause of the yellow leaves.

Remove any slow-release fertiliser spikes or just stop adding fertiliser to the water and you should start to see the problem stopping. Don’t feel you have to fertilise your plant as we don’t tend to do it with Spider Plants as they grow quickly and produce plenty of baby plants without it.

Those are the most common reasons why your Spider Plant has developed yellow leaves. Luckily they are quite hardy plants so they will bounce back even if the problem has affected a lot of the plant.

Trim away the worst affected areas to encourage new and healthy growth and over time your plant should recover. If you want to learn more about caring for your plant then check out our Spider Plant care guide.

Fiddle and Thorn is a participant in the Amazon Services LLC Associates Program, an affiliate advertising program designed to provide a means for sites to earn advertising fees by advertising and linking to Amazon.com

Take our houseplant survey!

Quickly respond to our 30 second houseplant survey and get 75% off our Complete Houseplant Care eBook!

Take the Survey

No thanks…

Why does my Snake Plant have soft mushy leaves?

Last Updated: April 1, 2022

One of the most common issues Snake Plant parents have is mushy leaves. But there is one good thing about this problem though – there aren’t many causes of mushy Snake Plant leaves which makes finding and fixing the cause pretty simple. Below you will find the most common causes and what to do once you have identified the problem.

Overwatering is the leading cause of mushy leaves for Snake Plants

About 99% of the time, overwatering is the cause of mushy Snake Plant leaves. Sansevierias really don’t need much water at all meaning their soil can very quickly become waterlogged even if you are careful. This will cause the roots to rot and the leaves to become soft and mushy.

The first thing to do if you spot mushy leaves on your Snake Plant is check the amount of moisture in the soil immediately and see the health of the root system. If the soil is very moist then remove it from the plant’s roots and replace the potting mix entirely. It is a good idea to trim away the dead and mushy parts of the root system so your Snake Plant can begin to recover.

Using a moisture meter really helps to gauge this properly. If you don’t what to have to worry about overwatering again you can grab a self-watering pot like this one, we use these all the time to make sure our plants are getting what they need, even when we’re away from home!

Drainage Issues can also be the problem

Sometimes it may not be your watering schedule that is causing your Snake Plant’s leaves to go soft and mushy, but poor drainage of the soil and pot. You can very easily increase the amount of drainage and aeration in the pot by mixing in a small amount of perlite. This will make it far easier for water to flow through and out of the drainage holes of your pots (you should also check to make sure your pots have drainage holes). Another easy step is to add a few small stones or pebbles to the bottom of your pots, this helps in making sure that the drainage holes don’t get blocked by clumps of soil.

Although clay or terracotta pots can be a little bit more expensive or breakable, their upsides are much more than just the aesthetic. Your Snake Plant will most likely come in a cheap plastic pot as these are great for nurseries and plant shops but less good for your plant’s health. Terracotta plant pots are permeable which means that some of the water evaporates through the sides of the pot. This isn’t the case for the plastic pots which makes overwatering a lot easier to do.

Too much humidity around your Snake Plant

Aside from watering, humidity is the only other real factor that can cause your Snake Plant’s leaves to go mushy. Snake Plants thrive in average to low humidity levels and don’t need to be misted or anything like that. If the leaves are damp for long periods of time then this may cause them to rot and go mushy.

Make sure your Snake Plant isn’t sat next to a humidifier or isn’t being misted regularly. If you’re home is naturally quite humid then maybe invest in a dehumidifier or move your plant away from sources of high humidity such as the cooker or showers.

Should I remove the mushy leaves?

We always recommend removing leaves that are unhealthy or dying as this conserves energy and nutrients for the healthy parts of the plant. It means you Snake Plant won’t waste anything trying to keep these mushy leaves alive. Plus your plant will look much better if you trim away the soft leaves which is a bonus!

Complete Houseplant Care eBook

Our comprehensive (and rather good looking) eBook that will teach you everything you need to know to successfully care for, and maintain your houseplants!

Buy on

Fiddle and Thorn is a participant in the Amazon Services LLC Associates Program, an affiliate advertising program designed to provide a means for sites to earn advertising fees by advertising and linking to Amazon.com

Take our houseplant survey!

Quickly respond to our 30 second houseplant survey and get 75% off our Complete Houseplant Care eBook!

Take the Survey

No thanks…

Why does my Schefflera have yellow leaves? Causes and Solutions

Last Updated: May 27, 2022

If you notice your Schefflera developing yellow leaves it can be concerning and you might not be sure what is causing it. There are a few things which can lead to yellow Schefflera leaves so it’s important to find the right cause before you change anything about how you care for your plant. Below you will find all of the most common causes of yellowing on a Schefflera as well as how to diagnose and fix the problem!

Overwatering can cause yellow Schefflera leaves

Too much water is one of the main reasons why Schefflera plants develop yellow leaves. They don’t need to be watered a huge amount and won’t mind if you forget every so often. So if you accidentally overwater, or the drainage holes are blocked by something then the roots may start to rot. This prevents the plant from getting any of the needed nutrients which causes yellowing in the leaves.

A simple way to know if the soil is waterlogged is by smelling it. If the potting mix smells damp and musty then there’s a good chance it has been waterlogged for a while. Take the plant out of the pot to double-check. If the soil is waterlogged and clumpy then you want to replace it straight away. It’s important that you monitor the moisture levels in your plant going forward so you can adjust your watering schedule accordingly.

Yellow leaves can indicate watering issues

This is slightly different from overwatering as it is more about how quickly the soil goes from dry to soggy. If you have underwatered your Schefflera then you don’t want to all of a sudden drown it in water to compensate. This can cause shock as the change in your plant’s environment is very sudden. This shock can be causing the yellow leaves. Instead, you want to gradually increase how much or how often you water your Schefflera.

Low humidity can cause some yellow leaves

If the edges on your Schefflera’s leaves are yellow rather than the whole plant, then a lack of humidity in the air might be the cause. Schefflera’s can survive happily in the average humidity of your home but will struggle if the air is particularly dry. This can happen if the heating is on a lot during winter or there isn’t much ventilation.

The best methods for increasing humidity for a Schefflera and avoiding more yellow leaves developing is to mist or make a pebble tray. We recommend misting a few times a week using a spray bottle. The number 1 tip when it comes to misting is doing it in the mid-morning. This allows enough time for the water to evaporate off before it gets cold at night. Cold damp leaves will often rot!

To make a pebble tray all you need is a plate and a few handfuls of pebbles. Fill up the water halfway up the pebbles on the plate and pop your Schefflera on top. The water will slowly evaporate around your plant!

Direct light can cause yellow patches on your Schefflera

Another cause of yellow leaves on Schefflera plants is sunburn. This can happen when your plant receives too much direct light. If the yellowness on the leaves is quite patchy and looks as though the leaf has been scorched then direct light is most probably the cause. Trim away the worst affected leaves and move your Schefflera to a slightly shadier spot. They like bright light but it must be indirect (especially in summer).

Yellow leaves can also indicate pests

Another slightly rarer but worrying cause of yellow Schefflera leaves is a pest infestation. Pests such as aphids, spider mites or scale insects may be hiding on your plant and sucking on the leaves. This exhausts the leaves and causes them to go yellow or form tiny holes in the leaves. To spot them use a magnifying glass and inspect the undersides of the leaves and the stem joints. This is where you are most likely to find them.

Treatment of pests can vary but the first thing you must do is isolate your plant and keep it far away from any of your other houseplants. Check other plants over which were close to your Schefflera as pests can move around plants if they are close. Then trim off the worst affected leaves to curb the infestation a little before showering your plant and treating with an insecticide.

If you have caught the problem early then there is a good chance your Schefflera will return to its usual health. However, if the pests have taken over the majority of the plant then this is more unlikely. There have been times where we have had to get rid of a plant because the infestation was widespread and the risk of spreading it to other houseplants was too big.

Some yellowing may just be natural ageing

If it is the lower leaves on your Schefflera that are turning yellow then this may be simply natural ageing. Over time, your plant will drop some of its oldest leaves in favour of growing bigger healthier new ones. This is completely natural and isn’t something you did wrong or anything to worry about. The rate of natural ageing should be a 1 or 2 of the oldest leaves every few months. Monitor the rate of yellowing to see if it is speeding up or well above this rate as there might be another cause you need to look out for.

So those are the most common reason why your Schefflera has developed yellow leaves. If you have caught the issue early then your plant should recover quickly with a few changes here and there. We recommend trimming away the worst affected yellow leaves so your plant doesn’t waste any energy trying to keep these alive and can instead focus on growing new healthy (and hopefully green) leaves!

If you want to find out more about caring for your plant or treating other common problems then check out our Schefflera Care Guide.

If you can’t seem to fix the issue and things are just getting worse, then you might choose to propagate your Schefflera so that you can save some of the healthy parts of your plant.

Fiddle and Thorn is a participant in the Amazon Services LLC Associates Program, an affiliate advertising program designed to provide a means for sites to earn advertising fees by advertising and linking to Amazon.com

Take our houseplant survey!

Quickly respond to our 30 second houseplant survey and get 75% off our Complete Houseplant Care eBook!

Take the Survey

No thanks…

Why does my Schefflera have curling leaves?

Last Updated: November 30, 2022

If you notice that your Schefflera’s leaves have begun curling then this is signaling that something isn’t quite right. Luckily, we imagine you’ll be very pleased to know that this is often one of the first signs of unhappiness. This means that if there are no other visible symptoms on your plant, you’ve likely caught the issue early or the issue isn’t so serious that it could kill your plant.

In this article, we will go over the most common causes of curling leaves on a Schefflera so that you can get straight to diagnosing and treating the problem. We will also share our tips on what to change in order to prevent the problem from rearing its ugly head again in future.

Underwatering is a common cause of curling leaves

Our first port of call when diagnosing curling leaves on most plants actually is underwatering. The reason for this is that it’s one of the mechanisms that plants use to reduce moisture lost through their leaves.

Schefflera plants won’t all of a sudden start dying if you forget to water them on the odd occasion but over time, consistent underwatering will start to have noticeable repercussions.

Underwatering can take several forms as it can mean you’ve just forgotten to water your Schefflera entirely over the past few weeks or months or it can mean that you are just giving your plant too little water and over time this has built up to cause a problem.

If your plant just has curling leaves then it could be that you have found the issue pretty early but other signs of underwatering can include brown dry leaves, drooping stems or small/stagnant growth.

Before you go and drown your Schefflera with water to hopefully fix the issue, you need to be sure that this is the cause. To confirm the diagnosis, take your Schefflera out of its pot to check how much moisture (if any) is in the potting mix. You also want to check over the roots now you’ve taken your plant out of its pot to see if they are crispy and shrivelled.

Once you have determined that your Schefflera is suffering from a lack of water, slowly reintroduce water to your plant rather than drowning it. Any dramatic and sudden changes in their environment can cause them to go into shock so water your Schefflera a little bit once a day for about a week.

Hotspots and heat stress could be to blame

If your Schefflera is growing close to the window during summer or is near to any radiators, heaters or heating vents then it might be heat stress that is causing the leaves to curl. Plants use curling leaves as one of their mechanisms to fight against moisture loss which is what happens when the intense heat begins to dry out the leaves.

Whilst the initial symptom is often curling leaves, you might also spot them turning crispy and brown if the issue progresses.

Diagnosing this problem can be pretty simple and we recommend using a thermometer to establish whether temperature fluctuations are to blame. They’ll also help you spot any changes in temperature before they start impacting your plants and you can use them to detect cold drafts too so are a great investment for any plant parent.

Too much direct sunlight could be the problem

Intense, direct sunlight can also cause curling leaves on a Schefflera. If this is the case then they tend to start curling inwards.

Though a lack of light can also cause several issues for them, they don’t do well in harsh direct sunlight at all as it can dry out the leaves and cause scorched patches.

If you think that direct sunlight is the cause of the curling leaves on your Schefflera, move your plant to a slightly shadier spot in your home. If you are unsure how much light your plant is getting throughout the day/year, it can be useful to use a light meter to keep track of how the light level fluctuates throughout the day and across the seasons.

If the problem has progressed beyond curling leaves and has started to cause burnt patches across your plant then we recommend removing any severely affected leaves. You can keep leaves on which just have a small yellow patch but you don’t want your plant wasting energy on dying or dead leaves.

Curling leaves can also be caused by low light

As well as harsh light, really low light levels can also have a similar impact on your Schefflera and cause curling leaves. However, the way in which they curl often differs with low light and you might see them starting to curl downwards and look quite limp.

Alongside this, you may also notice slow, small, stagnant or leggy growth as these are all symptoms caused by a lack of sunlight as well.

Whilst this is more common in winter, it can also happen in summer if your plant is growing in the corner of a dark room so monitor your plant’s environment to diagnose the issue.

The easiest way to solve the issue is to of course move your plant to a sunnier spot in your home but if this isn’t possible then you’ll need to invest in a grow light. These are great at pulling your plants through the dark winter months and can also be useful if you are thinking about propagating any of your plants too!

Those are the most common reasons why Schefflera plants can begin to develop curling leaves. It can be a little bit of a tricky issue to diagnose because there are quite a few subtle problems that can all have a similar impact on your plant.

This is why we recommend going through each one whilst inspecting your plant and its environment to best figure out what is causing the curling leaves. Then as soon as you’ve made the diagnosis, it’s crucial to start treating the issue to prevent it from causing more long-term, irreversible damage.

To learn more about how to keep your plant thriving, check out our Schefflera care guide.

Fiddle and Thorn is a participant in the Amazon Services LLC Associates Program, an affiliate advertising program designed to provide a means for sites to earn advertising fees by advertising and linking to Amazon.com

Take our houseplant survey!

Quickly respond to our 30 second houseplant survey and get 75% off our Complete Houseplant Care eBook!

Take the Survey

No thanks…

Why does my Satin Pothos have yellow leaves? Causes and Solutions

Last Updated: April 1, 2022

Loved for their silver speckled leaves, Satin Pothos plants can be a little bit tricky to care for if they aren’t in the right environment or receiving ideal care. It can be pretty devastating to see that your plant has started to develop yellow leaves so it’s important you figure out exactly what’s causing the problem so you can bring your plant back to full health.

The main causes of yellow leaves on Satin Pothos plants are a range of water and sunlight issues mixed with rarer problems such as pests and fertiliser issues. Below you’ll find a detailed explanation of each problem as well as how to fix it!

Too much water is the most common cause of yellow leaves on a Satin Pothos

Although they like some moisture in the soil, they don’t like sitting in soggy potting mix for too long. Waterlogged soil will often cause the roots to rot and this prevents the plant from getting the needed moisture and nutrients. Alongside yellow leaves, overwatering can cause your Satin Pothos to turn soft and droopy.

If you suspect that your plant is turning yellow due to overwatering, the best thing to do is to take your plant out of its pot immediately and inspect the root system. Before you cut back on watering, it’s best to be 100% sure that root rot is the issue as underwatering can cause a whole range of issues in itself. If the root system has started to rot, trim away the worst affected areas to encourage new roots to grow. And if the potting mix is still quite soggy and waterlogged, it’s important that you replace it immediately. Waiting for it to naturally dry out risks more damage to the plant.

Moving forward, to help your Satin Pothos recover and to prevent more of the leaves from discolouring, adjust your watering schedule so you are only keeping a little bit of moisture in the soil, rather than it being soggy. Make sure you remove any excess water that has run out of the drainage holes so that your Satin Pothos’ roots aren’t sitting in a pool of water.

There are a few ways you can tell if it’s time to water your plant. Firstly, the finger method is where you press your finger into the soil a couple of inches. If your finger is coming out dry and clean then you likely need to water again. Using a moisture meter is the most reliable method of knowing how much moisture is in the soil as your routine will have to adjust depending on the seasons and placement of your plant.

Drainage issues can also be the cause of the yellow leaves

Sometimes it may not be your watering schedule or overwatering that is causing your Satin Pothos to develop yellow leaves, but the poor draining of the potting mix and pot. Luckily, there are a few really easy steps to increase the drainage in the soil.


  1. Add perlite

    We recommend adding some perlite to your potting mix as this not only helps with drainage but also aeration of the soil.

  2. Drainage holes

    Make sure that your pot has some drainage holes to allow for any excess water to run out into the plater or saucer.

  3. Small pebbles and stones

    By adding a few small stones or pebbles to the bottom of your pots it ensures that the drainage holes don’t get blocked by clumps of potting mix.

  4. Terracotta pots

    If you’re using plastic plant pots, then this next tip is for you. Plastic pots hold in every drop of moisture, which means if you accidentally overwater, or the drainage holes get blocked up, there’s nowhere for that water to go and it’ll likely damage your plant and cause yellow leaves (among other issues). But by using permeable terracotta pots some of the water in the potting mix can evaporate through the sides.

Yellow Satin Pothos leaves can indicate a lack of humidity

If you’re confident that you’re keeping your watering habits in check, then low humidity could be the cause of your plant’s leaf yellowing. A common telltale sign of a lack of humidity is dry leaf edges before the whole leaf turns yellow.

There are a variety of easy ways to increase the humidity for your Satin Pothos, some of which are free, others which take nearly no effort at all:

Misting the leaves

Use a spray bottle to mist the leaves a few times a week. This also gets rid of dust on the leaves which is a bonus. We recommend only misting your plant in the mornings to give enough time for the moisture to evaporate off the leaves. If your plant is still damp when the temperatures drop at night, then it opens up the risk of leaf rot.

Make a pebble tray

This requires a little DIY but it’s a great solution for Satin Pothos plants that have developed yellow leaves due to a lack of humidity. Fill up a tray or bowl with small stones and fill it up halfway with water. Place your plant on top of the stones and let the water vapour evaporate around your plant throughout the day.

The most important thing when making a pebble tray is to make sure that the water doesn’t reach high enough so that the roots are sitting in water which will risk root rot.

Showering your Satin Pothos

If you’re looking for a quick fix, washing down the leaves is a great way to boost the humidity. It will also get rid of dust and any pests that might be hiding on your plant without you realising. Make sure when you do shower down your plant, that you’re keeping the water pressure low so you don’t damage the leaves or vines.

Placement

If you have good lighting in your kitchen or bathroom then we recommend moving your Satin Pothos in there. The humidity level in those rooms is naturally higher because of showering and cooking. Just be careful not to put your plant too close to the cooker or this will burn the leaves pretty quickly and you’ll have a few more problems than just yellow leaves.

Buy a humidifier

If you’re worried about the lack of humidity becoming a real problem, then buying a humidifier is probably the best way to go as it’s the most reliable method of increasing the humidity. It keeps the humidity in the room at a consistent level so you don’t have to worry about a thing. But the benefits of humidifiers don’t stop at your houseplants, they are even great at clearing our skin and helping us get a better nights sleep.

We always recommend this humidifier from Amazon as a great place to start.

Yellow leaves can be caused by too much sunlight

Satin Pothos plants need bright but indirect light to really thrive. They can adjust to lower and medium levels of light but you’ll see less variegation in their leaves which is always a shame. But the one thing that these plants can’t handle, is long periods of direct sunshine. This is especially a problem during summer where the sun is much stronger. It can leave the leaves looking scorched and faded.

If you think that direct sunshine is causing the yellow leaves on your Satin Pothos, try to move your plant a little bit further away from the window so that it doesn’t receive any direct sun. Unfortunately, once your plant’s leaves have burnt, there’s no going back so we recommend trimming off the worst affected leaves to encourage new healthy growth.


Low light can also cause yellow Satin Pothos leaves

As well as too much sunlight, not enough can also cause some yellowing in the leaves of your Satin Pothos. However, it is mostly paired with small leaves and leggy or stunted growth. This is most common during winter where the sun is weaker and out for less of the day.

If you suspect that a lack of natural sunlight is the cause, start by placing your plant nearer to a window. If this happens during winter, you can get away with placing it right by the window as the direct sun rays won’t be as intense as in summer. However, during summer, you’ll want to be a little more cautious as to how much extra sunlight you give your Satin Pothos as too much light can also bring a range of issues as we explain next!

Pest Infestation

A slightly rarer issue that might be causing the yellow leaves on your Satin Pothos is a pest infestation. The uninvited visitors will suck on the leaves, exhausting them and causing them to turn yellow and eventually fall off!

Most pests are visible to the human eye if we look closely or use a magnifying glass so we can catch the problem by properly and regularly inspecting the leaves. Our recommendation is to take a proper in-depth look at the undersides of the leaves as this is where they like to live.

If you spot pests lurking on your plant the first thing to do is isolate your plant to prevent the infestation from spreading throughout your urban jungle. Then you want to trim off the worst affected leaves and vines to reduce the overall number of insects and curb the growth of the infestation. Then give your plant a wash down in the sink and treat with an insecticide/neem oil.

Over-fertilisation might also be behind the yellow leaves

If you’ve checked the potting mix for root rot, decided that light levels aren’t an issue and don’t find any pests, then another cause may be incorrect fertilisation. Although Satin Pothos plants enjoy monthly feeding during the growth period, too much fertiliser can very quickly cause scorched leaves and yellow patches.

To stop the issue from progressing any further, remove any fertiliser spikes or replace the entire potting mix if the pellets are mixed in. If you’ve been using a water-soluble fertiliser, either replace the potting mix as well or rinse it through properly in the shower.

Make sure you aren’t fertilising your plant during the colder darker months as growth will be dormant and it’ll be quite damaging for your plant. When you do fertilise your plant make sure you are using less than the recommended amount on the bottle. Every houseplant is different, not just the type of plant, but also the size and maturity which means there is no one-fits-all recommended amount so using less is safest.

Natural ageing can cause the odd yellow leaf

There’s one more cause of yellow leaves on Satin Pothos plants which is natural ageing. As your plant grows, it will want to spend the most energy on the new growth which can sometimes mean it drops one of the older leaves. his means that you could find some of the older starting to discolour just with the natural growth and development of the plant itself. This is absolutely nothing to worry about as long as the rate of yellowing is slow (a couple of leaves every year).

So those are the most common reasons why your Satin Pothos has developed yellow leaves. It’s quite a long list so it’s important that you go through the reasons and discount them one by one. If you have caught the issue early, there’s no reason why you can’t bring your plant back to full health by changing up the environment or your care routine. Keep an eye on your plant after making any changes to make sure the issue isn’t getting any worse.

To find out more about how to look after your plant, as well as other common issues and propagation advice, check out our Satin Pothos care guide.

Fiddle and Thorn is a participant in the Amazon Services LLC Associates Program, an affiliate advertising program designed to provide a means for sites to earn advertising fees by advertising and linking to Amazon.com

Take our houseplant survey!

Quickly respond to our 30 second houseplant survey and get 75% off our Complete Houseplant Care eBook!

Take the Survey

No thanks…

Why does my Satin Pothos have brown leaves?

Last Updated: June 21, 2022

There is something really special about the silver speckles on the leaves of a Satin Pothos plant so it’s devastating when we see that they are starting to turn brown. It can happen that sometimes the tips of the leaves turn brown, other times you might see brown spots and patches and you might be unlucky enough to have all of the leaf turning brown. There are a few different causes that can make the leaves on your Satin Pothos brown, so check out the post below to find the right diagnosis as well as how to fix it!

Brown leaf tips on a Satin Pothos indicates a lack of humidity

Really dry air can mean the plant transpires a lot more, which is when it loses moisture through the leaves. This can cause the tips to dry out and become brown. You may find this happening a lot more during winter as a mixture of central heating and a lack of ventilation can mean the air in your home dries out a lot quicker.

Here are a few ways to increase humidity for your Satin Pothos to prevent brown leaf tips:

Mist the leaves

This is one of the easiest ways to increase the humidity for your Satin Pothos and can help to prevent any more leaf tips from turning brown. We recommend misting the leaves a few times per week with a spray bottle. (We love these amber glass ones from Amazon).

Top tip: mist the leaves in the morning to allow enough time for the water droplets to evaporate before nighttime. If the leaves are still moist as the temperatures drop at night, they are a lot more likely to rot which causes a whole other issue.

Make a pebble tray

This will need a touch of DIY from your end but it’s a great solution for Satin Pothos plants that have brown leaf tips. Fill up a tray with small pebbles and fill it up halfway with water (if you’re filling it up any further it will mean the roots are sitting in the water which can cause root rot). Place your Satin Pothos on top of the pebbles (making sure it’s level). Throughout the day the water will slowly evaporate around your Satin Pothos increasing the humidity.

Finding a nice spot

If you’ve got a good level of natural light in your kitchen or bathroom then we recommend placing your Satin Pothos in there. The humidity level in those rooms will usually be naturally higher than in other areas of your home because of steam from showering and cooking. This will help to prevent brown leaves and leaf tips on your Satin Pothos.

Invest in a humidifier

We recommend that every plant parent owns a humidifier to keep their houseplants happy! They keep the humidity in the room at a consistent level so you don’t have to worry about a thing. They are especially useful over winter when central heating causes dry air, oh and they’re super affordable too!

We always recommend this humidifier from Amazon as a great place to start.

If you want to learn more about how to raise the humidity in your home for your Satin Pothos then check out our humidity guide.

Underwatering can cause brown Satin Pothos leaves

If you notice that there are dry patches all over the leaves of your Satin Pothos rather than brown leaf tips, then it may be underwatering that’s the culprit. Don’t worry if you forget the occasional watering, but consistent underwatering can cause some real issues.

Before you start pouring water over your Satin Pothos to fix the problem, it’s important that you are sure that it’s the right cause. It’s important to take your plant out of the pot and seeing how dry the potting mix feels. If it’s bone dry and the roots look crispy, then underwatering is the most likely culprit of the brown leaves. The best way to fix your underwatered Satin Pothos is to water your plant a little bit once a day for about a week. This will help to gradually reintroduce water without shocking your plant by changing the environment too rapidly.

We recommend buying a moisture meter to help you keep an eye on when your Satin Pothos needs more or less water which will help to avoid brown leaves in future.

Brown leaves can also indicate a bacterial infection

If you notice that there are brown spots with yellow rings on the leaves of your Satin Pothos then it’s most likely caused by the bacterial infection ‘leaf spot’. This happens when there is too much moisture on the leaves and they may start to rot.

It can happen if the leaves are wet as the temperatures drop at night – either due to misting late in the day, or splashing the leaves when watering your Satin Pothos.

The best way to fix this is to cut off the affected leaves to conserve your plant’s energy which will help encourage new healthy leaves and vines. In future, make sure to water your plant as close to the plant as possible (a thin spouted watering can really help with this). This ensures that you don’t get the leaves wet when you water your Satin Pothos.

So those are the most common reasons why Satin Pothos plants can start turning brown. Luckily, each of the issues isn’t a guaranteed death sentence for your plant and as long as you have caught the problem early, there’s no reason why you couldn’t get your Satin Pothos back to full health by tweaking some environmental or care aspects. Once you do make a change, keep a close eye on your Satin Pothos to see how it gets on. Like humans, plants can be a little sensitive to change so it’s important you monitor the improvements.

If you want to find out more about caring for your Satin Pothos plant, as well as how to diagnose and fix other common issues, check out our Satin Pothos care guide.

Fiddle and Thorn is a participant in the Amazon Services LLC Associates Program, an affiliate advertising program designed to provide a means for sites to earn advertising fees by advertising and linking to Amazon.com

Take our houseplant survey!

Quickly respond to our 30 second houseplant survey and get 75% off our Complete Houseplant Care eBook!

Take the Survey

No thanks…

Why does my Rubber Plant have yellow leaves? Causes and Solutions

Last Updated: January 17, 2022

Whether your Rubber Plant is variegated or has deep solid green leaves, if you notice yellow patches or spots on the leaves, or if an entire leaf has turned yellow, this is often not a good sign. It’s important that you figure out exactly what is causing the yellowing on your Rubber Plant as some of the issues can escalate quickly and might mean you are unable to bring your Rubber Plant back to full health.

Below we will go through each of the individual factors that can cause yellow leaves o

Natural ageing can cause some yellowing

Before we get onto the more worrying causes, it’s good to first see if natural ageing is the cause of the yellow leaves on your Rubber Plant. Like most other houseplants, Rubber Plants will occasionally drop their oldest, lowest leaves in favour of producing new healthy (and often bigger) growth. These leaves will turn a solid yellow colour before falling off the plant. It is totally normal for this to be happening and isn’t because of anything you are doing wrong.

To see whether or not natural ageing is the cause of the yellow leaves on your Rubber Plant, monitor the rate of yellowing and give your plant a full check over to see if there are any other signs of unhappiness. If the rate of yellowing is less than the rate of new healthy growth and is about only 1-2 leaves every few months, then it could simply be the ageing process. If there are no other signs of unhappiness, then this also points towards natural ageing.

If more leaves are starting to turn yellow, or the rate is higher than the growth of new leaves, then check over the reasons above again to see if you can determine what is causing the leaves on your Rubber Plant to go yellow.

Too much water is often a cause of yellow leaves

Yellow Rubber Plant leaves can also be a consequence of overwatering. It’s one of the main killers of Rubber Plants as a lot of the damage is caused in the potting mix, which means you can’t easily see until the problem has progressed quite far.

Rubber Plants don’t like to be sitting in a lot of water for long periods of time and prefer their potting mix to be relatively dry. Overwatering your Rubber Plant can lead to root rot meaning the plant becomes unstable and also cannot get needed nutrients from its root system.

To check whether the cause of the yellow leaves on your Rubber Plant is overwatering, check the moisture of the soil immediately and adjust your watering schedule accordingly. The most reliable way to know if your Rubber Plant needs watering is by using a moisture meter. We also recommend replacing the potting soil straight away (rather than waiting for it to naturally dry out) so that the roots can begin to recover. Always use a high-quality potting mix when replacing the soil as this ensures your Rubber Plant is getting the right balance of nutrients.

To encourage new healthy growth, trim off any rotten roots and dead yellow leaves so that your Rubber Plant doesn’t waste any energy on them.

Low Temperatures can be another cause of yellow leaves

Another cause of yellowing leaves in Rubber Plants is cold temperatures, in particular cold drafts. Native to Asia, Rubber Plants really dislike cold air so it is important that you put your plant in the warmest room in the house over winter. During summer, make sure that your Rubber Plant isn’t placed near any AC vents as this constant stream of cold air can over time really harm your Rubber Plant, causing yellow leaves amongst other issues such as stunted growth and drooping stems.

Another important thing to avoid is placing your Rubber Plant near doors or windows that are drafty. Even though the temperature of your home may be perfect for your Rubber Plants, the drafts coming in from outside may be colder and harm your plant’s health. You can always pick up a digital thermometer to check the temperatures across your home if you are unsure.

Pests are a rarer cause of yellow leaves

Whilst rarer than some of the other factors we have outlined above, your Rubber Plant’s leaves may be turning yellow due to a pest infestation. This is more common if you keep your Rubber Plant outside for part of the year, but can still happen to inside plants, unfortunately.

Insects like spider mites can find a home on your Rubber Plant and suck the nutrients from the leaves, causing yellow spots and patches across the leaves.

To spot pests, get up close to your plants using a magnifying glass and inspect the tops and undersides of the leaves to see if you can spot any insects.

If you have established that the yellow leaves on your Rubber Plant are caused by pests, there are a few ways to treat the infestation, including showering, neem oil and insecticide sprays.

Those are the most common factors that cause yellow leaves, patches or spots on your Rubber Plant. We recommend going through each of them whilst inspecting the soil, leaves and overall health of your plant to give you the best chance at successfully diagnosing the issue. Once you are sure what is causing your Rubber Plant’s yellow leaves, act immediately to resolve the issue as the sooner you treat it, the better chance you have at reviving your plant.

To learn more about how to spot and treat other common problems, as well as how to best care for your plant, check out our Rubber Plant care guide.

Fiddle and Thorn is a participant in the Amazon Services LLC Associates Program, an affiliate advertising program designed to provide a means for sites to earn advertising fees by advertising and linking to Amazon.com

Take our houseplant survey!

Quickly respond to our 30 second houseplant survey and get 75% off our Complete Houseplant Care eBook!

Take the Survey

No thanks…