Why is my African Mask Plant dying?

Last Updated: April 1, 2022

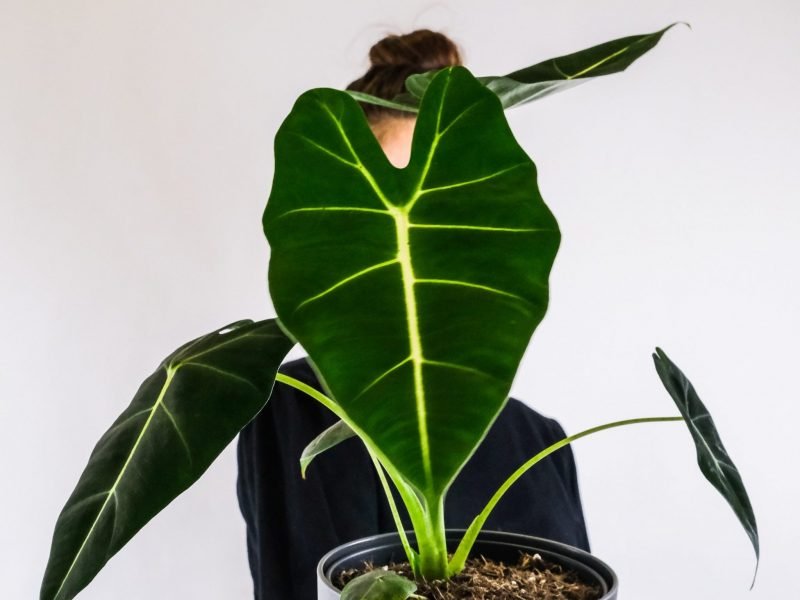
There are quite a few reasons why your African Mask Plant might be dying. But don’t worry, we have you covered. Below are the most common causes along with what symptoms they result in and how to fix the issue so you can quickly determine why your plant is dying and make the right changes. Good luck!

Watering issues

If your African Mask Plant is dying and developing yellow leaves then watering issues may be the cause. Too much or too little water can cause the plant to slowly die if the problem goes on for several weeks. Underwatering usually causes drier leaves whilst overwatering causes softer yellowing.

To establish if watering issues is what is causing your African Mask Plant to die, take the plant out of the pot and take a look at the soil. If the potting mix is very dry and powdery or waterlogged and clumpy then watering is causing the problem.

If the soil is waterlogged replace it straight away and trim away the rotten roots. This will allow your plant to start to recover. Hold back from watering as much as before and you should see healthy new growth eventually appearing. If the plant has been underwatered slowly reintroduce watering instead of drowning your plant. This avoids any shock caused by a sudden change of environment.

In the future, make sure to monitor the moisture levels in the soil to avoid any watering issues. You want to hold back watering as much during winter as the cold darker months mean your plant will go dormant and not produce any new growth. This is when root rot and waterlogged soil becomes a higher risk factor.

Low temperature

Another reason that your African Mask Plant might be dying is cold temperatures. Native to the tropics, African Mask Plants thrive in warm humid environments. If there is a slight cold draft coming through the door or window then this can impact your plant’s health.

Draft-proof any doors or windows that are close to your plant or move them into a slightly warmer room in your home. It may take a little time for your plant to adjust so don’t expect it to instantly recover.

Too much sunlight

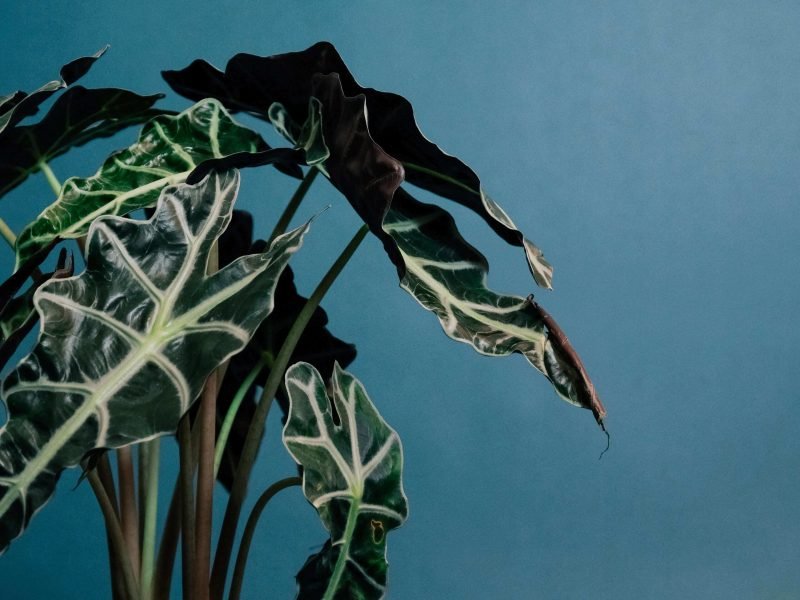
If there are yellow scorched patches on the leaves then it may be caused by too much direct light. African Mask Plants thrive in bright but indirect light. They can cope with a little direct sunlight but not in summer. The sun is too intense and will scorch the leaves.

Unfortunately, this is irreversible but you can prevent further scorching by moving your plant to a different spot in your home. Luckily this shouldn’t have damaged too much of the overall plant as the root system will still be healthy so your plant shouldn’t die on you.

Lack of humidity

If your African Mask Plant has developed brown spots or edges on the leaves then dry air is usually the case. Like with temperatures, African Mask Plants thrive in conditions like the tropics. Although we could never reach a humidity level anything like the tropics (and even if we could, we definitely wouldn’t want to live in it), we can increase the humidity a little and your plant will love you for it.

Here are a few simple ways to increase the humidity for your African Mask Plant:

Mist the leaves regularly

Use a spray bottle to mist the leaves a few times a week. This also gets rid of dust on the leaves which is a bonus.

Make a pebble tray

Fill up a tray of pebbles and fill halfway with water. Place your plant on top and the water will evaporate around it, increasing the humidity level.

Shower your plant

Wash down the leaves, keeping the water pressure fairly low. Not only will this up the humidity but it may get rid of any pests that are secretly living on your plant.

Move to the bathroom/ kitchen

These rooms have naturally higher humidity levels because of steam from showering and cooking. Your African Mask Plant will love it if the light levels are right.

Buy a humidifier

This is the long term solution to humidity issues and the best thing you can invest in for your plants. We recommend this humidifier from Amazon – our plants love it!

Pest infestation

Although rarer than other factors, another reason why your African Mask Plant might be dying is a pest infestation. Pests suck on the plant’s leaves, exhausting it and causing it to turn yellow in most cases. A lot of pests are visible to the human eye so we can catch the problem by properly inspecting the leaves. Pests like to hang out on the undersides of the leaves as well as the stem joints.

If you spot pests lurking on your plant the first thing to do is isolate it from any of your other houseplants. Pests can jump across plants if they are close so you want to avoid the problem spreading to any of your other plants. Check over your other plants to check for pests and keep them far away from non-infested plants.

You then want to trim off any badly affected leaves or stems. This will initially curb the growth of the infestation by cutting the numbers. You then want to shower your plant down to try and get rid of as many pests from the plant before treating with insecticide.

A pest infestation isn’t always a death sentence for your plant but it can be. We have had to get rid of several plants because there was just no getting rid of them and we didn’t want them to spread to other plants.

Those are the most common reasons why your African Mask Plant is dying. For all of the issues, if you have caught the problem early then you have a great chance of getting your plant back to full health. Be patient as these things can take time.

If you want to learn more about caring for your plant check out our African Mask Plant care guide.

Complete Houseplant Care eBook

Our comprehensive (and rather good looking) eBook that will teach you everything you need to know to successfully care for, and maintain your houseplants!

Buy on

Fiddle and Thorn is a participant in the Amazon Services LLC Associates Program, an affiliate advertising program designed to provide a means for sites to earn advertising fees by advertising and linking to Amazon.com

Take our houseplant survey!

Quickly respond to our 30 second houseplant survey and get 75% off our Complete Houseplant Care eBook!

Take the Survey

No thanks…

Why is my African Mask Plant drooping? Causes and How to Fix it!

Last Updated: September 5, 2023

With their sturdy dark green veined leaves, this plant grabs the attention of the entire room and stands tall among your urban jungle.

If you have started to notice that your African Mask Plant has begun to droop its leaves and your plant looks quite sad and limp, then there is definitely something wrong. If there aren’t any other signs of unhappiness then it means you have probably caught the issue quite early which makes it easier to reverse. But even if the drooping leaves on your African Mask Plant are also brown, yellow (or there are other issues), with the right methods you should be able to bring your plant back to full health.

Causes of droopy leaves on an African Mask Plant

In this post, we will be going over each of the causes of drooping leaves on African Mask Plants and show you how to fix it and prevent the issue from happening again. Some issues are easier to fix than others, some are easier to diagnose than others but don’t worry – we have you covered.

Overwatering

One of the most common causes of drooping African Mask Plant leaves is consistent overwatering. It’s super easy to do accidentally but can cause quite severe problems fairly quickly. If drooping leaves are the only thing that seems to be wrong with your African Mask Plant, then this is good news – it means that the problem is in the early stages and should be easier to fix. Other signs of overwatering include soft leaves, brown or yellow leaves and potting mix that smells pretty bad.

The reason that overwatering is so harmful to your African Mask Plant is that it causes waterlogged soil which cuts off air circulation in the potting mix. This rots the roots and prevents the plant from taking in any oxygen and nutrients. It also means that the roots can’t physically support the plant anymore. The combination of these two issues is why overwatering will often cause your African Mask Plant to droop its leaves and stems.

Before you take any drastic measures, you need to be 100% sure that overwatering is the cause of the drooping leaves. The first thing to do is to take your plant out of its pot which will allow you to closely inspect the potting mix and root system. If the potting mix feels soggy and clumpy, then this means your plant has been overwatered. If the roots are soft and mushy it suggests that this issue has been going on for a while.

How to fix an overwatered African Mask Plant


  1. Replace the potting mix.

    It’s crucial that you replace any waterlogged potting mix straight away with fresh, high-quality soil. Don’t wait for the soil to dry out on its own as this will only make the problem worse over the next few days and you risk causing even more damage to an already rotting root system.

  2. Trim off any soft and mushy roots and leaves.

    If your plant is trying to keep rotting leaves and roots alive, it will be wasting valuable energy that it could be using to recover and produce new growth. Use clean, sharp scissors to cut away dying growth.

  3. Adjust your watering schedule.

    It’s important to take a look at how often you were watering your African Mask Plant, and how much water you were giving it each time. Cut back on one of these factors to ensure the problem doesn’t happen again.

How to prevent the problem from happening again

Now that you’ve fixed the issue for the time being and your plant should be slowly recovering, let’s flip the attention to ways you can ensure you won’t overwater your African Mask Plant again and cause any more drooping leaves.


  1. Only water when the potting mix is dry.

    There are plenty of ways to determine when it is time to water. The most accurate of which is using a moisture meter. They are affordable little devices that you pop into the soil and it will literally tell you how damp it is. It takes all the guesswork away from watering your plants and will significantly reduce the risk of overwatering.

  2. Ensure good drainage.

    This will help solve the occasional accidental overwatering as it allows some of the water to escape. Having good drainage holes in your pot, using a well-draining potting mix that includes perlite and switching to terracotta pots are all ways you can increase the drainage for your African Mask Plant and avoid drooping leaves.

  3. Downsize your pot if necessary.

    One major factor when it comes to overwatering is the pot size. If your African Mask Plant is in a pot that’s much too large for the root system, it means that it will take much too long for the potting mix to dry out. This then increases the risk and possibility of root rot.

  4. Adjust your watering schedule depending on external factors.

    Although watering calendars can help us remember to water our plants, they aren’t actually the best thing for our green friends. It’s important to adjust how much and how often you water your African Mask Plant depending on the time of year, temperature fluctuations, sunlight levels and maturity of your plant. There’s no one fits all timeline which is why moisture metres are such a great tool.

Underwatering

The strange (and often frustrating) thing about drooping leaves on an African Mask Plant is that as well as too much water, the issue can also be caused by not enough water. African Mask Plants can be forgiving for the odd time where you forget to water, but consistent underwatering can lead to a variety of issues if not sorted; the most serious of which is plant death. However, if the leaves have only just begun to droop down on your African Mask Plant, then it suggests you have caught the problem early. Other signs of underwatering include brown leaf tips and edges, crispy leaves and your plant feeling super light when you lift it.

If the leaves of your African Mask Plant are quite dry as well as drooping down, then we suspect that a lack of water is the culprit. However, before you start pouring buckets of water over your plant, you need to make sure that this is really the cause of the drooping leaves on your African Mask Plant. As with overwatering, we recommend checking the moisture in the soil, either using the finger method to test how moist the potting mix is or by removing the plant from the pot. If the soil is dry and feels sandy, and the roots look a little crispy and shrivelled, then underwatering is likely the cause.

How to fix an underwatered African Mask Plant


  1. Give your plant a soak.

    Fill up a container with fresh temperate water and place your plant in there for about 10 minutes. This will allow the water to soak into the potting mix. Often when watering really dry soil, it flows right through and out the bottom of the pot which doesn’t help the issue at all.

  2. Slowly reintroduce watering.

    Sudden changes in the environment can be quite stressful for plants and if the potting mix goes from really dry to soggy super quickly, it can cause your plant to go into shock (this is why we recommend only soaking for 10 minutes). For the next week or so, slowly reintroduce watering by giving your plant a little every day.

  3. Adjust your watering schedule.

    Going forward make sure you are keeping an eye on when the potting mix is dry so you know when it’s time to water your African Mask Plant. Using a moisture meter is a great way to avoid any more drooping leaves in future.

Temperature Extremes

If you have inspected the potting mix of your African Mask Plant, and analysed your watering schedule and just can’t be sure that watering issues is the cause of the drooping leaves, then it may be extreme temperature fluctuations that are the problem.

African Mask Plants are native to the tropics of Asia and Australasia so thrive in warm temperatures meaning they’ll struggle in homes with cold drafts. You may not notice the cold air coming through cracks in doors and windows but if your African Mask Plant is right next to any cold air streams then this can over time be a real issue.

Make sure that you draft proof any windows or doors that are close to your African Mask Plant (and other tropical houseplants) as well as moving them away from any air conditioning vents as these can be quite damaging to your plants during summer. Using a digital thermometer is an easy way to monitor the temperature in your home and allow you to check for any cold drafts or hot spots that might form near windows during the warmer months.

If your African Mask Plant is living in a cool room, it’s also more at risk from overwatering and root rot. Your plant won’t need as much water as the soil will take a lot longer to dry out. This is the perfect mix for problems such as root rot to occur which is why you should be extra cautious when it comes to caring for your plants in winter or in colder rooms in your home.

Lack of Sunlight

Although watering and temperature issues tend to be the most common causes of limp drooping leaves on African Mask Plants, it’s important to also consider some other causes if you aren’t able to accurately determine the cause yet. African Mask Plants need bright but indirect sunshine to really thrive and produce new strong leaves and stems. A lack of sunlight (which is common during winter) can cause your plant to struggle and develop brown leaves, discolouration of the plant, small leaves, slow growth, drooping stems or leaves falling off. So all in all, a pretty big deal!!

If you suspect a lack of sunlight is causing the leaves on your African Mask Plant to droop down and become quite limp, then we recommend moving it to a slightly sunnier spot in your home. Keep it away from too much direct sunlight (especially in summer) as this can become quite intense and scorch the leaves as well as create a hotspot that can dry out your plant. If you’re unsure about the light levels across your home, you can always pick up a light meter that will help guide you when finding the perfect spot for your beloved African Mask Plant.

A Pest Infestation

A rarer but equally important cause of drooping leaves on African Mask Plants (and most other houseplants), is a pest infestation. It can be worrying for plant parents to think that pests might be making a home on their plants but if you catch the problem early, you can have a lot of success fighting against the pests. Insects that live on your plant will suck the nutrients from it which is why you’ll often see the leaves drooping down.

Pests are rare on houseplants that don’t spend any time growing outdoors but it can still happen. The first thing to do is isolate your plant away from your other houseplants to stop any spread of the pests. Then inspect your plant closely to spot any further signs, beyond drooping leaves, that indicate bugs are living on your African Mask Plant. The most common signs include yellow or brown spots on the leaves, holes in the leaves, white webbing across the stems or visible pests. Look closely at the undersides of your African Mask Plant’s leaves as this is where pests like to hang out. Using a magnifying glass will really help you spot any crawling around on the leaves.

If you do spot any signs of pests, cut away the worst affected leaves to curb the infestation. Then wash down the leaves and soil in the shower using warm water and wipe over them with a clean cloth. We also recommend treating your African Mask Plant with neem oil and showering every few days. Check over your other plants and keep all infested plants in isolation as pests can easily jump between leaves and plants that are close.

Those are the most common reasons why your African Mask Plant has developed limp and drooping leaves. We recommend going through each cause one by one to determine what’s behind your plant’s problem. Drooping leaves often indicate that you have caught the issue early so you should have a great chance at getting your plant back to full health. It is important to monitor your plant over the next few weeks and months to ensure that you’ve solved the issue.

Check out our African Mask Plant care guide for all the information you need to care for your plant, as well as other common problems, propagation methods and top tips to keep your plant happy and healthy!

Fiddle and Thorn is a participant in the Amazon Services LLC Associates Program, an affiliate advertising program designed to provide a means for sites to earn advertising fees by advertising and linking to Amazon.com

Take our houseplant survey!

Quickly respond to our 30 second houseplant survey and get 75% off our Complete Houseplant Care eBook!

Take the Survey

No thanks…

Why is my African Mask Plant (Alocasia Polly) turning yellow?

Last Updated: April 1, 2022

In this post, we go through all of the most common reasons why African Mask Plants develop yellow leaves and give you tips to fix the issue. If you have caught the problem early and there are only a few yellow leaves on your Alocasia Polly then you should have a really good chance at bringing your plant back to full health in no time.

Overwatering is the leading cause of yellowing leaves in African Mask Plants

Let’s start with the most common cause of yellow leaves on African Mask Plants – too much water. Although your plant likes some moisture in the soil, they don’t do so well if it becomes quite waterlogged as their roots will begin to rot. This means that your plant is unable to take up water and nutrients from the soil and photosynthesise properly, causing the leaves to go mushy, droopy and yellow.

Before changing anything in your watering routine for your African Mask Plant you want to be sure that this is definitely the problem. The best way to know is by taking your plant out of its pot and inspecting the soil and roots. If the potting mix is very moist and clumpy, and the root system feels a little mushy then overwatering is definitely causing the yellow leaves. You can also check the soil using a moisture meter to determine if it’s waterlogged. They are a great investment for all plant parents – a lot cheaper than having to buy new plants! Replace the potting mix straight away if it is waterlogged. Leaving it to dry naturally will take several days and risks more damage to your plant and its roots.

Trim away the rotten roots and worst affected yellow leaves. This means that your plant can focus on new growth rather than wasting valuable energy and nutrients trying to keep the dying parts alive. After a few weeks, you should start to see your African Mask Plant becoming stronger and maybe even producing new healthy growth. Be patient though as your plant has been through a lot and will need time to recover.

Drainage issues can cause yellow leaves

But what if the soil is really soggy but I am hardly watering? Well, this is where problems with drainage come in and can also be causing your Alocasia Polly to develop yellow leaves. If the water isn’t draining well through and out of the pot, then it can also cause root rot.

One great method to increase drainage is to add perlite to the soil. This aids with drainage and aeration in the soil. Also, make sure that the drainage holes aren’t being blocked by anything. One easy trick is to add a layer of stones to the bottom of the pot to stop them being clogged up by the soil.

We also always recommend using terracotta pots. When you first buy an Alocasia Polly it will most likely come in a plastic pot. These are great for plant shops and nurseries because they can cheap, lightweight and don’t break. However, they aren’t that good for your plant’s health in the long term. Plastic pots keep in every drop of moisture. But terracotta pots are permeable which means that some of the water can escape through the sides. It lowers the risk of root rot and yellow leaves as it prevents the soil from being waterlogged. Terracotta pots might be a little more expensive but they are definitely cheaper than replacing a dead plant. Plus they look good too! We love these pots which are available on Amazon.

Yellow leaves can indicate a lack of humidity

Humidity is an often forgotten part of houseplant care but a lack of it can cause your African Mask Plant’s leaves to turn yellow. Alocasia Pollys are native to the tropics which means they thrive in high humidity levels. Although we couldn’t reach that level of humidity in our homes (and if we could it would be very uncomfortable) we should try to slightly increase the water vapour in the air as ur houseplants will thank us for it!

African Mask Plants will start to struggle in homes with dry air, causing yellowing of the leaves. This is more prominent in winter as heating and less ventilation causes the air to be a lot drier so be more rigorous with your humidity upping routine when the heating is on.

Here are some of the easiest and cheapest ways you can increase the humidity for your African Mask Plant:

Misting the leaves

One of the simplest ways to increase the humidity for your Alocasia Polly is to mist their leaves with a spray bottle a couple of times a week. This is also a great way to get rid of dust as their large leaves are a serious dust magnet! You want to use fresh room temperature water so you don’t shock or burn the plant. We love these amber glass spray bottles!

You also want to avoid misting in the evenings as there won’t be enough time for the water to evaporate before it gets cold and dark. Once the temperature drops, wet leaves are more susceptible to rot which will mean they turn more yellow.

Build a pebble tray

If you like a bit of simple DIY then this is for you! Fill up a tray with small pebbles and fill it halfway up with fresh water. Place your African Mask Plant on top and over time the water will evaporate around your plant hopefully preventing any further yellow leaves.

One thing you want to be super careful with is making sure that the roots and the pot are not touching the water at all as this will cause root rot and waterlogged soil.

Give your Alocasia Polly a shower

Another way to instantly raise the humidity for your African Mask Plant and stop yellow leaves is to give it a shower. However, this is quite a short term solution and the effects don’t last long. Just pop them in the shower with the water pressure on low and wash down the whole plant. It’s also a great way to get rid of dust or any pests that might be secretly hiding on your plant.

Plant Placement

If you have good lighting in either your bathroom or kitchen then we recommend moving your Alocasia Polly in there. These rooms have higher natural humidity due to showering and cooking. Just be careful not to put your plants too close to the cooker or you risk burning the leaves.

Invest in a humidifier

These are a real game-changer when it comes to plant care. They are portable and affordable devices that keep a consistent humidity level in your home. They are also said to be good for you too, promoting better sleep and clearer skin. So this isn’t just an investment for your plants…

We recommend this humidifier from Amazon. We have been using it for years and our plants love it!

Want to know more about how to raise the humidity for your African Mask Plant and other houseplants? We have written a whole guide on this.

How to identify and avoid leaf burn

If your African Mask Plant has yellow patches all over the leaves, then it may be due to too much intense sunlight. They need a bright but indirect light to thrive. If your Alocasia Polly is receiving too much direct sunlight then the leaves can become burnt and scorched. This is more of a risk during summer as the sun is a lot stronger and out for more of the day.

Avoid putting your plant next to a window that receives a lot of direct light (south-facing in the northern hemisphere). We recommend you put them slightly closer to the windows during winter though as the sun isn’t as strong and they don’t do so well in lower light areas. So it’s all about getting that balance right. Light meters are a great way to monitor sunshine levels throughout the day.

Unfortunately, once the leaf has been scorched by the sun there is no going back. We recommend trimming away the yellow parts of the leaf to encourage new healthy growth.

Light deficiency can also cause leaf yellowing

As with a lot of things in the houseplant world, too much and too little of something can have a very similar effect. This makes fully understanding what’s wrong sort of like a puzzle sometimes!

African Mask Plants don’t grow very well in low light areas and will start to produce yellow leaves if they aren’t getting enough light. Try and move your plant to a spot with more natural light (making sure it’s indirect) and your plant should start to produce healthier green growth.

Pest Infestation

A rarer but more worrying cause of yellow leaves on an Alocasia Polly is a pest infestation. Spider mites, mealybugs and scale insects are common to African Mask Plants and can cause real damage to the plant. They suck on the leaves, exhausting the plant and causing the leaves to turn yellow. They are also known to bite small holes through the leaves which is one way to spot there is a problem.

Most pests you can spot just by closely inspecting the leaves. We always use a magnifying glass to inspect the undersides of the leaves and the stem joints as that’s where they like to

hang out. If you do spot pests on your plant, make sure to move them away from any of your other houseplants. Pests can spread between plants if they are close enough so isolate your infected plant immediately.

Each type of pest needs to be treated slightly differently but the first steps are always to wash your Alocasia Polly down in the shower before treating with an insecticidal spray or soap. There are other treatments such as neem oil that are also quite successful in curbing the infestations. If you have caught the problem before it has turned the whole plant yellow then you should be able to get rid of the infestation.

You can find out more about identifying, treating and preventing pests in our downloadable ebook.

Natural ageing can cause the odd yellow leaf

If none of the above really fits with that is happening to your Alocasia Polly, then it may just be due to natural ageing. Like most other houseplants, African Mask Plants will occasionally drop their oldest, lowest leaves in favour of producing new growth. These leaves will turn yellow before falling off the plant. It is totally normal for this to be happening and isn’t because of anything you are doing wrong.

If there are no more than 1 or 2 leaves turning yellow every few months then it’s nothing to worry about. But we do recommend you monitor how often the leaves are yellowing and falling just to check the rate of shedding doesn’t increase. If more leaves are starting to turn then check over the reasons above again to see if you can determine what is causing the leaves to go yellow.

Should I cut away my Alocasia Polly’s yellow leaves?

We get this question a lot when it comes to yellow houseplant leaves. You may be wondering if it is beneficial or damaging to your plant in any way to get rid of them. We always recommend trimming off the leaves. Not only does it make the plant look better and healthier, but it stops them wasting any energy trying to revive parts that are already dead or dying. Instead, your African Mask Plant can focus on producing new healthy green growth!

Those are the most common reasons why your African Mask Plant is developing yellow leaves. It can be quite a worrying problem to have so it’s important to act early. If the issue hasn’t spread to the whole plant then you have a good chance at solving the issue and getting your plant back to full health. It’s important to regularly check up on your plants, check their root system and their leaves as this will give you the best chance at spotting any issues early.

If you want to learn more about how to best care for your plant then check out our African Mask Plant care guide.

Fiddle and Thorn is a participant in the Amazon Services LLC Associates Program, an affiliate advertising program designed to provide a means for sites to earn advertising fees by advertising and linking to Amazon.com

Take our houseplant survey!

Quickly respond to our 30 second houseplant survey and get 75% off our Complete Houseplant Care eBook!

Take the Survey

No thanks…

Why has my snake plant got brown leaves/ tips?

Last Updated: May 17, 2022

Snake plants are known to be pretty easy to take care of and that is true to a certain extent. They aren’t as sensitive as most other houseplants and will survive well in a range of environments. However, if you notice that your snake plant has begun to develop brown leaves or tips, it could be a sign of unhappiness. The main reasons for this are: underwatering, scarring, overwatering, too much sunlight, over-fertilisation and low humidity.

Top Reasons Why Snake Plants Develop Brown Leaves

Underwatering

If your Snake Plant has developed dry, crispy brown leaves the main cause of this will be underwatering. They don’t like frequent watering and do prefer their soil to be dry. However, going to the other extreme is as damaging for your plant. If you think you have underwatered, take the plant out of its pot and inspect the root system to see what damage has occurred. This will indicate how likely it is for your snake plant to return to normal health. You can also use a moisture meter to determine how much moisture is in the potting mix.

Your first instinct might be to give your plant a tonne of water but this won’t actually fix the problem. Instead, you should begin to water your snake plant little and often. You don’t want to shock it or worse cause the already damaged leaves to rot. Water your plant a little every day for a few days and then space your watering out a little until you are watering only once a fortnight in the growing season.

Scarring

If your snake plant looks rough around the edges and there are brown damaged marks on the sides of the leaves this is often due to scarring.

Snake plants will scar easily if knocked or moved so if your plant is in an area of high traffic in your home this may be the cause. Make sure to move yours away from areas where children and pets can reach it.

Why Snake Plants Can Develop Brown Leaf Tips

Overwatering

Improper watering is one of the biggest issues for most houseplants, and snake plants are no different. Whilst they are definitely a lot less sensitive than other plants, overwatering them can cause some real issues over time.

Snake plants hate it when their soil is too damp and overwatering will cause their leaf tips to brown. During the growth months, you shouldn’t be watering your plant more than once every week or two. During the colder months, once a month is definitely enough. It is really good to get to know your plants as each and every one is ever so slightly different.

As well as checking the moisture at the top of the soil before watering, we also recommend picking up your snake plant before and after watering so you get an idea of much your plant will weigh when it needs water. Be careful that you don’t hurt yourself on the leaf tips when doing this, we are speaking from experience here!

Inconsistent watering

You might find that your snake plant’s leaf tips are turning brown also due to inconsistent watering, rather than simply too much water.

If your plant fluctuates between being waterlogged, to being bone dry, this can cause some real issues for the root system and plant causing brown tips. Just make sure that you stick to a strict watering schedule that reflects the growing and dormant seasons. Again, a moisture meter is great to help you regulate your watering and avoid over or underwatering. A self watering pot like this one will remove all of the guess work!

Too much light

The correct level of sunlight is more important than you think for your Snake Plant. They have a reputation that they can deal with anything from intense sunlight, to shady corners. However, if yours is getting too much direct light, this can cause the leaf tips to turn brown.

Try moving your plant a little further away from the window, or to a slightly shadier spot to avoid further leaf burn. Use a light meter to take away the guessing and make sure that your Snake Plant is getting the perfect amount of sunlight.

Overfertilisation

Most generic plant foods and fertilisers will recommend a dosage for your plants, but it’s often too much for your snake plant and can result in browning of the leaf tips.

It is best to try feeding at half the recommended dosage and see how your snake plant reacts. If you notice any browning you can flush the feed out with more water and try again the next time you water with a quarter of the dosage.

Low humidity

Snake plants like quite humid environments and can struggle in homes with dry air. This can be especially damaging in winter months when we often have the heating on for several hours a day.

A lack of humidity in the air can cause the leaf tips to brown and could eventually begin to affect the whole leaf. If you feel you have quite dry air, make sure to mist your snake plant with a spray bottle every week or so and this should help prevent the plant from drying out.

If you want an even easier solution to humidity problems consider investing in a humidifier as these great little devices can maintain levels in a much simpler way.

One important tip we have to share is that you should never cut off the brown tips. Whilst this is usually fine for a lot of houseplants, this could cause more damage to your snake plant’s leaves as they are very prone to scarring.

To find out more about Snake Plant care, visit our guide. There you will find everything you need to know to keep your Snake Plant healthy and thriving as well as tips and tricks around propagation, fertilisation and repotting.

Fiddle and Thorn is a participant in the Amazon Services LLC Associates Program, an affiliate advertising program designed to provide a means for sites to earn advertising fees by advertising and linking to Amazon.com

Take our houseplant survey!

Quickly respond to our 30 second houseplant survey and get 75% off our Complete Houseplant Care eBook!

Take the Survey

No thanks…

Why does my Peace Lily have brown leaves? Causes and How to Fix it!

Last Updated: May 29, 2022

We love Peace Lilies as they are one of the best houseplants at purifying the air and they have incredible blooms. However, it can be quite worrying if your Peace Lily starts to develop brown leaves. You can be pretty sure that the brown leaves on your Peace Lily are because of watering issues, too much, too little or even the wrong type. Below you will find everything you need to know to diagnose the problem as well as fix it and get your plant back to full health.

Underwatering can cause brown Peace Lily leaves

If the leaves are turning quite brown dry and crispy then it is often due to not having enough water. Peace Lilies like to have quite moist soil and will start to struggle and droop down if they aren’t getting enough of it. In fact, they are one of the most dramatic plants when they haven’t quite had enough water and can go from looking healthy to limp and lifeless within hours. However, once your Peace Lily has started to develop brown leaves due to underwatering then it does suggest the problem has been going on for a little while.

If you think your plant has been underwatered then check the soil before you change anything about your watering routine. You want to be 100% sure that the soil is very dry before watering it again. If you are sure that the problem is a lack of water then slowly reintroduce water to your Peace Lily. Like humans, plants can get shocked by a sudden and extreme change in environment. This is why you don’t want to simply drown your plant as it can cause more problems than just brown leaves.

You can check the moisture levels in the soil in a few ways. Firstly, if you have a moisture meter then this will always be the most accurate reading. However, you can also use the finger or chopstick method to test moisture levels in the soil of your Peace Lily. If your finger or chopstick comes out clean, then it suggests the soil is very dry.

You might also choose to take your Peace Lily out of its pot to inspect the soil. This will allow you to see whether or not the root system has also started to crisp up. If it has, then this means you have been underwatering your Peace Lily for quite a while. It doesn’t mean your plant is beyond saving but it just might take a while for it to get back to its normal self.

If you have concluded that the brown leaves are caused by a lack of moisture, water your Peace Lily once a day for a week. Afterwards, you want to go back to a more normal care routine, making sure to check the moisture in the soil frequently to avoid any more brown leaves developing.

Brown leaves can also mean your Peace Lily is being overwatered

Too much water can also cause your Peace Lily to develop brown leaves. But instead of the leaves being light brown and crispy, they are soft and darker brown. Check the soil straight away to see if it is waterlogged. If it is, then replace it with fresh potting mix to allow the roots to recover.

To avoid the problem happening again, make sure you are checking the moisture levels in the soil each time before you water. You can do this by putting a finger into the top two centimetres of the soil to see how damp it is. Another method is to lift up your Peace Lily before and after watering. After a few weeks, you should get a feel for how heavy your plant is when it needs water.

Top tip: Always check back half an hour after watering your Peace Lily to see if there is any water left in the sauces or at the bottom of the planter. If there is, pour it away so that your plant isn’t sitting in water. 30 minutes is usually enough for the plant to soak up as much water as it needs.

Mineral build-up can result in brown leaf tips on your Peace Lily

Although a rarer problem, Peace Lilies can be quite sensitive to tap water, especially if you live in a hard water area and this can result in brown leaf tips forming on your plant. This is due to the levels of fluoride, chlorine, salts and minerals that are in the treated water. Over time, these minerals can build up around the roots and suffocate them meaning they can’t take up the needed water and nutrients.

If you don’t want to use purified or bottles water then there are a few easy and free ways to solve the issue of brown leaves.

Let the chemicals evaporate

If you leave a watering can full of water to sit for a day then most of the chemicals should evaporate.

Use rainwater

Another method is to collect rainwater. The levels of chemicals are much lower than in the treated water that comes out of your tap.

It may take a few weeks for the effects of using purer water to show but this should stop any more leaves turning brown.

These are the most common causes of brown leaves on a Peace Lily plant. If you want to find out more about how to best care for your plant then check out our Peace Lily Care Guide.

Fiddle and Thorn is a participant in the Amazon Services LLC Associates Program, an affiliate advertising program designed to provide a means for sites to earn advertising fees by advertising and linking to Amazon.com

Take our houseplant survey!

Quickly respond to our 30 second houseplant survey and get 75% off our Complete Houseplant Care eBook!

Take the Survey

No thanks…

Why doesn’t my monstera have splits in its leaves?

Last Updated: May 17, 2022

Swiss Cheese Plants, also known as Monsteras are famous for their luscious green, split leaves. However, there are some instances where your monstera may not be producing any splits or holes in its leaves.

Whilst not always the case, this often suggests that your monstera is struggling in its environment. If you find that your monstera is not producing split leaves, we’ve found that these are the most common issues; Maturity of the plant, Insufficient light levels, Seasonal changes or Incorrect watering.

Your Monstera Might Be Too Young.

If you own a relatively young monstera, don’t be disheartened if the leaves don’t have any holes or splits in them yet. It can take up to 2-3 years before the plant matures enough to develop splits in the leaves. Young monsteras will have solid, heart-shaped leaves with thinner stems. Just make sure that you are looking after your monstera well and it should start to develop the split leaves that monsteras are known for. You’re just going need a little patience.

Insufficient Light Levels

If your monstera is a few years old, and is mature enough to have once had split leaves, but is no longer producing them, the problem is most likely a lack of light. Whilst monsteras can survive in lower light areas, they will not thrive. They require several hours a day of bright, indirect light to develop their infamous split leaves.

An east or south-facing window is the most ideal spot for your monstera, though a north-facing window can work too if this is your only option. Be careful with west-facing windows as they will receive a lot of direct sunlight in the afternoon which may damage the leaves. You want to find a nice balance between a bright spot, but without direct light as this will burn the leaves. You can also use a light meter to determine how much sunlight your plant is getting throughout the day.

If your home doesn’t have sufficient natural lighting, or you don’t have a nice spot for your monstera close to a window, there is another option. You can use a grow light to help supplement light to your monstera. You can buy grow lights as a fixture, but also as a light bulb to put into a lamp you already own. We recommend this LED grow light available on Amazon.

It May Be Seasonal

Although monstera growth is largely stalled in the darker months, any new leaves that do grow in winter will tend to have few, if any, holes. This is simply down to the adjustment in light levels in comparison to the sunnier months. Don’t be alarmed if your monstera grows solid leaves in winter, or even if it doesn’t grow any new leaves at all. This is completely normal and will, with the right care, start to thrive again in spring and summer.

If you’re concerned that light levels are dropping too low in winter, an LED grow light is a good option to supplement, though it certainly isn’t necessary.

Complete Houseplant Care eBook

Our comprehensive (and rather good looking) eBook that will teach you everything you need to know to successfully care for, and maintain your houseplants!

Buy on

You May Not Be Watering Correctly

Whilst insufficient light tends to be the most common reason why your monstera won’t produce split leaves, incorrect watering or fertilisation may also be a contributing factor. Make sure that you are watering your monstera enough so that the soil is never dry for long periods of time, but also be aware that they don’t like sitting in water for too long. You should only be fertilising your swiss cheese plant over the warmer growth period, as too much fertilisation in the winter months can harm your monstera’s natural growth.

There are a few things you can do to make sure your Monstera is being watered correctly:

Self watering pots

If you want a perfect, set it and forget it solution to making sure your Monstera is getting the right amount water then consider a good self watering pot. We really like this one from Amazon and use it all the time, especially if we’re going away for a while and won’t be around to keep things in order!

Monitor the moisture

You only want to water your Monstera when it’s time to do so. Too much or too little water can be damaging to your plant and mean it doesn’t mature enough to get split leaves. Using a water monitor will really help you know when to water your Monstera. We love using this moisture meter available on Amazon.

Use terracotta pots

Clay and terracotta pots are much better for your Monstera’s health than plastic pots as they allow some of the moisture to escape from the sides. Plastic pots keep all of the moisture in the soil. We love these terracotta pots from Amazon.

If you make sure to cover all of the bases outlined above, your monstera should start to thrive again. You want to be replicating its natural environment as much as possible so that the overall plant is happy and healthy, encouraging new growth.

The main thing is just to be patient with your monstera, even though moving it to a different spot may only take minutes, the plant might need a few months to adapt to the new light levels before producing split leaves. So as long as your plant is healthy and growing, try not to be too concerned.

Fiddle and Thorn is a participant in the Amazon Services LLC Associates Program, an affiliate advertising program designed to provide a means for sites to earn advertising fees by advertising and linking to Amazon.com

Take our houseplant survey!

Quickly respond to our 30 second houseplant survey and get 75% off our Complete Houseplant Care eBook!

Take the Survey

No thanks…

Why does my ZZ Plant have yellow leaves?

Last Updated: April 1, 2022

We recommend ZZ Plants to relatively new plant parents because of their easy care requirements. They aren’t as sensitive and delicate than some other plants and still look incredible in every room. However, if you find that your plant is starting to turn a little yellow, this will be your plant telling you that something isn’t quite right. The most common causes of yellow leaves on ZZ Plants are: overwatering, drainage issues, underwatering, too much sunlight, nutrient imbalance and temperature extremes.

Overwatering can cause yellow ZZ leaves

If the leaves on your plant have turned yellow you are most probably overwatering. Another thing to look out for that is caused by overwatering is whether those yellow leaves are starting to drop from the plant.

Overwatering is one of the main plant killers as you might not always be able to tell before it is too late. ZZ Plants don’t like to be sitting in a lot of water for long periods of time as this can lead to root rot meaning the plant becomes unstable and also cannot get needed nutrients from its root system. Waterlogged soil also gives off quite a damp and musty smell so make sure to check this every so often too.

If you think that your plant is waterlogged, check the moisture of the soil immediately and adjust watering accordingly. We also recommend replacing the potting soil straight away (rather than waiting for it to naturally dry out) so that the roots can begin to recover. Cut away the rotten roots and dead leaves so that the plant focuses on regenerating healthy growth. Make sure that you always wear gloves when handling your ZZ Plant as they have calcium oxalate which can cause skin irritation and also stomach pain (if ingested).

A yellow ZZ Plant can also indicate drainage issues

Sometimes it may not be your watering schedule that is causing your plant’s leaves to turn yellow, but the poor draining of the soil and pot. You can very easily increase the amount of drainage by mixing in a small amount of perlite. This will make it far easier for water to flow through and out of the drainage holes of your pots (you should also check to make sure your pots have drainage holes). Another easy step is to add a few small stones or pebbles to the bottom of your pots, this helps in making sure that the drainage holes are never blocked by soil or any loose debris.

Although clay or terracotta pots can be a little bit more expensive or breakable, their upsides are much more than just the aesthetic. The clay they’re made of is permeable which means that some of the water in your soil can evaporate through the sides of the pot. This isn’t the case for the plastic pots that most use, which instead hold in all of that moisture. So sometimes it is worth investing a little more to make sure that the roots of your ZZ Plant are not sitting in too much moisture.

Underwatering might also be causing yellow leaves

If your ZZ Plant’s leaves have turned yellow, dry and crispy (starting from the tips) it may be because you have not given it enough water for a while. Although your plant won’t die on you suddenly if you forget to water it every once or twice, or make it go a little longer without water whilst you are on holiday, consistent underwatering will start to have an impact on your plant’s health. It is important to keep an eye on the moisture levels of the soil so you know when your plant is ready for watering.

Make sure to check the moisture in the soil before you water your ZZ Plant. There are two really easy ways to make sure that it definitely needs water. First check the moisture at the top of the soil, if it is still damp then wait a few days before watering again. You can also lift up your plant carefully to check the weight of the plant before and after watering. You will then start to be able to gauge how heavy the soil is when it is in need of water.

If you find that your plant feels very dry, water it a little every other day for a week. Your first instinct might be to give it loads of water straight away but this can actually be harmful to your plant if the soil goes from one extreme to the other. Yes, plant’s can get shocked too by a sudden change in environment. So instead you want to reintroduce frequent watering for a week or two and this should solve the problem.

Luckily underwatering won’t instantly kill your ZZ Plant so you have time to rectify the problem before it is too late. If you trim away the yellow and dried leaves, any new growth should hopefully be healthy and luscious green!

Yellow leaves can be caused by too much sunlight

Lighting is always important to your houseplants and ZZ Plants are no different. If your plant is getting too much bright light you’ll start to notice yellowy patches throughout the leaf. You may also notice some brown tips on the leaves. This is due to the sunlight burning the leaves which is unfortunately irreversible. Try moving your plant into a slightly shadier place, and if there’s no improvement move it a little further again until you find it’s the perfect spot. You can carefully trim away the burnt yellow and brown leaves so your ZZ Plant can focus its energy on new healthy growth.

Nutrient imbalance can cause some yellowing

ZZ Plants can actually be a little sensitive to fluoride that you find in tap water. Over time, this may be causing harm to the roots which often shows itself in yellow leaves. If you live in a hard water area, it may be that your plant is reacting to high levels of chemicals in the water.

There are a few ways to make sure that the water you give them is free of both these chemicals. Firstly you can leave a jug of tap water for around 24 hours to allow for a lot of the chemicals to evaporate. Another method is leaving a tray outside to collect rainwater to give to your houseplants to make sure chemical levels are lower than the treated water that comes out of your tap. Some plant parents also have a filter system for their houseplant water but we find that the methods above work just as well!

Temperature extremes

Your ZZ Plant could be in an area where it’s getting a little too much light, or it’s getting too hot. The perfect spot for your plant is just a touch further inside a bright room, potentially an east-facing window if there’s a good spot available.

If you’re not already, make sure to open your windows every now and then to make sure that the air in your room is circulating properly. This reduces the risk of hotspots forming in the room where your ZZ Plant is sat.

It is also important to keep your plant away from AC or heating vents/radiators as these temperature extremes can be very harmful to your plant and result in various issues, including yellowing leaves. The ideal temperature for your plant is between 18°C – 24°C, so it shouldn’t be too difficult to keep in a good range. You can always pick up a digital thermometer to check the spot your ZZ Plant is in.

It could indicate a pest infestation

If you notice yellowing patterns on your ZZ Plant it may be caused by pests, most commonly in this case Aphids. You are more likely to get these if you keep your plant out over summer but they may also become infected in your home so watch out for these. Aphids camouflage themselves well so carefully inspect each leaf if you suspect they are present.

If you do notice Aphids on the leaves, first remove the most infected leaves and dispose of them immediately. Then wipe down the remainder of the plant with a warm soapy cloth whilst wearing gloves.

These are the main reasons why your ZZ Plant is developing yellow leaves. If you have caught the problem early and fix whatever it is that is causing the discoloured leaves, then your plant should return to full health pretty quickly. Be mindful that plants do naturally develop the odd yellow leaf which will drop off every few months, more so in winter. So just keep an eye out for the rate at which the leaves are changing colour and don’t be alarmed if you see the odd one.

Fiddle and Thorn is a participant in the Amazon Services LLC Associates Program, an affiliate advertising program designed to provide a means for sites to earn advertising fees by advertising and linking to Amazon.com

Take our houseplant survey!

Quickly respond to our 30 second houseplant survey and get 75% off our Complete Houseplant Care eBook!

Take the Survey

No thanks…

Why does my Yucca have yellow leaves? Causes and Solutions

Last Updated: January 16, 2022

A staple of many homes and offices due to their low-maintenance reputation, the Yucca is actually one of the most popular houseplants out there. Their large striking leaves definitely draw your attention and they are pretty adaptable too which make them almost irresistible. However, don’t think that almost unkillable actually means unkillable because if not given the right care and environment, your Yucca may start to show signs of unhappiness, often in the form of yellow leaves.

Yellow leaves aren’t always something to worry about but it’s crucial that you figure out what is causing the yellowing so you know whether or not to act on it. Below we will be going through all the common causes of yellow leaves on Yucca plants and it should help you bring your plant back to full health.

Overwatering is a common cause of yellow leaves

If the leaves on your Yucca have turned yellow you may be overwatering your plant. Another thing to look out for that is caused by overwatering is whether those yellow leaves are starting to drop from the plant. It may take time for them to fall off (if the problem is relatively new) or they might fall off regularly from your Yucca if things have progressed.

Overwatering is one of the main killers of Yucca plants as you might not always be able to tell before it is too late. Yuccas don’t like to be sitting in a lot of water for long periods of time so overwatering or a lack of drainage can start to cause real problems, not just yellow leaves.

Soggy soil can quickly lead to root rot meaning the plant becomes unstable and also cannot get needed nutrients from its root system. Waterlogged soil gives off quite a damp and musty smell so make sure to check this every so often too as this may start to happen before your Yucca develops visible yellow leaves.

To check whether too much water is the cause of the yellow leaves on your Yucca, check the moisture levels in the soil and adjust your watering routine. This can be either cutting down how often you water your Yucca, or how much water you give it each time.

The most reliable way to know if your Yucca needs watering is by using a moisture meter. We also recommend replacing the potting soil straight away (rather than waiting for it to naturally dry out) so that the roots can begin to recover. Always use a high-quality potting mix to make sure your Yucca is getting the right balance of nutrients. Cut the rotten roots and dead yellow leaves off your plant so that your Yucca focuses on growing new healthy green leaves.

Sunburn can also cause yellow leaves

Lighting is also a really important factor to consider when caring for your Yucca. If the leaves are getting too much direct sunlight each day they will start to burn and you will notice yellow patches starting to develop. This is due to the intense sunlight scorching the leaves.

If your Yucca is suffering from sunburn, then you’ll notice the yellow patches form on the side of the plant that is closest to the window. Often, the shadier side will look healthier. This problem will most commonly happen in summer, as the sun is not only out for longer each day, but the rays are a lot more intense than in winter.

If this has happened to your Yucca then move it to a spot in your home that doesn’t get any direct sunlight. They like bright light but it has to be indirect. We recommend removing the scorched leaves from the plant to encourage new healthy growth (and it looks better too!).

A lack of sunlight

As well as too much sunlight, not enough can also cause some yellowing in the leaves of your Yucca. However, it is mostly paired with small leaves and leggy or stunted growth so watch out for any of those warning signs too. This issue happens mostly during winter where the sun is weaker and out for less of the day.

If you suspect that a lack of natural sunlight is the cause, start by placing your Yucca nearer to a window. If this happens during winter, you can get away with placing it right by the window as the direct sun rays won’t be as intense as in summer. However, during summer, you’ll want to be a little more cautious as to how much extra sunlight you give your Yucca as too much light can also bring a range of issues as we explain next!

You can also use an LED grow light to supplement the amount of light that your Yucca is getting. They can be a real game-changer in preventing yellow leaves and boosting growth levels for all of your plants over the dark winter months.

Spider mites can also be causing the yellow leaves

A slightly rarer cause of yellow leaves on your Yucca is a pest infestation, most commonly spider mites when you have this problem with Yucca plants. Spider mites will suck on the leaves of your plant, exhausting them and causing them to turn yellow. As Yucca plants have quite large thick leaves, this can take longer compared to more delicate plants which can sometimes mean you spot the problem when it has advanced quite far.

Whilst an infestation is more common when the plant is struggling due to the wrong environment or care, it can happen to a plant in good health too if you’re unlucky so it’s an important one to rule out if you spot yellow leaves.

Most pests are visible to the human eye so we can catch the problem by properly inspecting the leaves. Check the undersides of the leaves carefully as this is where the unwanted visitors like to hang out! If you spot pests lurking on your plant the first thing to do is isolate your Yucca from all of your other houseplants. Pests can easily jump across plants if the leaves are touching so you want to avoid the insects spreading to any of your other plants.

The next step is to then trim off all badly affected leaves to curb the growth of the infestation. Then give your plant a wash down in the sink or shower and treat with an insecticide or neem oil.

Natural ageing process

If it’s only the oldest top leaves on your Yucca that are turning yellow then this may be simply natural ageing. Over time, your Yucca will drop some of its oldest leaves in favour of growing bigger healthier new ones, this is just your plant’s natural process.

The rate of natural ageing should be about 1 or 2 of the oldest leaves every few months and should never match or be more than the rate of new healthy green growth. If your Yucca is developing yellow leaves at a faster rate, there might be something not quite right and we recommend going through the above causes to see what is happening to your Yucca.

Those are the most common reasons why Yucca plants develop yellow leaves. It’s important to establish whether or not it is natural ageing so you only change the care routine or environment if necessary. Once you have made any adjustments, keep a close eye on your Yucca for a few weeks to make sure that no more yellow leaves are developing and you can’t see any other signs of unhappiness.

To learn more about how to best look after your plant, check out our Yucca care guide.

Fiddle and Thorn is a participant in the Amazon Services LLC Associates Program, an affiliate advertising program designed to provide a means for sites to earn advertising fees by advertising and linking to Amazon.com

Take our houseplant survey!

Quickly respond to our 30 second houseplant survey and get 75% off our Complete Houseplant Care eBook!

Take the Survey

No thanks…

Why does my Yucca have curling leaves?

Last Updated: November 30, 2022

A staple of many homes, the Yucca is definitely one of the most popular houseplants out there. Although they can very easily adapt to a variety of different environments, if things aren’t right you may still discover some issues slowly developing. One of these problems is that the leaves start curling. This can happen both inwardly and outwardly as a sign that your plant is struggling.

Luckily though curling leaves are often one of the earlier signs of unhappiness so if there are no other visible symptoms then it should mean you’ve caught the issue early. Below we will go through each of the different causes of curling leaves on a Yucca so that you can successfully diagnose and treat the issue effectively.

Overwatering is a common cause of curling Yucca leaves

Whilst overwatering can have some severe effects on Yuccas and other houseplants, curling leaves are often an early warning sign that the soil has become waterlogged and that the root system has started to rot. This can appear alongside leaf loss and yellow leaves as the issue progresses and the root system becomes more and more damaged.

Yuccas like their soil to dry out and don’t deal so well with waterlogged potting mix. They can easily go for weeks without water which is one of the main reasons they are such a loved low-maintenance plant. So if there is one extreme it prefers it is often underwatering (but more on that later).

It’s important that you diagnose the issue of overwatering as quickly as possible as this is one of the fastest issues to kill your plants if not solved.

To confirm the issue, remove your plant from its pot and check for rot and waterlogged soil. If your Yucca has become quite large and you are unable to lift it and repotting is difficult then there are other ways to check soil moisture. Using the chopstick method or a moisture meter can help figure out how soggy the soil is. Unfortunately, the only way to know if the roots have started to rot is by removing the plant from its pot.

If the roots have started to rot they will be mushy and dark in colour. Healthy roots however are pale and firm to touch. If you find the root system has started to rot, trim away the infected parts and add fresh (dry) soil.

Moving forward, now that you’ve done all you can to stop overwatering from causing more harm, for now, it’s important to flip your attention to long-term prevention. If you continue watering your Yucca at the same rate as before, it won’t be long until the issue returns.

It’s vital that you adjust your watering schedule so that you are either watering less frequently or deeply. Either will help give your Yucca enough time to dry out. You also want to be making sure that you check the soil has dried out before rewatering.

Underwatering can also be harmful to your Yucca

Although Yucca plants are known for needing little water and thriving in dry soil, if underwatered for too long it can cause issues such as curling and brown leaves. You will be pleased to know however that underwatering isn’t a quick killer of Yucca plants so you should be able to revive it fairly easily.

Before underwatering causes dry crispy brown leaves, it will usually start off by showing itself as curling leaves. This is a mechanism that Yucca plants (and many other plant types) use to reduce the loss of moisture.

There are a few different factors that can cause your Yucca to start curling as a result of underwatering so it’s important to find the one that fits your plant care so you know how to fix it.

Watering the Yucca too lightly (Yucca plants require an infrequent but generous soak).

Not watering frequently enough (although Yucca plants are somewhat drought tolerant, they still require scheduled watering, especially during heatwaves and hot months).

Lower humidity can also increase transpiration from the leaves causing them to dry out and start curling as they simply require more water than normal.

Your plant is in water-repellent soil. (If the soil being used is peat-based it can dry off quickly to form a hard potting mix. This then repels water from the surface and it runs down the pot without actually reaching the roots.)

The best way to diagnose and confirm that underwatering is causing your Yucca to start curling is to remove it from its pot and inspect the soil and root system. If you notice that the roots have turned dry and crispy then this indicates underwatering.


How to fix the issue of curling leaves caused by underwatering

Give your Yucca plant a 10-15 minute soak. This will ensure the root system takes up the water rather than it all just running out of the bottom of the pot.

Adjust your watering schedule moving forward so that you are watering more generously or more frequently (whichever you weren’t doing before).

Monitor the environment to pick up on any fluctuations that might mean your plant is drying out quicker (low humidity, higher temperatures and more sunlight). This will help you spot when you need to increase watering before it’s even caused an issue with your plant!

Low light levels can harm your Yucca’s health

Although these plants can deal with a range of environments and light levels, if your Yucca isn’t getting enough light it can start to cause some problems over time, one of the most common being curling leaves.

If you don’t have a light monitor then it can be tricky to scientifically measure the amount of light your Yucca is getting but check in with it several times a day to see the sort of light it is getting. If your plant is growing in the darkest corner of the room then this could definitely be the cause.

You will tend to find curling leaves as a result of low light more common in winter for obvious reasons. It can then be difficult to find a sunnier spot for your plant so you might want to invest in an LED grow light to supplement light levels. They are a great investment to pull your plants through the winter!

Too much sunlight can also cause curling leaves

Direct sunlight will very quickly scorch and burn the leaves of your Yucca which is, unfortunately, irreversible. It will dry out and burn the leaves so look out for any scorched patches on the curling leaves that are most exposed to the sunlight (facing the window).

If you think that direct sunlight is the cause of the curling leaves on your Yucca, move your plant to a slightly shadier spot in your home. This might be a little bit of trial and error as you figure out where the right balance is as you don’t want to move it somewhere super dark.

We recommend only removing the leaves if they are badly scorched as if the only problem is curling, this can sometimes fix itself once your plant is in a better environment. If there are any leaves, however, that are nearly fully yellow then it’s best to remove these to prevent your plant from wasting valuable energy trying to keep these alive.

Curling Yucca leaves can mean cold temperatures

If watering isn’t the issue, then it can be quite common that extreme temperatures can cause curling leaves on a Yucca, in particular cold air. As they are native to hot and dry parts of the Americas, Yuccas thrive in warm temperatures.

If they are placed next to a drafty window or door or are in a cool room in your home then they will struggle and the leaves will begin to curl. But it’s not just winter weather that you need to be concerned about as air conditioning units can be a real nightmare for warmth-loving houseplants. You need to be sure that your plant isn’t sitting in the direct line of the unit.

Look out for pests

Whilst pests are a rarer issue compared to some of the problems listed above, they can be a very (very) worrying problem so it’s important you rule it out straight away.

The first thing to do is inspect your Yucca fully by looking at the undersides of the leaves, the stems and also in the potting mix. You want to look out for any of the following signs: holes in the leaves, brown or yellow spots, white webbing, white powder and of course visible pests on the plant or in the potting mix.

If you do find pests (or even a single sign of them) isolate your Yucca immediately to stop the spread across your other plants and make sure to inspect your entire urban jungle. Pests can easily jump across leaves that are close to each other so you want to isolate your plant immediately.

We recommend giving your infected Yucca a shower. As they have quite sturdy leaves you can get away with putting the water pressure a little higher than you would for a lot of other more delicate plant types.

Then treat with neem oil and an insecticide to fight the infestation. If you spot any areas of your plant that are a lot more infected than others, remove those leaves as this will cut down the number, making the pests easier to win against.

Those are the most common factors that can lead to curling leaves on a Yucca. Once you have made some changes to its care or environment, it’s crucial that you keep a close eye on your plant over the next few weeks. This will help you make sure that everything is progressing in the right direction and help you spot any other issues that are arising out of those changes early.

To learn more about how to keep your plant thriving, check out our Yucca care guide.

Fiddle and Thorn is a participant in the Amazon Services LLC Associates Program, an affiliate advertising program designed to provide a means for sites to earn advertising fees by advertising and linking to Amazon.com

Take our houseplant survey!

Quickly respond to our 30 second houseplant survey and get 75% off our Complete Houseplant Care eBook!

Take the Survey

No thanks…

Why does my Yucca have brown leaf tips? And how to fix them!

Last Updated: May 17, 2022

Long leafed plants such as Yuccas, Spider Plants and Snake Plants are all very prone to dry brown leaf tips. There are quite a few causes and it can be really difficult to diagnose why it is happening. But we have gathered all the most common reasons into this post so you can hopefully crack down on those dry leaf tips!!

Underwatering causes brown Yucca leaves

If your Yucca has developed dry, crispy brown leaves it is often due to a lack of water. Although Yuccas don’t like frequent watering and hate sitting in puddles of excess water, this doesn’t mean that they can survive for long periods of time with really dry soil. If you think you may have underwatered your Yucca take it out of the pot and see how dry the soil is.

It is important to inspect the health of the root system at this stage as well to see if there is any damage. Trim away any of the dead roots so your Yucca can start to grow healthier ones.

Your first instinct for an underwatered Yucca might be to give it lots of water to make up for the lack of it. But this will actually just cause further issues. You want to gradually reintroduce watering in small amounts to prevent any shock (yes plants get shocked by a change of environment too!) Water your plant a little every day for a few days and then space your watering out to once a fortnight during the growing season and once a month over winter.

If you’re worried that you’re not being too consistent with your watering, or just want the piece of mind of knowing you’re doing the right thing, it could be worth investing in a moisture meter. These handy little things are pretty cheap and remove all of the guess work, this is our favourite one from Amazon and it does a great job of keeping our plants happy!

Dry air could be the problem

Yuccas like medium levels of humidity and will struggle to thrive in homes with dry air. A consistent lack of humidity will cause the leaves to dry up a little which shows in the form of brown leaf tips. This can start to happen a lot more during winter as central heating and a lack of ventilation causes very dry air.

If it is only the leaf tips that are brown then you should have caught the problem fairly early on. Over time the dry air may cause the larger brown patches across the leaves. Checking the humidity level couldn’t be easier too, you just need to get yourself a handy little humidity monitor and you’ll be up and running in no time!

Luckily we have some really easy methods that will help you increase the humidity for your Yucca:

  • Misting the leaves

    One of the simplest ways to increase the humidity for your Yucca is to mist the leaves with a spray bottle a couple of times a week. We always recommend doing this in the mid-morning as you want to leave enough time for the water to evaporate off. If the leaves are wet overnight when it is cooler it can often lead to leaf rot. These are our favourite spray bottles, plus they look great!

  • Use a Pebble tray

    Place your Yucca over a tray of small pebbles. Fill up the tray so the water reaches half way up the pebbles. This stops your plant sitting in the water and causing the roots to rot. The water in the tray will slowly evaporate, lifting up the humidity level.

  • Give your Yucca a shower

    To quickly raise the humidity and wash down your plant of any long-standing dust, you can always give them a quick shower. Simply pop them in the shower and wash them down with lukewarm water, this will clean off the leaves and give the soil a good soaking. You don’t need to worry too much about keeping the water pressure low as Yuccas are quite sturdy and you shouldn’t cause too much damage to the leaves.

  • Move your Yucca plant

    If you’re lucky enough to have great lighting in your bathroom or kitchen we recommend moving your Yucca in there. The steam generated by showers and cooking means these rooms always have a naturally higher humidity level than other areas of our home.

  • Invest in a humidifier

    Getting yourself a humidifier is the long term solution and probably the most reliable way to increase the humidity level in your home. They are affordable devices which evaporate water into the air. You can also get ones that you can program to run on a schedule or automatically turn on and off to maintain a certain humidity level. Our favourite humidifier is this one from Amazon; it’s affordable, works really well and looks great too!

    Want to know more about how to raise the humidity for your Yucca and other houseplants? We have written a whole guide on this.

Flouride toxicity could be the problem for your Yucca

Yuccas are sometimes a little sensitive to the fluoride that is in tap water. If you live in a hard water area this can be a problem over time as it can be damaging for the root system.

If you don’t want to invest in a water purifying system (we don’t blame you) then there are two free ways you can solve this problem.

  1. Wait for 24 hours

    If you leave your watering can full of water out for a full day then most of the chemicals should evaporate leaving your tap water pure.

  2. Rainwater

    Another method is to collect rainwater as the chemicals are much lower than the treated water that comes out of your tap.

Overfertilisation is a cause of brown leaves!

Another cause of brown leaf tips on a Yucca plant is over fertilisation. Yuccas really don’t need to be fertilised often. We recommend fertilising using a water-soluble fertiliser at lower than recommended strength every 2-3 months during spring and summer and not at all during the colder winter months. This is because your Yucca will go dormant and not produce any new growth.

If you are fertilising your Yucca more often than this, then it may be the cause of the brown leaf tips. You can actually even skip the fertiliser all together if you prefer. We don’t tend to do it for our Yuccas as they grow very slowly anyway.

These are the main reasons why your Yucca may have developed brown leaf tips. Unfortunately, once the leaf has turned brown there is no reversing that so just focus on fixing the problem so the new growth is healthy and green.

You can find out more about Yucca care in our plant specific guide or in our How to Care for your Houseplants downloadable ebook.

Complete Houseplant Care eBook

Our comprehensive (and rather good looking) eBook that will teach you everything you need to know to successfully care for, and maintain your houseplants!

Buy on

Fiddle and Thorn is a participant in the Amazon Services LLC Associates Program, an affiliate advertising program designed to provide a means for sites to earn advertising fees by advertising and linking to Amazon.com

Take our houseplant survey!

Quickly respond to our 30 second houseplant survey and get 75% off our Complete Houseplant Care eBook!

Take the Survey

No thanks…