Why is my Asparagus Fern turning yellow?

Last Updated: April 1, 2022

It can be quite alarming when you start to notice that your beloved Asparagus Fern is starting to turn yellow and you aren’t sure what is causing it. If there are yellow leaves on your Asparagus Fern then it is definitely trying to tell you that something isn’t right with either its environment or the care that it is being given. Below we explain all of the causes of yellow leaves on an Asparagus Fern which should hopefully help you to diagnose the cause.

Too much light can cause yellow Asparagus Fern leaves

Lighting is always an important element to take into consideration when caring for your houseplants and Asparagus Ferns are no different. If your Fern is getting too much bright light you’ll start to notice yellowy patches throughout the leaves. This is due to the sunlight burning the leaves which is unfortunately irreversible. Asparagus Ferns have delicate leaves so are more prone to sunburn than other houseplants so we recommend moving your Asparagus Fern into a slightly shadier place, and if there’s no improvement move it a little further again until you find it’s the perfect spot. Using a light meter can help you figure out the best spot for your Asparagus Fern.

You can carefully trim away the burnt yellow and brown leaves so your Asparagus Fern can focus all of its energy on new healthy growth.

Complete Houseplant Care eBook

Our comprehensive (and rather good looking) eBook that will teach you everything you need to know to successfully care for, and maintain your houseplants!

Buy on

Overwatering may be causing the yellow leaves on your Asparagus Fern

If the leaves on your Asparagus Fern have turned yellow you may be overwatering your plant. Another thing to look out for that is caused by overwatering is whether those yellow leaves are starting to drop from the plant.

Overwatering is one of the main killers of Asparagus Fern as you might not always be able to tell before it is too late. Asparagus Ferns don’t like to be sitting in a lot of water for long periods of time as this can lead to root rot meaning the plant becomes unstable and also cannot get needed nutrients from its root system. Waterlogged soil gives off quite a damp and musty smell so make sure to check this every so often too as this may start to happen before your Fern develops visible yellow leaves.

To check whether the cause of the yellow leaves on your Asparagus Fern is overwatering, check the moisture of the soil immediately and adjust your watering schedule accordingly. The most reliable way to know if your Asparagus Fern needs watering is by using a moisture meter. We also recommend replacing the potting soil straight away (rather than waiting for it to naturally dry out) so that the roots can begin to recover. Always use a high-quality potting mix to make sure your Fern is getting the right balance of nutrients. Cut away the rotten roots and dead yellow leaves so that your Asparagus Fern focuses on regenerating healthy growth.

Drainage Issues

Sometimes it may not be your watering schedule that is causing your Asparagus Fern’s leaves to turn yellow, but the poor draining of the soil and pot. You can very easily increase the amount of drainage in the pot of your Asparagus Fern by mixing in a small amount of perlite. This will make it far easier for water to flow through and out of the drainage holes of your pots (you should also check to make sure your pots have drainage holes). Another easy step is to add a few small stones or pebbles to the bottom of your pots, this helps in making sure that the drainage holes are never blocked by soil or any loose debris.

Although clay or terracotta pots tend to be a bit more expensive and are breakable, their upsides are much more than just the aesthetic. The clay they are made of is permeable which means that some of the water in the soil can evaporate through the sides of the pot. This isn’t the case for the plastic pots that most use, which instead hold in all of that moisture. So sometimes it is worth investing a little more to make sure that the roots of your Asparagus Fern are not sitting in too much moisture. We love these terracotta pots from Amazon.

Underwatering can also cause yellow Asparagus Fern leaves

If your Asparagus Fern’s leaves have turned yellow, dry and crispy (starting from the tips and moving through the plant) it may be because you have not given it enough water for a while. Asparagus Ferns prefer a little and often approach to watering to ensure their soil is damp but not waterlogged. If you have consistently underwatered your Fern, this may be the reason why it has develop yellow leaves. It is important to keep an eye on the moisture levels of the soil so you know when your Asparagus Fern is ready for watering.

Make sure to check the moisture in the soil before you water your Asparagus Fern. There are two really easy ways to make sure that it definitely needs water. First check the moisture at the top of the soil, if it is still damp then wait a few days before watering again. You can also lift up your Asparagus Fern carefully to check the weight of the plant before and after watering. We recommend doing this by holding the pot rather than the plant itself to avoid any damage to the delicate leaves. You will then start to be able to gauge how heavy the soil is when it is in need of water.

If you find that your Asparagus Fern feels very dry, water it a little every other day for a week. Your first instinct might be to give it loads of water straight away but this can actually be harmful to your Fern if the soil goes from one extreme to the other. Yes, plant’s can get shocked too by a sudden change in environment. So instead you want to reintroduce frequent watering for a week or two and this should solve the problem. Trim away the yellow and dried leaves and hopefully once the problem has been rectified, any new growth should be healthy and green!

The yellow leaves may be caused by a lack of nutrients

Another cause of yellowing leaves on Asparagus Ferns is a lack of nutrients. It may happen that over time the soil becomes very nutrient deficient, or the water has flushed out all of the nutrients needed. Yellow leaves are sometimes a cause of a lack of nitrogen. There are two methods which will help increase the level of nutrients for your Asparagus Fern. Firstly, remove all of the old soil in the pot and replace with new nutrient-rich houseplant potting soil. (Remember to make sure it is also well-draining to avoid waterlogging). Alternatively, you can treat with a well balanced houseplant fertiliser at half strength. Our houseplants have always liked the liquid fertiliser from Miracle Gro which is available from Amazon here.

Cold temperatures can cause yellow Asparagus Fern leaves

Asparagus Ferns prefer slightly warmer temperatures so may struggle in cold homes. Over time, the cold air will impact your Asparagus Fern’s health and may be causing them to develop yellow leaves. Make sure your Fern is away from all air conditioning vents, drafty windows or doors as the colder air can shock your plant. You can always pick up a digital thermometer to check the temperature of the spot your Asparagus Fern is sat in to see whether it needs to be moved.

Those are all of the main reasons why your Asparagus Fern may be developing yellow leaves. The most common ones are direct light and overwatering so we recommend starting with those to see if you can best diagnose the problem. Check out our Asparagus Fern care guide for more information on general care tips, recommendations and advice to help your plant thrive.

Fiddle and Thorn is a participant in the Amazon Services LLC Associates Program, an affiliate advertising program designed to provide a means for sites to earn advertising fees by advertising and linking to Amazon.com

Take our houseplant survey!

Quickly respond to our 30 second houseplant survey and get 75% off our Complete Houseplant Care eBook!

Take the Survey

No thanks…

Why is my Asparagus Fern turning brown? Causes and How to Fix it

Last Updated: April 1, 2022

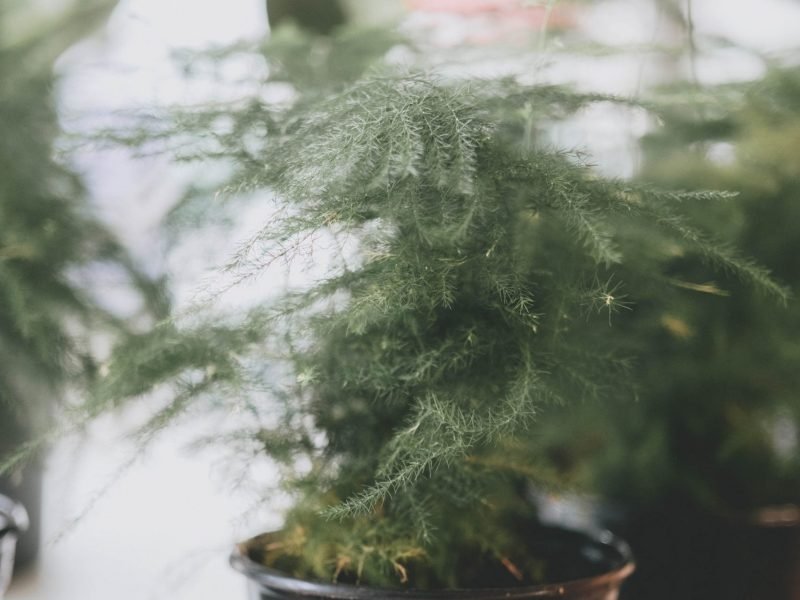
There’s just something special about them and their ability to bring a little bit of wilderness to our home. However, their beauty does come at a price though as they aren’t the simplest houseplant to care for. They can be quite fussy about their environment and care so it is not unusual for your Asparagus Fern to develop brown leaves (some people call them needles, but we still just call them leaves).

In this post, we will share with you the most common reasons why Asparagus Ferns develop brown leaves, as well as sharing how to fix and prevent the issues to bring your plant back to full health.

Causes of brown leaves on an Asparagus Fern

In this post, we will be going over each of the causes of brown leaves on Asparagus Ferns and show you how to fix it and prevent the issue from happening again. Some issues are easier to fix than others, some are easier to diagnose than others but don’t worry – we have you covered and will help you get to the bottom of the problem.


Lack of Humidity

One of the most common causes of brown leaves on Asparagus Ferns is a lack of humidity (dry air). Because the leaves are so thin and delicate, they are a lot more susceptible to this than the majority of other houseplants.

Luckily, there are a variety of easy ways to increase the humidity for your Asparagus Ferns, some of which are free, others which take nearly no effort at all:


  1. Misting the leaves

    This is the number one thing you should be doing to keep your Asparagus Ferns happy and healthy. The leaves can dry out super quickly and turn brown as they are so small so misting them regularly is key. Use a spray bottle to mist the leaves at least a few times per week.

    We recommend only misting your Asparagus Fern in the mornings to give enough time for the moisture to evaporate off the leaves. If your plant is still damp when the temperatures drop at night, then it opens up the risk of the leaves and stems rotting.

  2. Make a pebble tray

    This requires a little DIY but it’s a great solution for Asparagus Ferns that have developed brown leaves due to a lack of humidity. Fill up a tray or bowl with small stones and fill it up halfway with fresh water. Place your Asparagus Fern on top of the stones and the water will evaporate around your plant throughout the day.

    The most important thing when making a pebble tray is to make sure that the water doesn’t reach high enough so that the roots are sitting in water which will risk root rot. Top up the water when it getting quite low. The frequency will depend a lot on environmental factors such as temperature, sunlight etc.

  3. Placement

    If you have good lighting in your kitchen or bathroom then we recommend moving your Asparagus Fern in there. The humidity level in those rooms is naturally higher because of steam from showering and cooking, making it a great solution for those who might forget to mist, or who don’t have the right things to build a pebble tray.

    Just be careful not to put your plant too close to the cooker or this will burn the leaves pretty quickly and you’ll have a few more problems than just brown leaves on your Asparagus Fern.

  4. Buy a humidifier

    If you’re worried about the lack of humidity becoming a real problem, then buying a humidifier is probably the best way to go as it’s the most reliable method of increasing the humidity and keeping it at a stable, consistent level.

    They are super affordable devices that also have benefits for us, as well as our plants. They are thought to help to clear our skin as well as improving our quality of sleep. So as well as preventing any more brown leaves developing on your Asparagus Fern, humidifiers are great for our other plants as well as us too!

    If you want to know more about how to raise the humidity for your Asparagus Fern or any of your other houseplants then check out our detailed humidity guide.

Too much Sunlight

Asparagus Ferns need bright but indirect light to really thrive. Whilst they can often adjust to less than ideal light levels, growth will be slower and it can also cause brown leaves (see below) as well as other issues for your Asparagus Fern.

If your Asparagus Fern is sat right next to a window, then it may be experiencing sunburn during summer. Direct light during the hottest months of the year can be very intense and is harmful to the delicate leaves on an Asparagus Fern, often causing them to turn brown and fall off.

If you think that direct sunshine is causing the brown leaves on your Asparagus Fern, try to move your plant a little bit further away from the window so that it doesn’t receive any direct sun. Unfortunately, once your Asparagus Fern leaves have been damaged from the sun, there’s no going back so we recommend trimming off the worst affected stems to encourage new healthy (and green) growth.

Not enough Sunlight

As well as too much sunlight, not enough can also cause some brown leaves on your Asparagus Fern. Your plant needs a certain level of light to photosynthesise and if your plant is too far from the window then it could be causing the brown leaves. A lack of sunlight is often paired with stunted growth or stems that look as though they are reaching for the light. This issue tends to be more common during winter where the sun is weaker and out for less of the day.

If you think that insufficient light levels are causing the brown leaves on your Asparagus Fern, the best thing to do is start moving your plant a little closer to the window. You want to make sure that you don’t move it somewhere with too much direct light, especially in summer.

If your home doesn’t receive that much natural sunlight or the winter nights are dragging on for too long, then you can also supplement the light using an LED grow light. These are great for plants struggling with a lack of sunlight as they allow you to control the additional light and will go a long way to preventing any more brown leaves from developing on your Asparagus Fern.

Overwatering

Another common reason why your Asparagus Fern may have developed brown leaves is too much water. It can be quite easy to accidentally give your plant too much water and their delicate leaves can be quite sensitive to any damage caused to the root system.

The reason that consistent overwatering can be so harmful to your Asparagus Fern is that it causes waterlogged soil which cuts off air circulation in the potting mix. This can quite quickly rot the root system and prevents your Asparagus Fern from taking in any oxygen and nutrients. It also means that the roots can’t physically support the plant anymore which can also mean the stems droop down as well as brown leaves developing.

Before you take any drastic measures and change your watering routine, you need to be 100% sure that overwatering is the cause of the brown leaves on your Asparagus Fern. The first thing to do is to take your plant out of its pot which will allow you to closely inspect the potting mix and root system. If the potting mix feels soggy and clumpy, then this means your plant has been overwatered. If the roots are soft and mushy it suggests that this issue has been going on for a while and may be harder to revive your Asparagus Fern.

Ways to fix an overwatered Asparagus Fern:


  1. Replace the potting mix immediately.

    It’s crucial that you replace any waterlogged potting mix straight away with fresh, high-quality soil. Don’t wait for the soil to dry out naturally as this will only make the problem worse over the next few days and you risk causing even more damage to an already rotting root system.

  2. Trim off any soft, mushy or brown roots and leaves.

    You want to make sure that your Asparagus Fern doesn’t waste any vital energy trying to keep dying roots and leaves alive. By removing these from your plant, you allow all energy to be put into growing new healthy green growth. Use clean, sharp scissors to remove any dying parts of your plant.

  3. Adjust your watering schedule.

    Take a look at how often you were watering your Asparagus Fern, and how much water you were giving it each time. Cut back on one of these factors to ensure the problem doesn’t happen again.

How to prevent overwatering causing any more brown leaves

Now that you’ve addressed the current issue, it’s important that you take measures in the future to prevent overwatering and any more brown leaves from happening again.


  1. Only water when the potting mix feels dry.

    There are several easy methods to determine when it is time to water your Asparagus Fern which will help prevent any more brown leaves. The most accurate of which is using a moisture meter. They are affordable little devices that we believe every plant parent should own. Pop the moisture meter into the soil and it will literally tell you how much moisture is in the potting mix. It takes all the guesswork away from watering your plants and will significantly reduce the risk of overwatering.

  2. Ensure good drainage.

    This will help solve the occasional accidental overwatering as it allows some of the water to escape from the pot. Having several drainage holes in your pot, using a well-draining potting mix that includes perlite as well as switching from plastic posts to terracotta ones are all ways you can increase the drainage for your Asparagus Fern and avoid further brown leaves.

  3. Downsize your pot if necessary.

    One major factor when it comes to overwatering is the size of the pot and how much soil can fit in it!. If your Asparagus Fern is in a pot that’s much too large for the root system, it means that the soil percentage is higher than it ideally should be and it will take much too long for the potting mix to dry out. This then increases the risk and possibility of root rot which causes several issues, not just brown leaves!

  4. Adjust your watering schedule depending on external factors.

    Although watering calendars can help us remember to water our plants, they aren’t actually the best thing for our green friends as things don’t always work like clockwork. It’s important to adjust how much and how often you water your Asparagus Fern depending on the time of year, temperature fluctuations, sunlight levels and maturity/size of your plant. There’s no one fits all timeline which is why moisture metres are such a great tool for us plant parents.

Underwatering

You might be seeing a pattern here, in that brown leaves are often caused by too much or too little of something – and the same is true for water. Asparagus Ferns can be forgiving for the odd time where you forget to water, but consistent underwatering can lead to a variety of issues if not sorted; the most common of which is brown leaves that will quite quickly fall off the plant.

Before you start pouring loads of water over your plant, you need to make sure that this is really the cause of the brown leaves on your Asparagus Fern. As with overwatering, we recommend checking the moisture in the soil, either using the finger method to test how moist the potting mix is or by removing the plant from the pot. If the soil is dry and feels quite sandy to touch, and the roots look a little crispy and shrivelled, then underwatering is likely the cause.

How to fix an underwatered Asparagus Fern:


  1. Give your plant a soak.

    Fill up a container with fresh temperate water and place your plant in there for about 10 minutes. Avoid hot or super cold water as this can shock and burn your plant (they are even more sensitive to this when other issues are occurring). This method allows the water to soak into the potting mix and your plant will only take up as much as it needs. Often when watering really dry soil, it flows right through and out the bottom of the pot which doesn’t help solve the issue.

  2. Slowly reintroduce watering.

    Sudden changes in the environment can be quite stressful for plants and if the potting mix goes from really dry to super soggy quickly, it can cause your plant to go into shock (this is why we recommend only soaking for 10 minutes). For the next week or so, slowly reintroduce watering by giving your plant a little every day before returning to a more normal schedule.

  3. Adjust your watering schedule.

    If you had simply forgotten to water your Asparagus Fern and that’s why the brown leaves appeared, the fix is easy – just make sure to remember, make a note of it or ask a friend to help you out. However, if your watering routine just wasn’t enough for your Asparagus Fern then going forward make sure you are keeping an eye on when the potting mix is dry so you know when it’s time to water your Asparagus Fern. Using a moisture meter is a great way to avoid any more brown leaves caused by a lack of water in future.

Temperature Extremes

If you have inspected the potting mix of your Asparagus Fern, checked the light levels and regularly boost the humidity and can’t be sure that the above causes are the right fit for your Asparagus Fern, then it may be extreme temperature fluctuations that are the problem.

Asparagus Ferns are native to South African so thrive in warm temperatures meaning they’ll struggle in homes with cold drafts. You may not notice the cold air coming through cracks in doors and windows but if your Asparagus Fern is right next to any cold air streams then this can over time be a real issue.

Make sure that you draft proof any windows/ doors that are close to your Asparagus Fern (and other tropical or heat-loving houseplants) as well as moving them away from any air conditioning vents as these can be quite damaging to your plants during summer. Using a digital thermometer is an easy way to monitor the temperature in your home and allow you to check for any cold drafts.

If your Asparagus Fern is in quite a cool room, this can also increase the risk of overwatering and root rot (which brings us back to the overwatering problem) Your Asparagus Fern won’t need as much water as the soil will take a lot longer to dry out in cooler temperatures. This can be the perfect place for root rot and leaf rot to occur so be extra cautious when it comes to caring for your Asparagus Fern in winter or in colder rooms in your home.

Warm temperatures and hotspots next to windows that can be formed from direct sunlight can also dry out your Asparagus Fern and cause brown leaves. Using a temperature monitor can also help you avoid this problem, as well as moving them at least 1 metre away from radiators, stoves and heating vents.

Natural ageing

There’s one more cause of brown leaves on Asparagus Ferns which is actually not a problem at all – natural ageing. As your plant matures, it will want to spend most of its energy on the new growth. This can mean your plant drops some of its oldest, often lowest leaves. If you find that a few stems and leaves are turning brown at quite a slow rate then this could be the reason.

This is absolutely nothing to worry about as long as the rate of browning is slow, then it’s just simply part of the natural ageing cycle of your plant. You can trim away the brown leaves or leave them to fall naturally.

Should I trim away the brown leaves off my Asparagus Fern?

We get this question a lot, and we do recommend trimming away any stems that have gone brown. If the occasional leaf (needle) on your Asparagus Fern is brown, then leave this alone. However, if a large chunk of a stem is brown then remove this part. Once the stems are brown, there’s no bringing them back to green, unfortunately, so removing them will allow your plant to focus energy on new healthy growth. Always use clean scissors when removing stems so as not to pass any pests or bad bacteria onto your Asparagus Fern. Make sharp cuts instead of just tugging at the stems to make sure you don’t damage your plant.

So those are the most common reasons why your Asparagus Fern has developed brown leaves. It is quite a long list of reasons, so we recommend going through each one and discounting them if they don’t apply to your plant. Get up close to your plant, inspect the potting mix as well as the environment and your care routine and you should be able to diagnose the problem pretty quickly.

If you have caught the issue early, there’s no reason why you can’t bring your plant back to full health by changing up the environment or your care routine. Keep an eye on your plant after making any changes to make sure the issue isn’t getting any worse.

To find out more about Asparagus Fern care, as well as other common issues and propagation advice, check out our Asparagus Fern care guide.

Fiddle and Thorn is a participant in the Amazon Services LLC Associates Program, an affiliate advertising program designed to provide a means for sites to earn advertising fees by advertising and linking to Amazon.com

Take our houseplant survey!

Quickly respond to our 30 second houseplant survey and get 75% off our Complete Houseplant Care eBook!

Take the Survey

No thanks…

Why is my Asparagus Fern dying? Causes and Treatments

Last Updated: August 26, 2022

There are few plants out there that look quite as stylish and cool as the Asparagus Fern but the thing that makes them stand out is also the thing that makes them so difficult to care for; their ultra-thin leaves. Because Asparagus Ferns are so delicate, even the slightest change in care or the environment can have devastating effects on your plant and there are quite a few different reasons why it might be dying.

But don’t give up on your plant yet as below we go through each of the different reasons why an Asparagus Fern might be dying, as well as how to diagnose the problem, fix it and prevent it from happening again in future.

A dying Asparagus Fern can indicate too much sunlight

If there are yellow scorched patches across your plant, then your Fern might be dying due to too much direct light. Asparagus Ferns thrive in more medium light conditions and whilst they can tolerate indirect bright light, direct summer sunshine is too intense and will scorch the leaves.

Unfortunately, this is irreversible but you can prevent further scorching by moving your plant to a different spot in your home.

Overwatering can also cause your Asparagus Fern to start dying

If you notice that your dying Asparagus Fern is looking quite limp and yellow, then this could also be caused by overwatering. Asparagus Fern don’t need to be watered often, we go for once every 7-10 days in summer and even less in winter. They really don’t like having soggy soil as their leaves are so delicate so it’s best to ensure the soil dries out fully between waterings.

The reason that overwatering is so harmful and could be the culprit behind your dying Asparagus Fern, is that it can very quickly lead to root rot Not only does it cause the leaves to turn yellow, but it will also mean that the plant is unable to take up water or nutrients, meaning your plant may begin to die pretty quickly. You can do this through the use of a moisture meter,

If you think that you may have overwatered your Asparagus Fern and this is why it’s dying, check the soil moisture to confirm. You should also look at the root system as if the roots have started to rot, they will appear as dark brown/black in colour and will be soft to touch.

It is best to replace any waterlogged soil straight away rather than just sit and wait for it to dry up over time. This prevents any more damage being done to your dying Asparagus Fern.

To prevent the issue from reoccurring, cut back on either how much water you are giving each time, or how frequently you water. You also want to make sure to check the moisture in the soil before you water. You can do this using a moisture meter or the chopstick method.

You also want to think about how to best change your watering schedule throughout the year to prevent your Fern from dying of overwatering. Asparagus Ferns are dormant in winter so don’t be alarmed if there is not much growth happening. This also means that the amount of water needed dramatically decreases so it becomes a lot easier to accidentally overwater in these darker months.

Your Asparagus Fern may be dying due to underwatering

If your Asparagus Fern has really crispy leaves that are falling off your plant, then you may have been underwatering it for a while which is why it’s dying. Asparagus Ferns don’t like to have super soggy soil but will suffer if it is bone dry for extended periods of time.

We always recommend a little but often approach to watering Asparagus Ferns. This ensures that it keeps the soil moist but not waterlogged. To see whether your Asparagus Fern is dying due to being underwatered, check the moisture levels in the soil and adjust your watering schedule moving forward.

Low humidity levels could also be causing your Asparagus Fern to die

A humid environment is vital for a healthy Asparagus Fern and they can really struggle if your home has dry air. This happens during winter a lot more as the heating and lack of ventilation will lead to much drier air. Luckily there are a few easy things you can do to increase the humidity and prevent your Asparagus Fern from dying.

  1. Mist the leaves.

    This is one of the easiest ways to increase the humidity for your dying Asparagus Fern. Use a spray bottle to mist the leaves a few times a week and your Asparagus Fern will love you for it.

  2. Use a pebble tray.

    This requires a little DIY but it’s a great solution. Fill up a tray with small stones and fill it up halfway with water. Place your Asparagus Fern over the top and over the course of the day the water will evaporate under your plant. Always make sure the plant is not sitting in the water though as this will cause root rot.

  3. Proper placement.

    If you have good lighting in your kitchen or bathroom then we recommend moving your Asparagus Fern in there. The natural humidity from showering and cooking makes them a great spot for your plant and means you also don’t need to worry so much about the soil drying out.

  4. Buy a humidifier for your Asparagus Fern.

    These affordable little devices keep the humidity in the room at a consistent level so are great for reviving dying Ferns and other plants. Some humidifiers even have built-in features that allow you to put it on a schedule or turn itself off once it has reached a specific humidity level in the room!

Those are the most common reasons why Asparagus Ferns begin dying. The number one thing to look at is moisture – either how much you are watering, how quickly your plant is drying out and whether there is enough humidity for it to thrive. Asparagus Ferns are difficult to care for so we don’t recommend them often to plant beginners or busy plant parents but the reward for the right care is worth it in the end!

To learn more about how to care for your plant and stop it from dying in future, check out our Asparagus Fern care guide.

Fiddle and Thorn is a participant in the Amazon Services LLC Associates Program, an affiliate advertising program designed to provide a means for sites to earn advertising fees by advertising and linking to Amazon.com

Take our houseplant survey!

Quickly respond to our 30 second houseplant survey and get 75% off our Complete Houseplant Care eBook!

Take the Survey

No thanks…

Why is my Arrowhead Plant dying? Causes and Solutions

Last Updated: August 26, 2022

Although they aren’t the most difficult plant to take care of, their long stems and large thin leaves make them susceptible to a wide range of problems. If you have spotted signs that your Arrowhead Plant is dying, then it’s crucial you figure out what’s happening quickly!

In this article, we will be sharing the most common reasons why your Arrowhead Plant might be dying, as well as ways to effectively treat the problem and stop it from causing any more harm to your plant in future.

A dying Arrowhead Plant can indicate overwatering

Improper watering is one of the biggest issues for most houseplants and Arrowhead Plants are no different. Overwatering will cause them to start dying, showing up as brown leaf tips, rotten roots and unstable and mushy leaves and stems.

During the growth months, you shouldn’t be watering your Arrowhead Plant more than once every week. During the colder months, it’s important to cut back to about once every 3 to 4 weeks. As well as checking the moisture at the top of the soil before watering, we also recommend picking up your plant before and after watering so you get an idea of much your plant will weigh when it needs water.

To solve the issue and revive your dying Arrowhead Plant, replace any waterlogged soil and trim away rotten roots. Then moving forward, cut back on the frequency of watering so that the soil has time to dry out.

*A little watering tip we have for Arrowhead Plants is to always water from the bottom. This encourages the roots to grow downwards and will increase the plant’s stability. To do this, use a saucer or lift the plant pot out of its planter.

A dying Arrowhead Plant can also suggest underwatering

If your plant’s potting mix is very dry then it may be underwatering that is causing it to die. Again you want to be 100% sure this is causing your plant to die before you increase how much you water your plant. Take the plant out of the pot and see if the potting mix is bone dry. It will start to feel very powdery if there is no moisture and the roots may have started to crisp up.

To start reviving your dying Arrowhead Plant you need to be very careful about introducing water again. Plants can get quite shocked if their environment suddenly changes (yes they are quite like humans in that way!) so you need to give them little bits of water once or twice a day to get some moisture into the soil.

You can also choose to bathe your plant for about 10 minutes to allow the soil to start soaking up some water without becoming waterlogged.

Moving forward, to prevent your Arrowhead Plant from dying due to underwatering again, increase the frequency or amount of water you are giving your plant, whilst keeping an eye on soil moisture using a moisture meter.

Intense sunlight levels might also be to blame

If there are yellow scorched patches on the leaves of your Arrowhead Plant then it may be dying due to too much direct light. Arrowhead Plants thrive in bright but indirect light. They can cope with a little direct sunlight but not in summer. This is because they have very thin delicate leaves and when the sun is too hot and intense, it will burn the leaves.

Unfortunately, once your plant has been sun damaged, those patches are irreversible. However, to prevent further scorching, move your plant to a different spot in your home where it will receive bright but indirect light.

Cold drafts can also cause your Arrowhead Plant to start dying

Another thing to watch out for when diagnosing a dying Arrowhead Plant is cold air. Although you might not notice them, if there are any small cracks in windows or external doors that are close to your Arrowhead Plant, the cold drafts might be what is killing your plants. Signs that the temperature is too low include brown leaves, leaf drop, drooping plant and stagnant growth.

But it’s not just in winter that you need to be wary, as the stream of cold air from AC vents can be just as damaging.

Using a digital thermometer will help you confirm whether this is why your Arrowhead Plant is dying and will help you track any fluctuations in temperature. This will help you determine where the best spot for your plant is.

Dry air can also cause issues for your Arrowhead Plant

If your Arrowhead Plant has developed brown spots or edges on its leaves then dry air is a possible cause. Like with temperatures, these plants thrive in conditions like the tropics and although we could never reach a humidity level anything like the tropics (and even if we could, we definitely wouldn’t want to live in it), we can increase the humidity a little and your plant will love you for it.

Low humidity levels won’t impact your plant from one day to the next, so if your Arrowhead Plant has slowly been developing brown leaf tips etc then this is definitely a possibility. Using a humidity monitor can help you confirm the issue.

There are several quick and easy ways to increase the humidity for your plant and prevent it from dying. Firstly, we always recommend that plant parents start misting their Arrowheads a few times per week to give a nice boost to the humidity level. Other methods you can also try include moving it to your bathroom (if there is a good light level), using a pebble tray or showing your plant.

If things don’t seem to be improving after using these techniques, or you find yourself forgetting to mist regularly then the best thing is to invest in a humidifier. They will take all of your dry air worries away!

Your Arrowhead Plant might also be dying due to pests

It can happen that pests such as mealybugs, spider mites and scale insects take hold of your Arrowhead Plant. Alongside actually spotting the insects on your plant, signs to look out for include brown or yellow spots, holes in the leaves and white webbing/powder across the stems.

If you find pests (or signs of them) on your dying plant we recommend giving the whole plant a shower. Keep the shower pressure quite low though to avoid any damage to the long stems on your plant. You should also treat your plant with an organic insecticide to fight the infestation.

You also need to check over your other plants in the room to see if any other plants have pests. Then keep your Arrowhead Plant (and other infected plants) a good distance away from any of your other houseplants during treatment as you don’t want the pests to spread.

We hope this guide has been helpful and has allowed you to figure out what is happening to your dying Arrowhead Plant. Once you’ve made the needed adjustments to your care routine or your plant’s environment, monitor your plant daily to ensure that things are progressing in the right direction.

Check out our Arrowhead Plant care guide to learn more about how to keep your plant happy!

Fiddle and Thorn is a participant in the Amazon Services LLC Associates Program, an affiliate advertising program designed to provide a means for sites to earn advertising fees by advertising and linking to Amazon.com

Take our houseplant survey!

Quickly respond to our 30 second houseplant survey and get 75% off our Complete Houseplant Care eBook!

Take the Survey

No thanks…

Why Is My Arrowhead Plant Drooping? And How To Fix It!

Last Updated: April 1, 2022

Due to their long stems, your Arrowhead plant can easily begin to droop if something is wrong! It is important that you catch the problem early and correct it as this will give your Arrowhead the best chance at bouncing back. Below we have outlined the most common reasons why your Arrowhead is drooping.

Underwatering might be causing your Arrowhead to droop

Too little water can harm your Arrowhead plant in more ways that one. It can cause dry leaves, lack of growth and nutrient deficiency. But one of the earlier signs of underwatering is drooping stems and leaves. This occurs commonly on plants with long stems as they need to carry the weight of the leaves. This is why it tends to happen a lot with Arrowheads.

If you find that the stems and leaves look a little droopy and lifeless, it is most probably because the soil has been too dry for too long. Stick a finger in the top few centimetres of the soil to check the moisture levels. You can also try lifting your Arrowhead if your plant is not that mature to see how light the pot feels. However, be careful not to injure yourself in the process.

How to fix an underwatered Arrowhead:

Your first instinct might be to give it loads of water straight away to compensate for the lack of it. However, it can actually be harmful to your Arrowhead if the soil goes from one extreme to the other and you might get a lot more problems than the initial drooping plant. Instead, you want to reintroduce frequent watering for a week or two and this should solve the problem. Over time keep an eye on how much you are watering your Arrowhead by checking the moisture in the soil frequently.

Drooping leaves can indicate a lack of humidity

If the soil isn’t particularly dry, the drooping stems on your Arrowhead could be due to a lack of humidity. Arrowheads are native to the tropics of Central and South America so they like quite humid environments and can struggle in homes with dry air. This can be especially damaging in winter months when we often have the heating on for several hours a day and are not opening the windows as much to circulate the air.

There are several ways you can increase the humidity for your Arrowhead which should fix the drooping leaves:

Misting the plant

One of the simplest ways to increase the humidity for your Arrowhead and prevent it from drooping is to mist them with a spray bottle a couple of times a week.

Pebble tray

Place your houseplants over a tray of pebbles and add fresh water to the tray. Over the day water from the tray will evaporate giving the plants above exactly what they’re looking for.

Give your Arrowhead a shower

To quickly raise the humidity and wash down your Arrowhead of any long-standing dust, you can always give them a quick once over in the shower. Simply pop them in the shower and wash them down with lukewarm water, this will clean off the leaves and give the soil a good soaking. Leave them in the shower for around 5-10 minutes after washing to let any excess water run out of the pot. The last thing you want to do is waterlog the soil as this can cause a whole range of other issues for your Arrowhead beyond the drooping stems.

Move your Arrowhead to the bathroom

If you’re lucky enough to have great lighting in your bathroom you can move your plant in there to increase the humidity and prevent your plant from drooping. The running water from your showers means your bathroom is probably one of the most humid in your home. The kitchen is also a good place for your Arrowhead as the steam from cooking means it is also fairly humid. Just be careful to keep it away from cookers to avoid burning your plant.

Buy a humidifier

They’re relatively affordable little devices and they make keeping a consistent humidity level so much easier. Most will allow you to place them on a timer so they run on a fixed schedule, and some will even have a built-in monitor so they automatically turn on and off to keep the humidity exactly where you want it. These are the most reliable way to prevent your Arrowhead from drooping as a result of dry air.

Those are the main two reasons why your Arrowhead’s stems and leaves may be drooping. The first place to start is always checking the soil as this is where most issues will arise from. Hopefully, if you have caught the problem early enough and correct the issue you should see your plant begin to lift up and look a lot healthier in no time.

To learn more about how to best care for your plant, check out our Arrowhead plant care guide.

Fiddle and Thorn is a participant in the Amazon Services LLC Associates Program, an affiliate advertising program designed to provide a means for sites to earn advertising fees by advertising and linking to Amazon.com

Take our houseplant survey!

Quickly respond to our 30 second houseplant survey and get 75% off our Complete Houseplant Care eBook!

Take the Survey

No thanks…

Why is my Anthurium Clarinervium turning yellow?

Last Updated: April 1, 2022

Best known for their incredible heart-shaped leaves with striking white veins, the Anthurium Clarinervium is an incredible houseplant that will add that wow factor to every room. It can be quite concerning, however, when you notice that the leaves on your Anthurium Clarinervium have started to turn yellow. Whether this appears as yellow spots, large yellow patches or even an entire yellow leaf, it’s important that you get to the bottom of the problem and bring your Anthurium Clarinervium back to full health. The less the issue has progressed and the quicker you solve the problem, the greater chance you have at avoiding plant death.

Diagnosing the cause of the yellow leaves isn’t always a walk in the park though and there are several factors that can cause them. Below we will go through each of the causes so you can figure out what is wrong with your Anthurium Clarinervium.

Consistent overwatering

Let’s start with the most common cause of yellow leaves on Anthurium Clarinerviums – too much water over a long period of time. Although Anthurium Clarinerviums likes some moisture in the soil, they don’t do so well if it becomes quite waterlogged as their roots will begin to rot. This won’t happen if you just overwater once or twice, but if this happens consistently, then you will have a problem on your hands. Once the roots have started to rot your Anthurium Clarinervium won’t be able to get all the nutrients it needs and the leaves will turn yellow as well as potentially turn mushy and droop down.

Before you go changing anything in how much or how often you water your Anthurium Clarinervium, you want to be certain that this is the cause. The best way to know is by taking your Anthurium Clarinervium out of its pot and inspecting the soil and roots. If the potting mix is very moist and clumpy, and the root system feels a little mushy then overwatering is definitely causing the yellow leaves. You can also check the soil using a moisture meter to determine if it’s waterlogged. They are a great investment for all plant parents – a lot cheaper than having to buy new plants that’s for sure!!

If you do have waterlogged soil, it’s important that you replace it immediately rather than leaving it to dry out on its own. You don’t want to risk any more damage to your plant’s roots as this will only cause more yellow patches on your Anthurium Clarinervium;

To get your Anthurium Clarinervium back on the road to full health, trim away the rotten roots and worst affected yellow leaves. This will allow your Anthurium Clarinervium to focus all of its energy on growing new healthy green growth.

Temperature extremes and fluctuations

Another cause of yellow leaves on Anthurium Clarinervium plants can be cold temperatures and drafty rooms. Anthurium Clarinerviums need warm temperatures (or at least room temperature) to really thrive so it’s important that you put your plant in the warmest room in the house over winter.

You also want to avoid placing your Anthurium Clarinervium near doors or windows that are drafty. Even though the temperature of your home may be perfect for your Anthurium Clarinervium plant, the drafts coming in from outside will be much colder (especially in winter) and harm your plant’s health. You can always pick up a digital thermometer to check the temperatures across your home if you are unsure.

Nutrient deficiency

A lack of nutrients may also be why your Anthurium Clarinervium has yellow leaves. It can happen that over time the soil becomes very nutrient deficient, or overwatering has flushed out all of the nutrients from the potting mix.

There are two methods that will help increase the level of nutrients for your Anthurium Clarinervium and avoid more yellow leaves developing on your plant. Firstly, remove all of the old potting mix and replace it with new nutrient-rich houseplant potting soil. Alternatively, you can treat with a well-balanced houseplant fertiliser at half strength. Our houseplants have always liked the liquid fertiliser from Miracle Gro which is available from Amazon here.

Direct sunlight

If your Anthurium Clarinervium has yellow patches all over the leaves, then it may be due to too much intense sunlight. If your Anthurium Clarinervium is receiving a high level of direct sunlight then the leaves can become burnt and scorched. This is more of a risk during summer as the sun is a lot stronger and out for more of the day. If this is the cause, you’ll notice that the leaves facing the window are the worst affected. Unfortunately, once the leaf has been scorched by the sun there is no going back. We recommend trimming away the yellow parts of the leaf to encourage new healthy growth.

Avoid putting your plant next to a window that receives a lot of direct light (south-facing in the northern hemisphere). We recommend you put them slightly closer to the windows during winter though as the sun isn’t as strong and they don’t do so well in lower light areas. So it’s all about getting that balance right.

Pests can also cause yellow leaves

Although a pest infestation is quite rare on plants that only spend time indoors, Anthurium Clarinervium can begin to show yellow leaves if infested by pests. Insects such as mealybugs or spider mites might be living on your plant and sucking their nutrients without you even noticing, which will cause the leaves to turn yellow.

To identify whether your Anthurium Clarinervium is suffering from a pest infestation, use a magnifying glass to spot them on the leaves. They like to hang out on the undersides of leaves or near the leaf and stem joints so look extra carefully there. Other signs of pests include small brown and yellow spots, white webbing or holes in the leaves.

Although spotting pests can be easy, treating them can be a bit of a pain. Shower down your plant, treat with neem oil and a natural insecticide. Make sure to isolate your plant as soon as you spot signs of pests to avoid them jumping onto any of your other beloved houseplants.

Those are the main causes of yellow leaves on Anthurium Clarinervium plants. It’s important that you act as soon as you notice the first sign of trouble as problems are more easily solved when they haven’t progressed as far. Take a look through each of the factors above whilst inspecting your Anthurium Clarinervium closely to give you the best chance at finding the true cause of the yellow leaves.

Unfortunately, once the leaves have turned yellow, there isn’t anything you can do to reverse this so we recommend trimming away the worst affected leaves so your Anthurium Clarinervium can focus on growing new healthy stems and leaves.

To learn more about how to best care for your plant, as well as propagation and general care tips, check out our Anthurium Clarinervium care guide.

Fiddle and Thorn is a participant in the Amazon Services LLC Associates Program, an affiliate advertising program designed to provide a means for sites to earn advertising fees by advertising and linking to Amazon.com

Take our houseplant survey!

Quickly respond to our 30 second houseplant survey and get 75% off our Complete Houseplant Care eBook!

Take the Survey

No thanks…

Why is my Anthurium Clarinervium dying? Causes and how to fix it

Last Updated: September 14, 2022

If you have started to notice some signs of unhappiness on your Anthurium Clarinervium and are worried that it might be dying, you have come to the right place. Often we might see brown or yellow leaves, your plant might be losing leaves or drooping down and we might not always know what is causing it and how to revive your plant.

In this article, we will go through the various causes of a dying Anthurium Clarinervium, as well as how to treat the issue and prevent it from causing any more damage in future.

Direct sunlight during summer might be causing issues

As with a lot of things in the houseplant world, too much or too little of something can cause your Anthurium Clarinervium to start developing issues and dying. Too much sunlight is one of those problems because when the sun is intense it can scorch the leaves.

Signs that your ??Anthurium Clarinervium is dying due to sunlight issues are yellow scorched marks on the leaves, faded leaves and if the issues are primarily on the side that is facing the window.

Try to move your plant a little bit further away from the window so that it doesn’t receive any direct sun (the ideal is bright but indirect light). Unfortunately, once the leaves have burnt, there’s no going back so we recommend trimming off the worst affected leaves to encourage new healthy growth and help revive your dying plant.

A dying Anthurium Clarinervium can also suggest overwatering

Overwatering is a very quick killer of Anthurium Clarinervium plants because you will only really notice the issue once it has already rotted through the root system. Although they won’t start dying if you overwater them once in a while if the problem is consistent, you will start to see issues such as yellow leaves, leaf loss, soft stems and black roots.

If you have overwatered your Anthurium Clarinervium it is best to replace the soil straight away rather than just sit and wait for it to dry up over time. This removes the risk that more damage will be done in the days it takes for the potting mix to dry out. You just want to make sure you are careful when removing the soil from the roots as you don’t want to cause any further damage.

To prevent the issue in the long term, make sure to check the moisture in the soil before you water your Anthurium Clarinervium. There are two really easy ways to make sure that it definitely needs water.

First check the moisture at the top of the soil, if it is still damp then wait a few days before watering again. However, to be more accurate we recommend using a moisture meter moving forward so that you can track how long it takes for the potting mix to dry out so that you aren’t watering again too soon.

Underwatering can also cause problems for your Anthurium Clarinervium

Another common reason that might explain why your Anthurium Clarinervium is dying is a lack of water. This will be a slower issue to develop than overwatering and your plant will be fine if you just forget to water them every once in a while but will start to develop problems after not getting any moisture for weeks and months on end.

The most common signs of an underwatered Anthurium Clarinervium are dry leaves, light brown spots on the leaves, crispy leaves and drooping stems.

Before you start watering your plant more frequently, it’s important to be sure that underwatering is the cause of your dying plant. Take your plant out of its pot to see how dry the potting mix feels. If it is dry and powdery and the roots have maybe even started to crisp up, then your Anthurium Clarinervium is likely dying due to underwatering.

Your first instinct to reverse this and revive your dying plant might be to drown your Anthurium Clarinervium to make up for the lack of water, but this can actually cause more damage and shock your plant.

Instead, we recommend watering your plant a little bit once a day for a full week. This will help to moisten the soil without shocking the plant (which can happen if their environment changes suddenly). A moisture meter can help with knowing when to water so we recommend investing in one of those to keep track of when to water moving forward.

Cold temperatures can kill your Anthurium Clarinervium

Another reason that your Anthurium Clarinervium might be dying is cold temperatures. Native to the tropics, Anthurium Clarinerviums thrive in warm humid environments. If there is a slight cold draft coming through the door or window or your plant is too close to an air conditioning vent, then this can start to cause real issues over time.

Diagnosing temperature extremes is pretty easy as you just need to buy a small digital thermometer that you can place next to your plant to check for any fluctuations throughout the day and night.

To solve the issue of cold temperatures and prevent your plant from dying, draft-proof any doors or windows that are close to your plant or move them into a slightly warmer room in your home. It may take a little time for your plant to adjust so don’t expect it to instantly recover.

A dying Anthurium Clarinervium can also suggest low humidity levels

A humid environment is vital for a healthy Anthurium Clarinervium and they can really struggle if your home has dry air. This happens during winter a lot more as the heating and lack of ventilation will lead to much drier air. If the leaves have begun to go a little dry from the tips and edges inward or are curling inwards then a lack of humidity may be the problem.

Luckily there are quite a few different ways that you can lift the humidity level for your dying Anthurium Clarinervium and get it back to full health.

  1. Mist the leaves

    This is the main one that we recommend getting into the habit for all of your humidity-loving houseplants as it’s a great way to keep a nice steady level and prevent your plant from dying. Use a spray bottle to mist the leaves a few times a week.

  2. Use a pebble tray

    This requires a little DIY but it’s a great solution to solving dry air. Fill up a tray with small stones and fill it up halfway with water. Place your plant over the top and over the course of the day the water will evaporate under your plant. One thing to make sure of with this method is that your plant isn’t sitting in the water as this will cause root rot.

  3. Change your plant’s placement

    If you have good lighting in your kitchen or bathroom then we recommend moving your dying Anthurium Clarinervium in there. The natural humidity from showering and cooking makes them a great spot for your plant and means you don’t even have to remember to do anything!

  4. Invest in a humidifier

    These affordable little devices keep the humidity in the room at a consistent level so are great for houseplants that suffer from brown leaf tips easily. The great thing about humidifiers is that they literally do all of the work for you so are great for busy or forgetful plant parents.

A dying Anthurium Clarinervium could be a worrying sign of pests

Whilst rarer than some of the other reasons, your Anthurium Clarinervium might be dying due to a pest infestation. They can be susceptible to gnats, mealybugs and scale insects and the likelihood is often higher if your plant is spending some of the year outside. They suck on the plant’s leaves which damages them and leaves behind yellow patches and holes.

Check over your plant for visible pests or signs of pests (brown or yellow spots, holes in the leaves or white webbing/powder across the stems). Once diagnosed, move your infected plant away from all other houseplants and check your other plants over just in case.

To revive your dying Anthurium Clarinervium, remove the worst affected leaves, wipe down the rest of the leaves and flush the soil out in the shower. This should initially curb the size of the infestation and make it easier to get rid of. Then treat with insecticide and neem oil.

Those are the most common reasons why your Anthurium Clarinervium is dying. It’s important to go through each of them whilst inspecting your plant and its potting mix so that you can eliminate factors that don’t apply and hopefully make the right diagnosis. Then once you have made changes to either the environment or your care routine, keep a close eye on your plant to make sure that things are moving in the right direction.

To learn more about caring for your plant and preventing more common issues from arising, check out our Anthurium Clarinervium care guide.

Fiddle and Thorn is a participant in the Amazon Services LLC Associates Program, an affiliate advertising program designed to provide a means for sites to earn advertising fees by advertising and linking to Amazon.com

Take our houseplant survey!

Quickly respond to our 30 second houseplant survey and get 75% off our Complete Houseplant Care eBook!

Take the Survey

No thanks…

Why is my Aluminium Plant turning brown?

Last Updated: April 1, 2022

Aluminium Plants (Pilea cadierei) are loved for their incredible silver speckled leaves so it can be quite worrying when some of them might start to turn brown. It can be quite a common issue that a lot of plant parents face as it is caused by a variety of factors. However, don’t worry as in this post we will be outlining all the different causes for brown leaves on Aluminium Plants so you can identify and solve the issue.

Too much sunlight can cause brown leaves

Sunlight is one of the main factors that cause Aluminium Plants to develop brown leaves. Though a lack of light can also cause several issues, the main problem lies is with direct sunlight. There is often a misconception that there is no such thing as too much light for a houseplant. But this couldn’t be further from the truth.

Direct sunlight will very quickly scorch and burn the leaves of your Aluminium Plant which is irreversible. It will dry out and burn the leaves, causing brown/ yellow patches across the leaves.

If this is the cause of the brown leaves, trim away the scorched areas and move your Aluminium Plant to an area of your home with indirect sunlight.

Dry air can also cause brown leaves

If your Aluminium Plant has brown dry leaf tips or edges, then a lack of humidity may be the cause. Aluminium Plants will struggle in homes with quite dry air, especially in winter where heating and less ventilation often makes this problem worse.

But don’t fret, here are a few simple ways to increase the humidity for your Aluminium Plant:

Mist the leaves regularly

This is one of the easiest ways to increase the humidity for your Aluminium Plant and avoid further brown leaf tips. Mist the leaves several times per week with a spray bottle. (We love these amber glass ones from Amazon). Always try to mist in the mornings so there’s enough time for the water to evaporate off the leaves before temperatures drop and the risk of leaf rot increases.


  1. Make a pebble tray

    This requires you to do a little DIY but it’s a great solution for brown Aluminium Plant leaves. Fill up a tray with small stones and fill it up halfway with fresh water. Place your plant on top and slowly the water will evaporate around your plant increasing the humidity. Don’t let the water level touch your plant’s roots as this will over time cause the roots to rot.

  2. Give your plant a shower

    One simple thing you can do to instantly boost the humidity is showering your Aluminium Plant. Washing it down with water also gets rid of dust and potential pests that might be on your plant. Shower your Aluminium Plant with temperate water so you don’t shock or burn the plant. Keep the water pressure relatively low to avoid breaking any of the leaves or stems.

  3. Placement

    If you have sufficient light levels in your kitchen or bathroom then we recommend moving your Aluminium Plant in there. The humidity level in those rooms is often naturally higher than in other areas of your home because of the steam released when showering and cooking. Just be careful not to put your plant too close to the cooker or this will burn the leaves pretty quickly!

  4. Invest in a humidifier

    If you want to take all the worries away from keeping a steady humidity level, then buying a humidifier is the best option. Some humidifiers even have features that mean you can put it on a repeating schedule or turn itself off once the rooms reach the desired humidity level.

    We always recommend this humidifier from Amazon as a great place to start.

Overwatering

Overwatering is probably the most damaging of houseplant issues and is quite a common reason why Aluminium Plants develop brown leaves. Aluminium Plants don’t like sitting in puddles of water for long periods of time. This will cause damage to the root system and mean your plant will often develop brown leaves as well as droop down and turn soft.

To figure out if overwatering is the reason your Aluminium Plant is turning brown, check the moisture levels in the soil immediately. If the soil is quite waterlogged and clumpy then replace it with fresh dry mix which will allow the plant to start to recover. Trim away the rotten roots and hold off on watering as much or as often as you did before.

Due to the damage caused to the root system, your Aluminium Plant may take a little while to fully recover and grow new healthy leaves. But be patient and you should start to see your Aluminium Plant starting to grow new healthy leaves in no time.

Cold Temperatures

Aluminium Plants don’t really like winter very much because they struggle in cold temperatures. Not only does the cold weather cause them to stop growing, but it can also mean the leaves, stems and roots freeze.

During the winter months, your Aluminium Plant will also become more susceptible to root and leaf rot, especially if there is moisture lingering in the potting mix and on the leaves,

To avoid this, make sure your Aluminium Plant (and most of your other houseplants) are in the warmest rooms in your home throughout winter and always water in the morning so there is enough time for the water to be soaked up or evaporate before it gets dark.

Those are the most common reasons why Aluminium Plants develop brown leaves. We recommend going through each one by one to figure out what is the main cause. If you have caught the problem fairly early, you shouldn’t have too many issues getting your plant back to full health.

To find out more about Aluminium Plant care, as well as other common issues you may face, check out our Aluminium Plant care guide.

Fiddle and Thorn is a participant in the Amazon Services LLC Associates Program, an affiliate advertising program designed to provide a means for sites to earn advertising fees by advertising and linking to Amazon.com

Take our houseplant survey!

Quickly respond to our 30 second houseplant survey and get 75% off our Complete Houseplant Care eBook!

Take the Survey

No thanks…

Why is my Aluminium Plant losing leaves?

Last Updated: May 30, 2022

Adored for their silver and green leaves, the Aluminium Plant is one of the fastest-growing houseplants but this doesn’t mean that them losing leaves isn’t an issue sometimes. There are a handful of reasons why Aluminium Plants lose their leaves and below you’ll find a detailed run-through of each of them, including how to solve the issue and prevent it from happening again.

Overwatering can cause your Aluminium Plant to lose leaves

As with a lot of things in the houseplant world, proper watering can be one of the biggest issues as it can be difficult to get the right balance. Overwatering is a big concern when it comes to caring for Aluminium Plants, and it is often the main reason why leaves drop off the plant.

We always tend to go for a little and often view towards watering Aluminium Plants as they like quite even moisture levels, rather than going from soggy to dry and fluctuating a lot. Too much water over a long period of time can quickly cause root rot which will mean leaves start to fall off your Aluminium Plant and the whole plant becomes quite unstable and leggy. If you think your Aluminium Plant might be suffering from root rot, it’s important to take your plant out of your pot to see how much moisture is in the soil. If you find that the soil feels quite soggy and clumpy then replace it straight away and cut away the roots that have started to rot. You don’t want to wait for it to naturally dry out as this can damage the plant even more and cause more leaves to fall off.

There are several things you can do to prevent the problem from happening again by ensuring you only water your Aluminium Plant when it needs it. One way is to pick your plant up before and after watering as this will give you an idea of how heavy your plant is when it needs water. You should also invest in a moisture meter as they will literally tell you how moist the potting mix is – yes it’s really that easy!

Another thing you can do to avoid overwatering is use a self-watering pot or self-watering globes. They release water to your Aluminium Plant only when it needs it and will help to avoid waterlogged soil and root rot.

Cold temperatures can also cause leaves to drop

Aluminium Plants will survive well in rooms with average room temperature but can be quite sensitive to cold temperatures which can cause their leaves to fall off. Make sure to draft proof any doors and windows that are near to your Aluminium Plant to avoid cold drafts coming in from outside. If your Aluminium Plant is losing leaves in summer, it could also be due to close proximity to any AC vents so watch out for those.

You can always pick up a digital thermometer to check the spot your Aluminium Plant is sitting for peace of mind.

Your Aluminium Plant might be losing leaves due to natural ageing

If it’s only the bottom leaves on your Aluminium Plant that are falling off, then this may be natural ageing. As it matures, your Aluminium Plant will drop some of its oldest leaves to focus its energy on growing new healthy and often bigger growth.

This is a completely natural process so don’t lose any sleep over this. It’s not caused by the wrong care or environment and is actually just a sign that your plant is maturing well.

The one thing you should be doing though is keeping an eye on the rate of ageing. On average your Aluminium Plant should lose 1-2 leaves every couple of months. If your Aluminium Plant is losing more then it’s most probably a sign that something isn’t quite right. Go back to the reasons we have mentioned above to see whether watering or temperature issues are the cause of your Aluminium Plant losing leaves.

Those are the most common reasons why Aluminium Plants lose leaves. Natural ageing is nothing to worry about but if watering or temperature issues are the cause, then you should take steps to solve this issue straight away. If the problem persists for too long, it may eventually cause plant death.

To find out more about caring for your plant, check out our Aluminium Plant care guide.

Fiddle and Thorn is a participant in the Amazon Services LLC Associates Program, an affiliate advertising program designed to provide a means for sites to earn advertising fees by advertising and linking to Amazon.com

Take our houseplant survey!

Quickly respond to our 30 second houseplant survey and get 75% off our Complete Houseplant Care eBook!

Take the Survey

No thanks…

Why is my Aluminium Plant dying? Causes and How to Revive it!

Last Updated: August 26, 2022

Aluminium Plants are one of the fastest growing houseplants out there which can actually make them a little tricky to care for. Not only will they break through your favourite pots if not repotted often enough, but it will very quickly become known if there are issues that are causing your Aluminium Plant to start dying on you.

Luckily we are strong believers in never giving up when it comes to dying plants as we have seen plants be revived from almost nothing. In this article, we will go through each of the different factors that may be why your Aluminium Plant is dying, as well as how to treat and prevent the issues.

Overwatering can cause your Aluminium Plant to start dying

Overwatering is the most common issue that kills Aluminium Plants and pretty much all other houseplants so this tends to be our first port of call. The other reason why this should be your first stop is that overwatering is a very quick killer of plants so you want to make sure to spot this one early.

The reason that overwatering is such an issue for Aluminium Plants is that it can quickly cause the roots to start to rot. This starves your plant of needed moisture, oxygen and nutrients and will cause it to start dying.

If you think you may have overwatered your Aluminium Plant then you must inspect the soil first before making any changes to your routine. You want to make sure that this is definitely the problem as the same symptoms can occur for various things. Carefully take your plant out of the pot and inspect the roots and soil. If the potting mix is soggy and clumpy then it is most likely overwatering that is causing your Aluminium Plant to start dying.

To solve the issue and revive your dying Aluminium Plant, remove and replace all of the potting mix if it’s still waterlogged. Don’t wait for it to dry out as this just risks more damage being done to an already dying and sensitive plant. If the roots are badly damaged then trim away the worst affected areas. This will encourage your plant to grow new roots and not waste precious energy trying to keep the rotting ones alive.

A dying Aluminium Plant can also indicate underwatering

If your Aluminium Plant has developed really crispy leaves, then you may have been underwatering it for a while which is why it’s dying. Aluminium Plants like their soil to be slightly moist and will really struggle if they have to go a long time between waterings. This is why we recommend a little but often watering method.

Confirm the issue by checking the moisture levels in the soil before making any changes to your care routine.

To prevent the issue long-term, it’s a good habit to get into to check the moisture levels in the soil using either a finger, chopstick or the lifting method (though only do this with smaller plants). This will mean you can keep an eye on how much water it needs and avoid your Aluminium Plant dying on you again!

Your Aluminium Plant could be dying due to intense sunlight

If your Aluminium Plant’s leaves have developed brown or yellow patches, it may also be dying because it is getting too much direct sunlight. This can cause the leaves to burn, from which they will not be able to recover.

Whilst Aluminium Plants like areas with bright light, it needs to be indirect. This is especially important during summer when the sun is a lot more intense and is out for longer each day. It can be a good idea to get into a routine of moving your Aluminium Plant depending on the season so that you are maximising the amount of light in winter but reducing exposure to direct sunlight in summer.

A lack of sunlight might also be the issue

On the other side of the scale, your Aluminium Plant could also be dying due to not receiving enough light. Symptoms of this include leggy growth, stunted growth and leaf drop. This can be quite an easy fix as you need to find a good spot for your Aluminium Plant with more natural sunlight.

If you’re struggling to find a spot with better lighting, it could be worth looking into and investing in a quality grow light. These are great investments for all plant parents as not only are they great for supplementing light during winter but they can be used to cultivate young cuttings in your propagation projects.

Low humidity levels could be causing your dying Aluminium Plant

If your Aluminium Plant has developed brown spots or edges on the leaves then it could be dry air that is causing it to start dying. Although we could never reach a humidity level anything like the tropics (and even if we could, we definitely wouldn’t want to live in it), we can increase the humidity a little and your Aluminium Plant will love you for it.

Here are a few simple ways to increase the humidity and prevent your Aluminium Plant from dying:

  1. Your plant will love it if you get into the habit of misting your plant.

    Use a spray bottle to mist the leaves a few times a week. This also gets rid of any dust on the leaves which is a real added bonus!


  2. If you’re into doing a little DIY, then building a pebble tray can really help your Aluminium Plant.

    Fill up a tray of pebbles and fill halfway with water. Place your plant on top and the water will evaporate around it, increasing the humidity level.


  3. Another great way to increase the humidity without spending any extra money is to move to the bathroom or kitchen.

    Because of showering and cooking, both of these rooms often have a slightly higher natural humidity level.


  4. Get a humidifier

    If the problem is progressing quite rapidly, then the most reliable way to increase the humidity and prevent your Aluminium Plant from dying would be to invest in a humidifier.


Those are the most common causes of a dying Aluminium Plant. When it comes to reviving your plant, catching the issue as early as possible is the number one thing that will help your plant on the road to recovery. This is why we strongly advise plant parents to regularly check up on their houseplants to spot signs of unhappiness before they’ve really taken over your plant.

To learn more about what care your plant needs to prevent it from dying, check out our Aluminium Plant care guide.

Fiddle and Thorn is a participant in the Amazon Services LLC Associates Program, an affiliate advertising program designed to provide a means for sites to earn advertising fees by advertising and linking to Amazon.com

Take our houseplant survey!

Quickly respond to our 30 second houseplant survey and get 75% off our Complete Houseplant Care eBook!

Take the Survey

No thanks…